Motion Warping
Ninja Combat uses Motion Warping to modify the Root Motion in combat-related animations, so they can take into consideration a target's positions and "look at" rotations.
Motion Warping is useful in multiple combat-related situations such as:
Attacks: Attack animations often cover a fixed distance. Motion Warping ensures attackers properly connect with their targets without over-reaching.
Evades: It is common to modify the length of an evade, maybe based on potential targets, edges or even ability modifiers. Motion Warping can be used to fine-tune the movement's distance and precision.
This page will walk you through the Motion Warping components and how to configure it for your abilities.
Motion Warping Interface
Within Ninja Combat, all interactions with the Motion Warping component happen through the CombatMotionWarpingInterface. This interface is designed to abstract combat-specific functionalities, without relying on a specific implementation.
Motion Warping Component
The Combat System provides its own Motion Warping Component, which extends on the Motion Warping Component provided by Unreal Engine and implements the CombatMotionWarpingInterface.
Adding the Motion Warping Component
In your Character Blueprint or Base class, add
NinjaCombatMotionWarpingComponent.Implement
GetMotionWarpingComponentfrom theCombatSystemInterface, returning the Motion Warping Component.
The default Motion Warping Component provided by Ninja Combat also provides the following features:
Feature | Details |
|---|---|
Transform Calculation | The target location and rotation can be extended by overriding |
Melee Attack Range | When warping melee attack animations the ability's optimal distance is taken into consideration. |
Adjustment Threshold | Adjustments in the Motion Warping, considering an attack's optimal distance are only done if the adjustment is meaningful, which is determined by |
Warp Scale | You can scale the final warp value, per-axis, to fine-tune the warp effect (e.g., disable vertical warping for large enemies). This can be done via |
Debug Mode | Enabling debug mode, per component, renders spheres and arrows that visually represent the warp location and rotation. |
Gameplay Targeting System
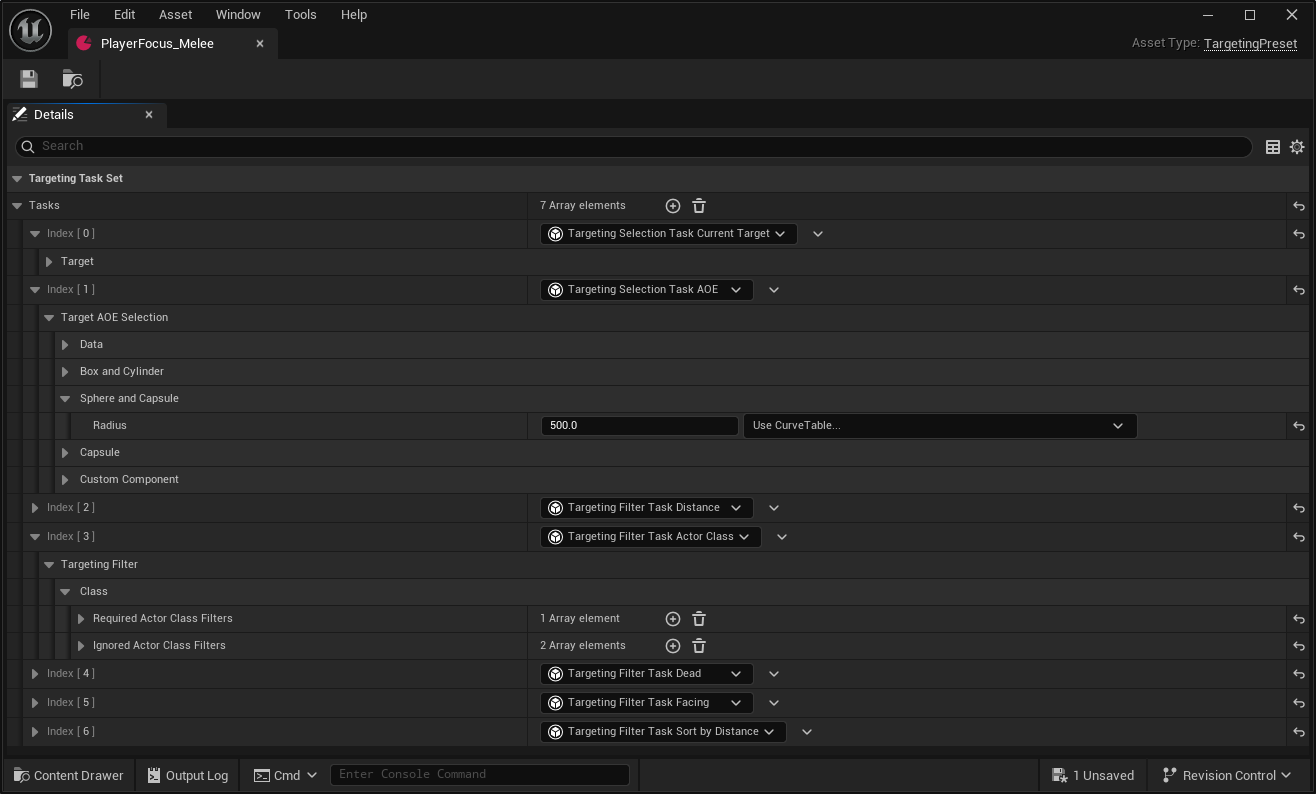
The default Motion Warping Component provided by Ninja Combat relies on the Gameplay Targeting System to find eligible warp targets. Targeting Presets are executed asynchronously.
Let's break down a Targeting Preset that could be used for Motion Warping.

Targeting Task | Type | Details |
|---|---|---|
Current Target | Selection | Selects the target currently assigned as the Target Lock. |
Targets in Area | Selection | Selects all targets in a sphere, within a given radius. Make sure to ignore the source actor and instigator. |
Filter by Distance | Filter | Removes targets that are too far away. Particularly relevant since we are not only collecting targets in a radius, but we are also collecting the Target Lock. |
Filter by Actor Class | Filter | Defines class pre-requisites and exceptions. You can add your base enemy class as a requirement and remove the player class from the filter for extra-safety. |
Filter by Dead | Filter | Removes actors that are dead, from the Combat System's perspective. |
Filter by Facing | Filter | Removes targets that are not in front of the targeting source, to avoid warping to a target that is behind the player. |
Sort by Distance | Sorting | Sorts all selected targets, by distance. The closest target will be the priority. |
Animation Warping
The most common way to configure a motion warp is by adding Animation Notify States to the Animation Montage that needs warping. For that, two Notify States are used:
Notify State | Details |
|---|---|
Motion Warping | Configures how the warp will behave. Provided by the Unreal Engine's Motion Warping module. Meant to be used in conjunction with its core Motion Warping component. |
Track Motion Warp Target | Determines when the Motion Warping starts, and for how long it will last. Based on the Gameplay Targeting System. |
Configuring an Attack Motion Warping
Open the Attack Animation Montage related to the Melee Attack that will benefit from the Motion Warping.
In the Animation Montage, add the Track Motion Warp Target, set the warp name to Combat Warp and your Targeting Preset.

In the Animation Montage, add the Motion Warping, set the modifier to Skew Warp and the warp name to Combat Warp, matching the previous step.

Setting Warp Targets
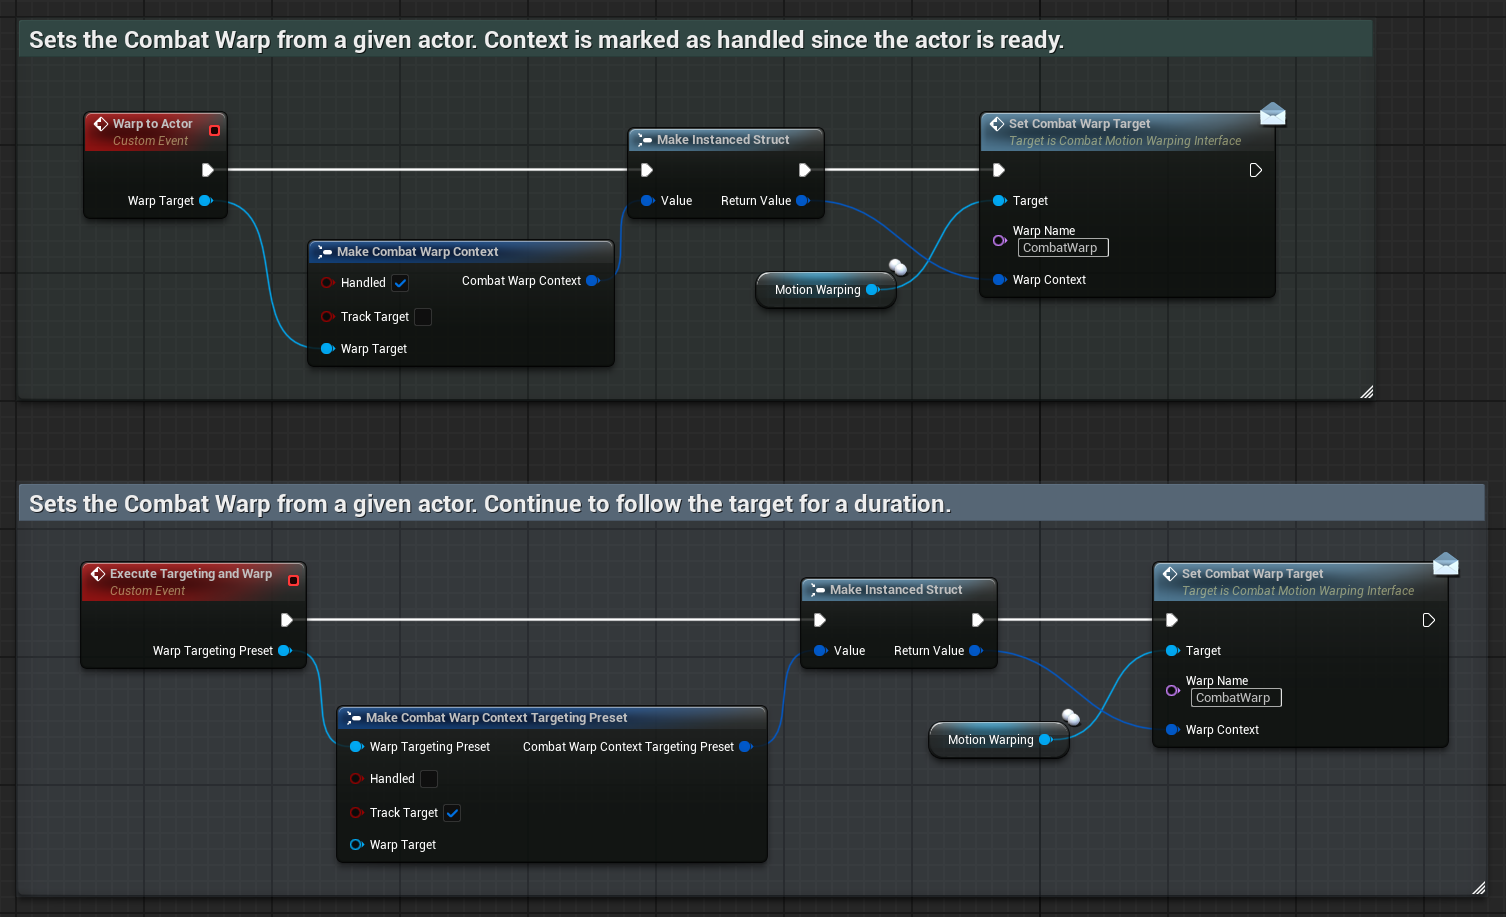
You can also set warp targets directly, via the Interface/Component. For that you will commonly use an Instanced Struct that represents the Warp Context. Ninja Combat provides the following options:
Warp Context | Details |
|---|---|
Combat Warp Context | Default option that uses an Actor as the Warp Target. |
Targeting Preset Context | An option that collects the Actor using a Targeting Preset. |
You can derive your own struct from FCombatWarpContext, overriding attributes like target acquisition logic or validation rules. When sending contexts directly to the Motion Warping Component, the following attributes should be considered:
Handled: Informs that the actor set in the context is verified and ready to use.
Track Target: Informs that the actor's location should be continuously tracked. When tracking is enabled, the system will update the warp location every tick. This is useful for abilities that chase moving enemies for a few frames, before contact.

Modifying Warp Calculations
The default Motion Warping Component calculates warp location and rotation using the CalculateWarpLocation and CalculateWarpRotation functions. These can be overridden to modify or completely replace the default behavior.
Additionally, you can fine-tune warp adjustments by customizing ApplyMeleeOptimalDistance and ApplyWarpLocationScale.
Melee Optimal Distance
Some Combat Abilities define an optimal distance for execution. The Warp Component respects this by modifying the warp location only when the avatar is farther than that distance.
If the avatar is already within the optimal distance, the warp location remains unchanged by default.
To change this behavior and allow the avatar to be pushed back to exactly the optimal distance, enable the bAllowMeleePushback flag on the Motion Warping Component. When this flag is set, the warp will adjust the location even if the avatar is already too close.
To customize or extend this behavior, override the ApplyMeleeOptimalDistance function in Blueprints or C++.
Warp Location Scale
The default component includes a WarpScale property that scales the delta between the warp location and the avatar's current position.
This can be especially useful for axis adjustments, such as removing vertical offset (Z-axis), to ensure the character remains grounded when warping.
To customize this logic, override the ApplyWarpLocationScale function in Blueprints or C++.
Debug Mode
To enable a visual representation of each warp target and calculation, enable Debug Mode in the component's Details Panel.