CombatMelee Combat
Last modified: 02 December 2024The weapon or character must implement the Melee Interface.
The Attack Ability is used to execute Melee Attacks. Once it activates, it will listen to many Gameplay Events.
Melee Scans events are sent usually by the Melee Scan Notify and will initiate a per-frame Scan.
At the end of each frame, the Damage Gameplay Effect is applied to all targets collected by the Melee Scan.
The Melee Combat functionality is designed to connect animations, scans, and targeting in a cohesive way so that Melee Attacks can be configured in various ways for different types of combat systems.
Here is a Sequence Diagram showing how all the participants in the Melee Combat are related.
Attack Ability
A Melee Attack starts with the Attack Ability.
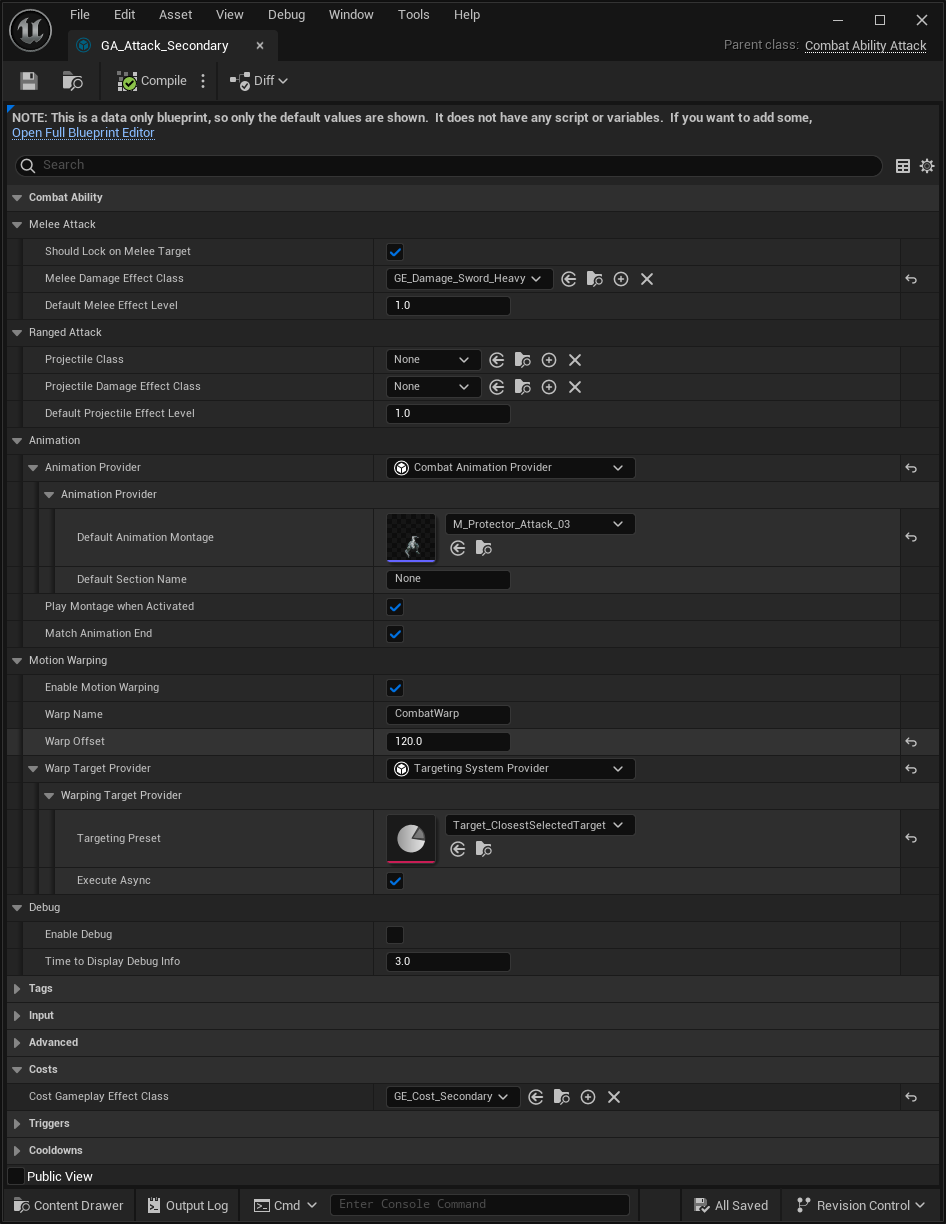
Within the Melee Attack category, you can decide if successful attacks against a target will result in a Target Lock, and the Gameplay Effect to apply on successful hits.
Then, the Animation Provider determines which animation should be played during the attack. The default animation provider uses a single animation montage and section name.
The next section, Motion Warping, allows you to define a way to collect targets, via the Targeting Preset to warp the animation. Motion Warping is a technique where the animation's Root Motion is scaled enough to travel a specific distance or rotate to a certain target. You can also apply a Warp Offset that will reduce the distance to travel between the attacker and the target.
Melee Scan
Once the selected Animation starts, it will listen for certain Gameplay Events. The ones relevant to Melee Attacks are:
Gameplay Event | Description |
|---|---|
| Starts the Melee Scan Task. The Melee Scan instance must be present in the Payload, as one of its Optional Objects. |
| Stops the Melee Scan Task. |
These Gameplay Events can be triggered by any object in the system, the only requirement is having a valid Melee Scan Instance in the payload.
The most common way to trigger these events is through the Melee Scan Notify State, which can be added to the Animation Montage played by the Attack Ability.
Melee Scan Notify State
The most common way to trigger the appropriate Melee Scan Gameplay Events is using the equivalent Animation Notify State, added to the Animation Montage set in the Attack Ability.
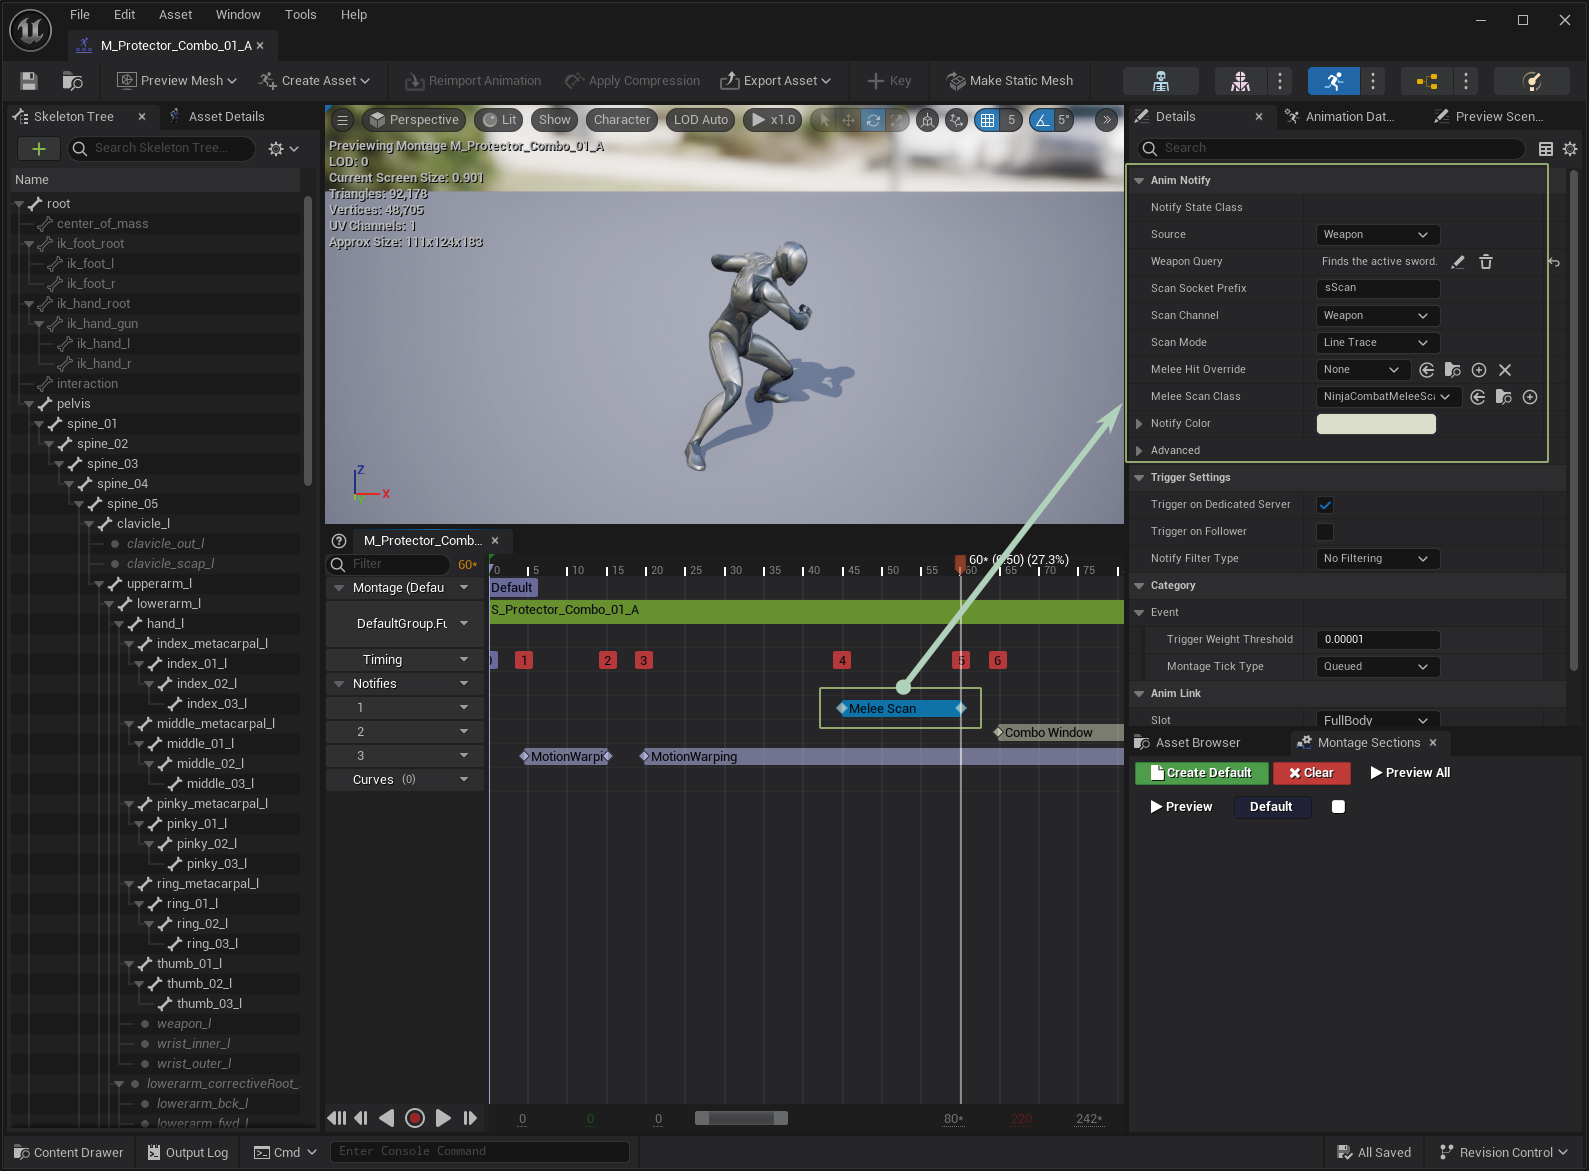
This Animation Notify State has important properties to know about:
Property | Description |
|---|---|
Source | Determines if this Melee Scan happens from the owner or from a weapon. |
Weapon Query | For Melee Scans happening from the weapon, this query is used to retrieve the correct weapon from the Weapon Manager. |
Melee Mesh Tag | An optional Gameplay Tag that can identify a specific mesh, in case multiple meshes are available. |
Scan Socket Prefix | A prefix for all sockets in the source mesh, used to perform the scan. |
Scan Channel | Channel used for the scan. You probably created a dedicated channel during the initial setup. |
Scan Mode | How the scan is performed (i.e. line traces or shape sweeps. Appropriate settings will be shown for each option. |
Melee Hit Override | An optional Gameplay Effect that overrides the one set in the Ability or provided by the Source. |
Melee Scan Class | The class containing the Melee Scan data and logic. |
Trail Gameplay Cue Tag | Gameplay cue that will be added and removed during the Melee Scan. |
tip
Modifying the Melee Scan
The default Trail Gameplay Cue defined by
GameplayCue.Combat.MeleeTrailsis already handled by the Combat Manager Component, using the sound and particle effects set in the Melee Weapon.
Melee Scan Instances
This object is used to transfer data from the animation and the correct mesh, to the Attack Ability and its internal Melee Scan Task. It also contains the logic to perform scans using the values provided to its properties.
If you need to modify the Melee Scan logic, this is the place to look into. You can set a Melee Scan Class to each Melee Scan Animation Notify State or globally, in the Project Settings for Ninja Combat.
tip
Modifying the Melee Scan
You can modify the Melee Scan logic executed by the Melee Scan Class in the
ScanForTargetsfunction. This function can be modified in Blueprints or C++.
Collisions
For Melee Scans, it is ideal to configure your character meshes to handle collisions. A good starting point for this setup is to have the following settings.
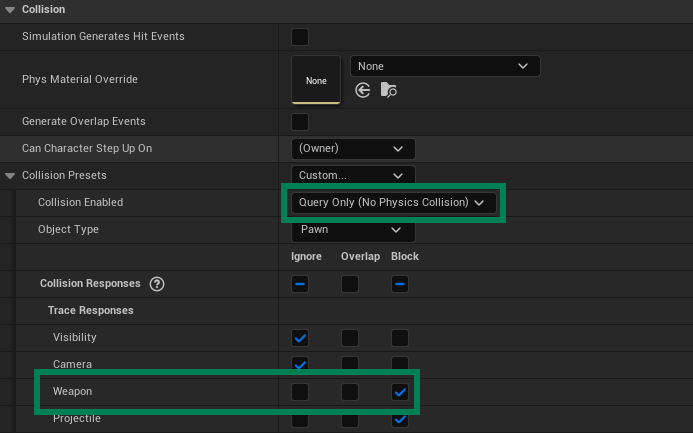
Collision Enabled: You need to at least have Queries enabled.
Collision ResponseS: Make sure that the Weapon channel created during the initial setup is set to Block.
note
Ignore Collision on the Capsule
Also make sure to check collisions in your character capsule. The Weapon channel should be set to Ignore.
Motion Warping
Melee Attacks can benefit from Motion Warping, which is a technique where the Root Motion of the animation is modified to reach or rotate to a given target.
Use this feature to achieve " stickiness " in combat, ensuring that attackers will reach their targets and connect their hits.
Motion Warping Component
Motion Warping is an optional feature. To opt-in, first, you need to add the NinjaCombatMotionWarpingComponent, or another component that implements CombatMotionWarpingInterface to your character, and then return this component from the GetMotionWarpingComponent function, in the CombatSystemInterface.
Motion Warping Notify State
Next, you must add the Motion Warping Notify State to your animation and set the appropriate values to it. This Notify State is provided by the default Motion Warping implementation in Unreal Engine, and you can read more about it in the official documentation.
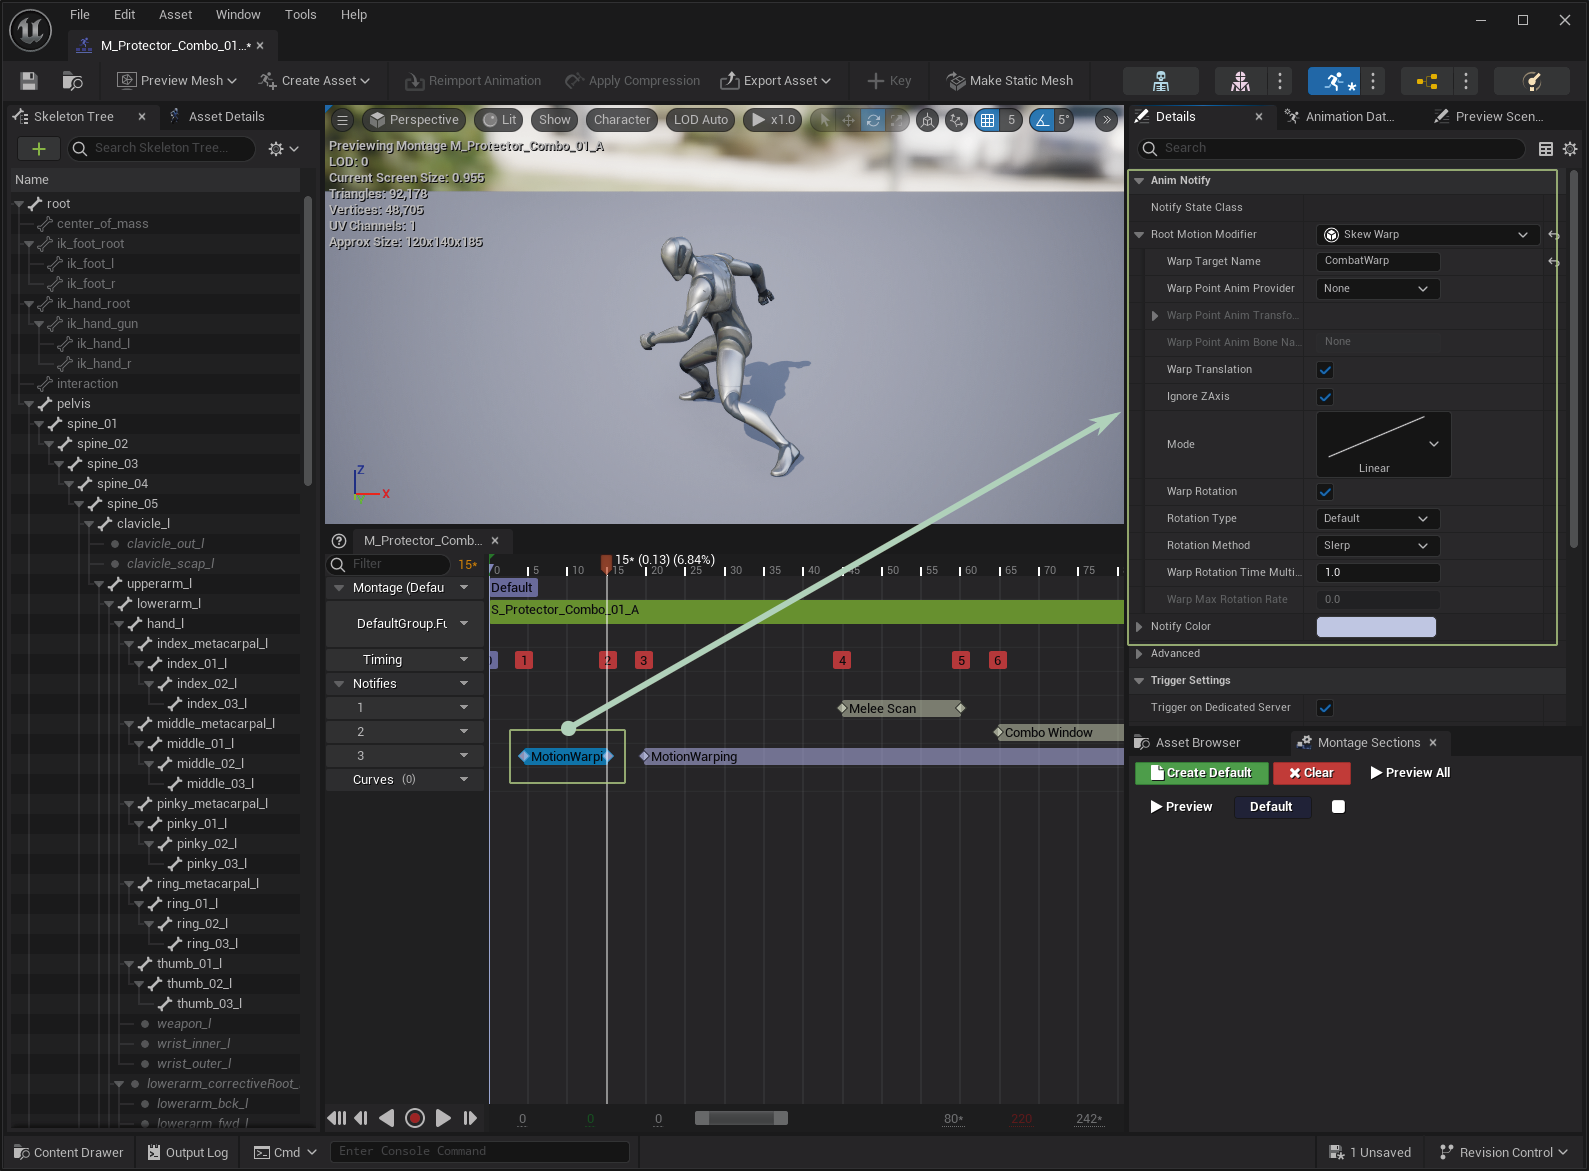
Here are a few important notes, related to the Combat System design:
Make sure that the Warp Target Name matches between the Notify State and the Attack Ability.
The length of the Notify State determines how fast your character will reach its target. You probably want to make that happen before the Melee Scan.
Depending on your animation, you might want to use yet another Motion Warping Notify State to allow the character to continue tracking the target during the attack.
The Attack Ability can apply an offset to the target, so it can better adjust to certain weapon ranges.
Motion Warping Target Provider
Back to the Attack Ability, you need to make sure that Motion Warping is Enabled, the Warp Target Name matches your Notify State, any Warp Offset is configured if applicable and finally, the appropriate Warp Target Provider.
The Default Target Provider will simply collect the current Combat Target, usually acquired by the Target Lock System. This can be enough for some scenarios, but depending on how you configure your ranges, this can lead to some long root motion stretches.
In cases where you need some fine-tuning for the target, you can use the Targeting System Provider. This alternative uses a Targeting Preset to determine the best target to warp to.
tip
Targeting Presets
These are Data Assets created from the
TargetingPresetclass. This is part of the Unreal Engine's Gameplay Targeting System.
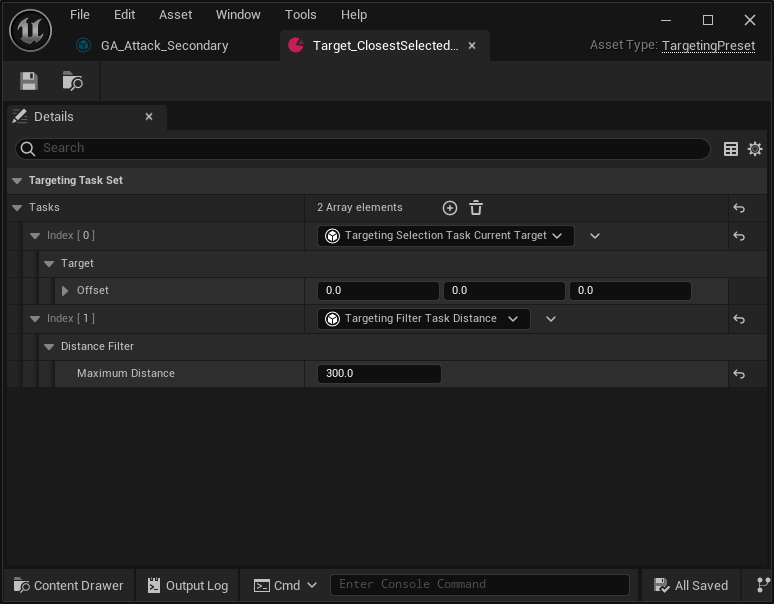
The example above uses two tasks.
A task that selects the current target acquired by the Target Lock System.
A task that filters targets by distance. If the target is too far, then the attacker should not warp.
Melee Attack Hits
Once an attack hits a target, the Damage and Defense System takes over to decide if that target will receive damage and if so, how much.
Successful hits may invoke cosmetics functions on the attacker or weapon, defined by the Melee Interface.
Melee Weapon Interface
This interface must be implemented by any object able to participate in melee combat: pawns or weapons. It contains functions that expose important data and objects, used by the Melee System to properly interact with these actors.
The most important functions to keep in mind are:
Function | Description |
|---|---|
| Provides the mesh used by Melee Scans. |
| Provides the mesh used by Melee Scans, identified by a specific tag. |
| Provides a Gameplay Effect applied when this actor generates a hit. |
| Level for the Gameplay Effect. |
| Optionally provides a damage value set by caller ( |
| Optionally provides a poise consumption value set by caller ( |
| Provides any trails that should be used by the Melee Scan, during a melee attack. |
| Defines a strength applied when physical reactions are enabled. |
| Provides impact trails used when the weapon hits (i.e. blood trails). |
| Activates the attack trails and sounds when necessary. |
| Deactivates the attack trails and sounds when necessary. |
| Invoked by the Damage System to render cosmetics from a registered hit. |
note
Gameplay Effect Priority
You can define a Gameplay Effect in three places: Attack Ability, Melee Interface, and Melee Scan.
If a Gameplay Effect is present in more than one place, the order of preference is Melee Scan > Melee Interface > Attack Ability.
Weapon Actor
The Weapon Actor (NinjaCombatWeaponActor) is an abstract class that can be used as a base for all your weapons. It properly implements the Melee Weapon Interface, executing the expected logic and exposing properties for adjustment.
The Combat System also provides another base class compatible with the Inventory System. For more information, check Weapon Actor and Inventory Integration.
The Base Weapon Actor comes with the Weapon Cosmetics Component, used to handle all cosmetic assets registered to the weapon, such as sounds and particles. This component is also integrated with the Asset Manager, supporting soft references and loading on demand.
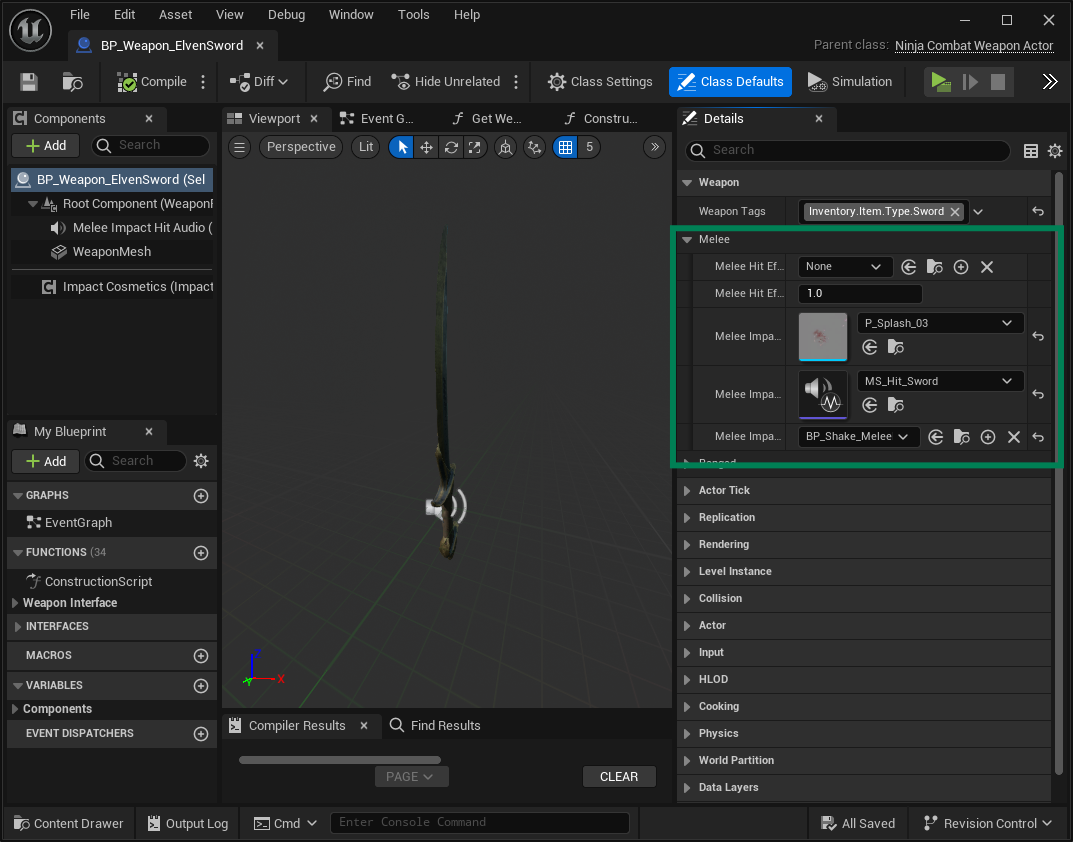
Here is an example of a Melee Weapon configured using the framework classes, adding particle and sound effects to hits.
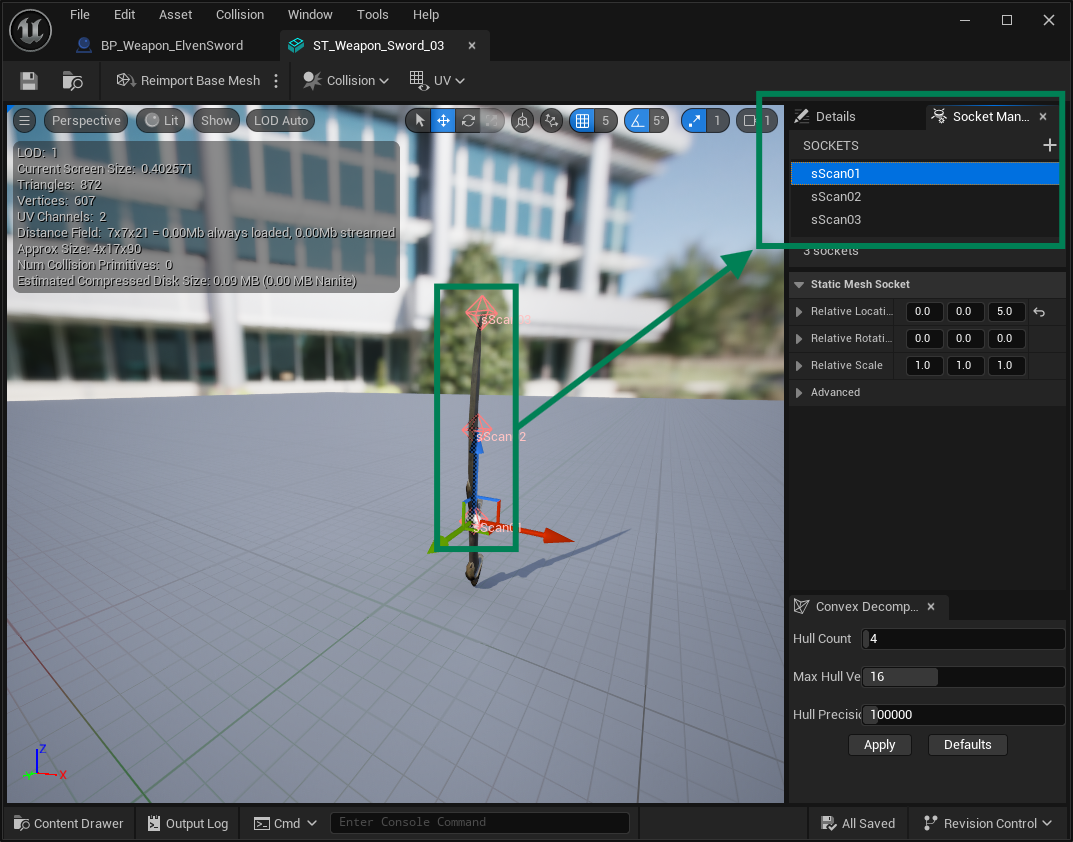
In the Weapon's Mesh, the correct sockets were added, as expected by the Melee Scan. Having three sockets spread across a blade is a good starting point for scans.
tip
Weapon Mesh Collisions
For Melee Scans, no collisions in the Weapon Mesh are necessary.
