First Steps with Ninja Interaction
This page guides you through the first steps for Ninja Interaction. Make sure to check the Interaction Setup instructions before continuing. This page assumes that Ninja Input is installed, but all concepts related to interaction inputs can easily transfer to plain Enhanced Input setups.
This page also assumes that Ninja G.A.S. is installed, but all concepts related to the Gameplay Ability System can easily transfer to other G.A.S. setups.
The following steps aim to provide an interactable actor that can be detected by the player. We will use the generic Smart Object and State Tree provided by Ninja Interaction.
Interaction Targets
An Interaction Target is any actor in the world that responds to an interaction request from another actor, usually an Interaction Instigator or Source, such as a player character or AI agent. Their behavior is defined by two assets:
Interaction State Tree: Defines each step that should happen when the interaction triggers.
Interaction Smart Object: Defines the usable slots and their configuration, including their state trees.
Ninja Interaction provides generic assets to get you started.
Create the Interaction Target Actor
Create a new Actor based on
NinjaInteractionActor_StaticMesh(or use the Skeletal Mesh,NinjaInteractionActor_SkeletalMesh, variation if appropriate).Set the provided generic Smart Object to the Interaction Target Component.
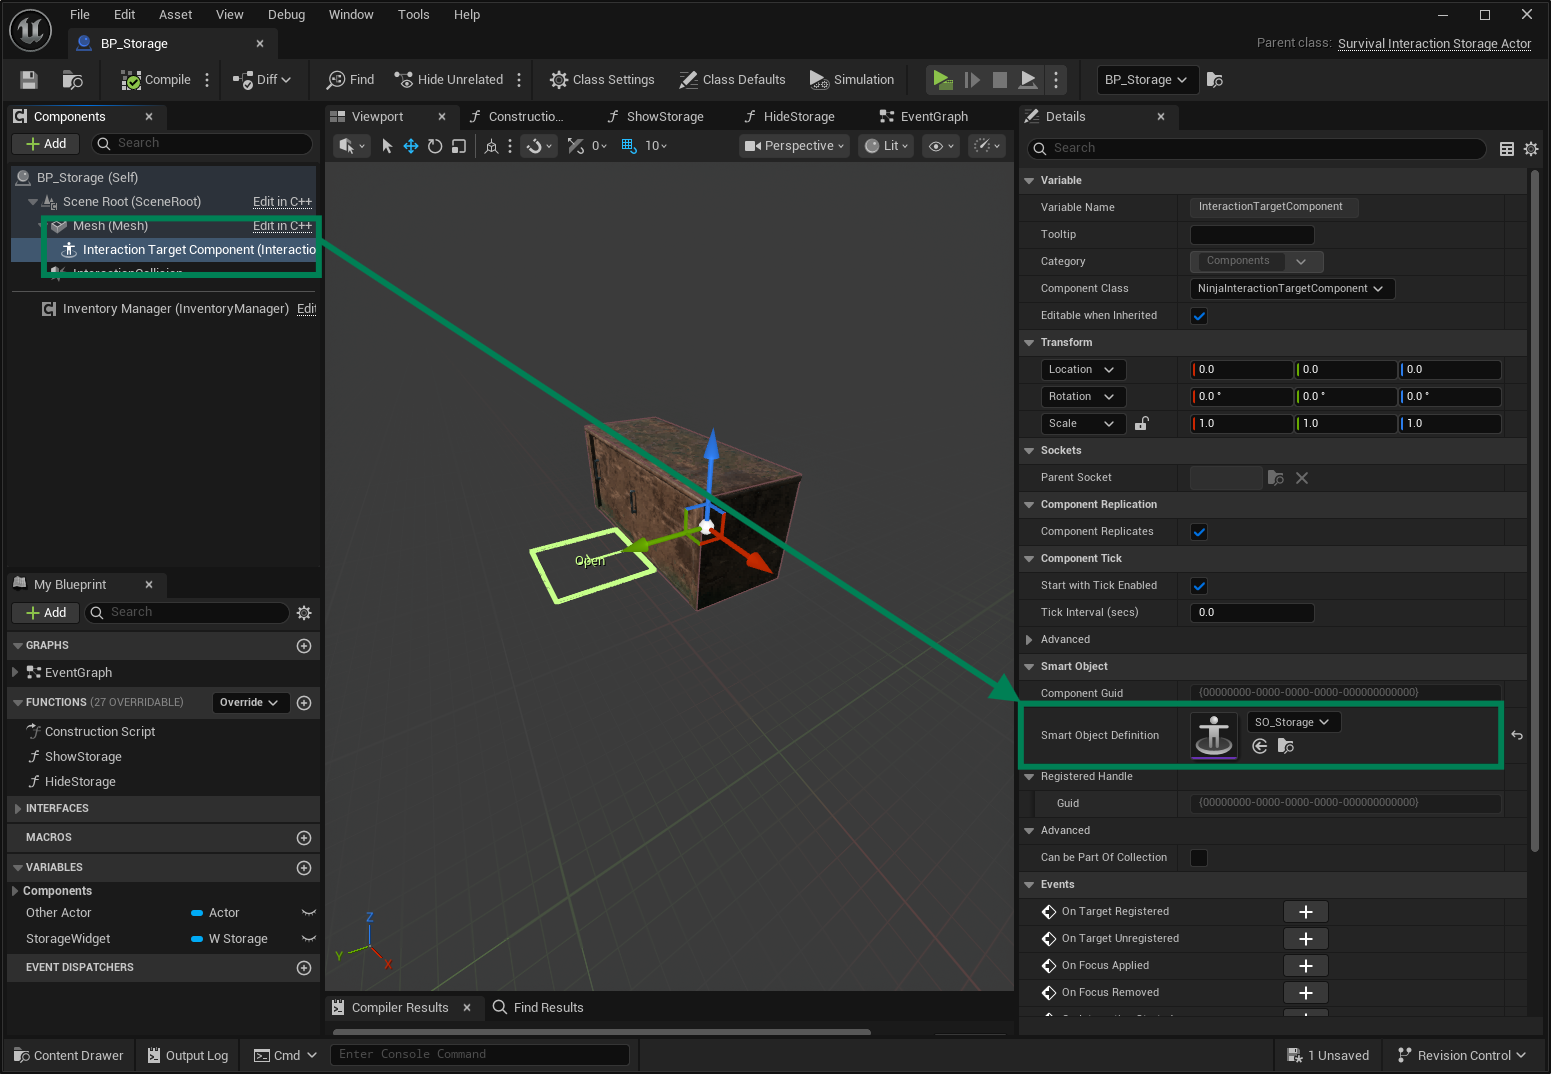
Assign your mesh asset, matching the one used in the Smart Object preview.
Add a collision component (e.g., Box Collision) that matches the object's shape, and set its Collision Preset to
InteractionTarget, as per the collision setup.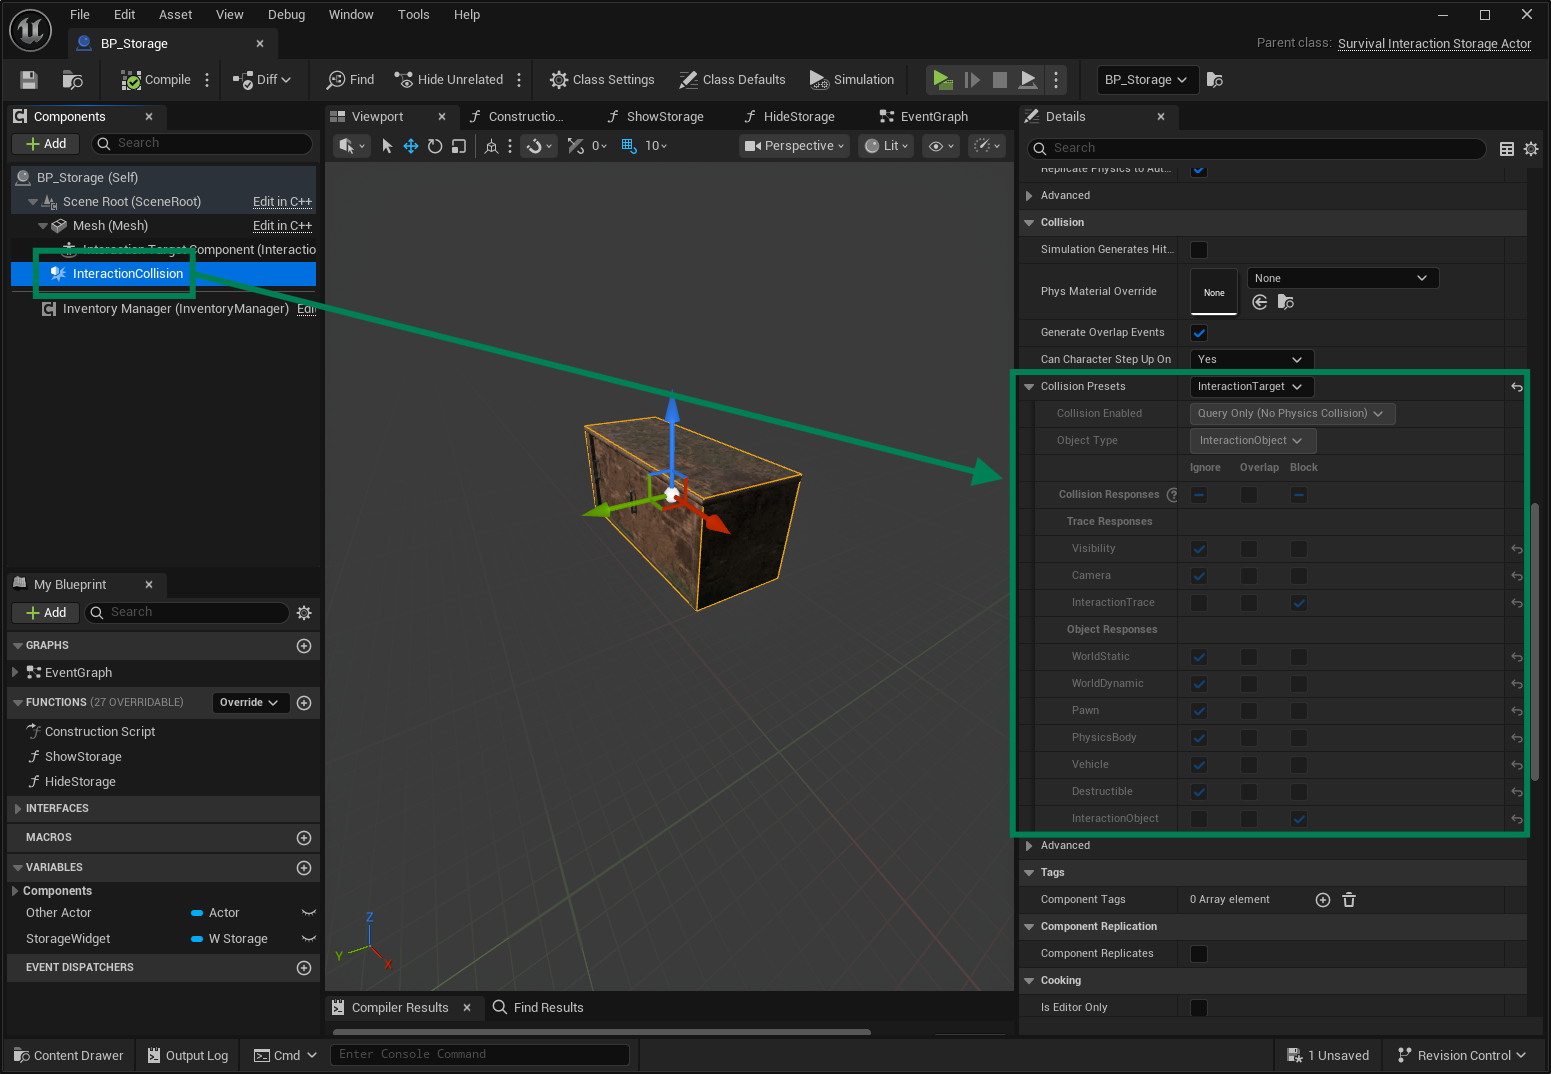
Optionally, add debug strings to track interactions in relevant events such as
HandleTargetRegisteredorHandleFocusRemoved.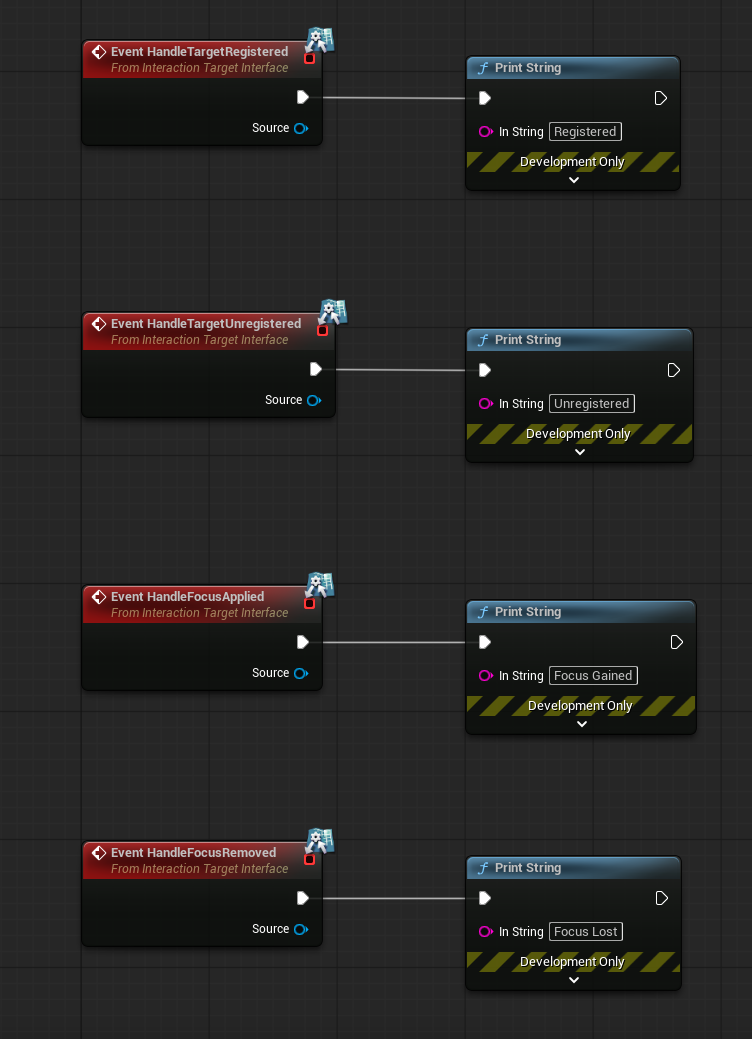
Implement
FinishInteractionEvent, which is invoked by the generic interaction State Tree. In this example, we'll simply apply a Gameplay Effect that grants health to the player.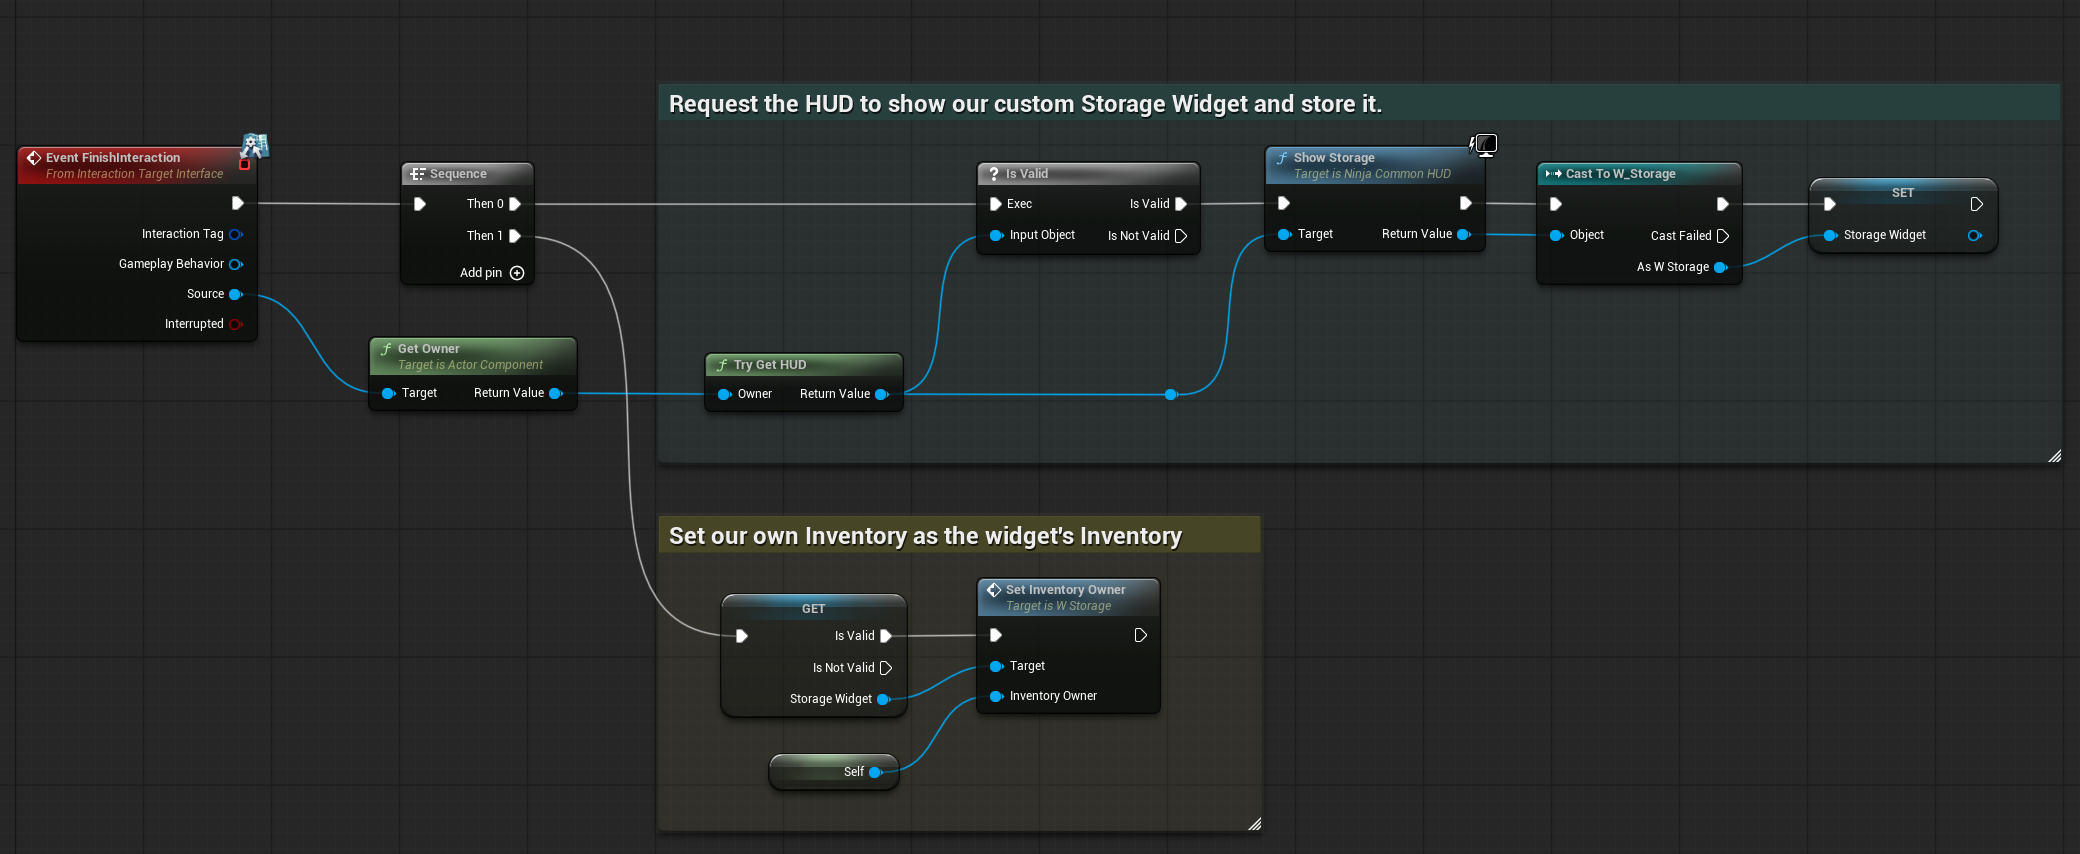
Interaction Sources
An Interaction Source (sometimes also referred to as the Instigator) is a Pawn or Character, and it is defined by the presence of the Interaction Manager Component. Sources must have access to an Ability System Component and will often include two collision components used to register and focus Interaction Targets.
Add the Interaction Manager Component
Navigate to your Player Pawn or Character Blueprint or C++ Class.
Add the Interaction Manager component,
NinjaInteractionManagerComponent.
Interactable Scan Collider
This collision shape (commonly a box or sphere) must be present on each interaction source actor. It is used to register interaction targets so they can later be focused and interacted with.
This collider must be identified by the Component Tag Interaction.Component.InteractableScan and the collider's Object Type should be InteractionObject, created during the Collision Settings setup.
Add the Interaction Scan Collider
In your main Pawn or Character, add a Sphere Collision.
Set the component's radius to a reasonable value, like
800.Add
Interaction.Component.InteractableScanto the list of Component Tags.Set the Object Type to
InteractionObject.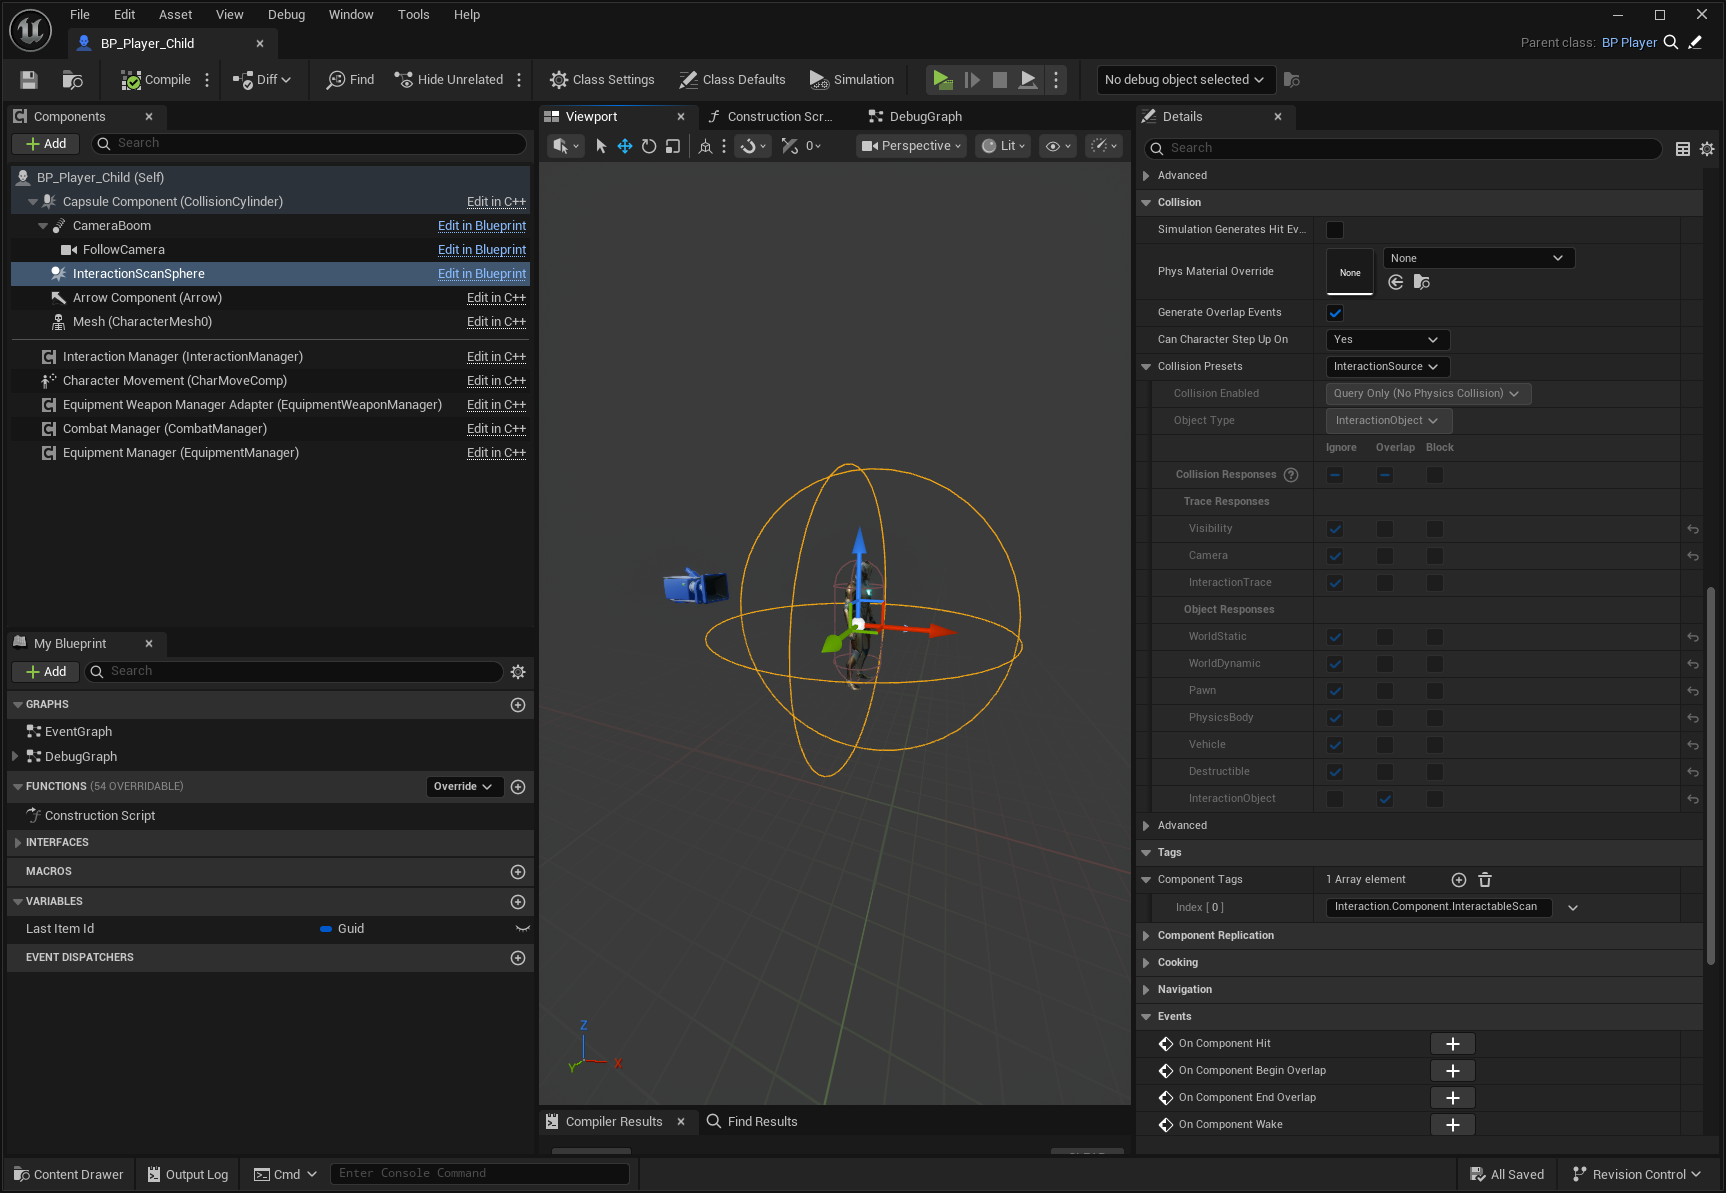
Interactable Focus Collider
This collision shape (commonly a box or sphere) is optional and, if present, applies focus to targets nearby. If you are using other strategies to detect focus, such as the player camera center, then you don't need this component.
This collider is usually smaller than the Scan Collider and, similarly, must be identified by the Component Tag Interaction.Component.InteractableFocus. The collider's Object Type should also be InteractionObject.
Add the Interaction Focus Collider
In your main Pawn or Character, add a Box Collision and place it in front of the character.
Set the component's dimensions to a reasonable value, like
50x50x100.Add
Interaction.Component.InteractableFocusto the list of Component Tags.Set the Object Type to
InteractionObject.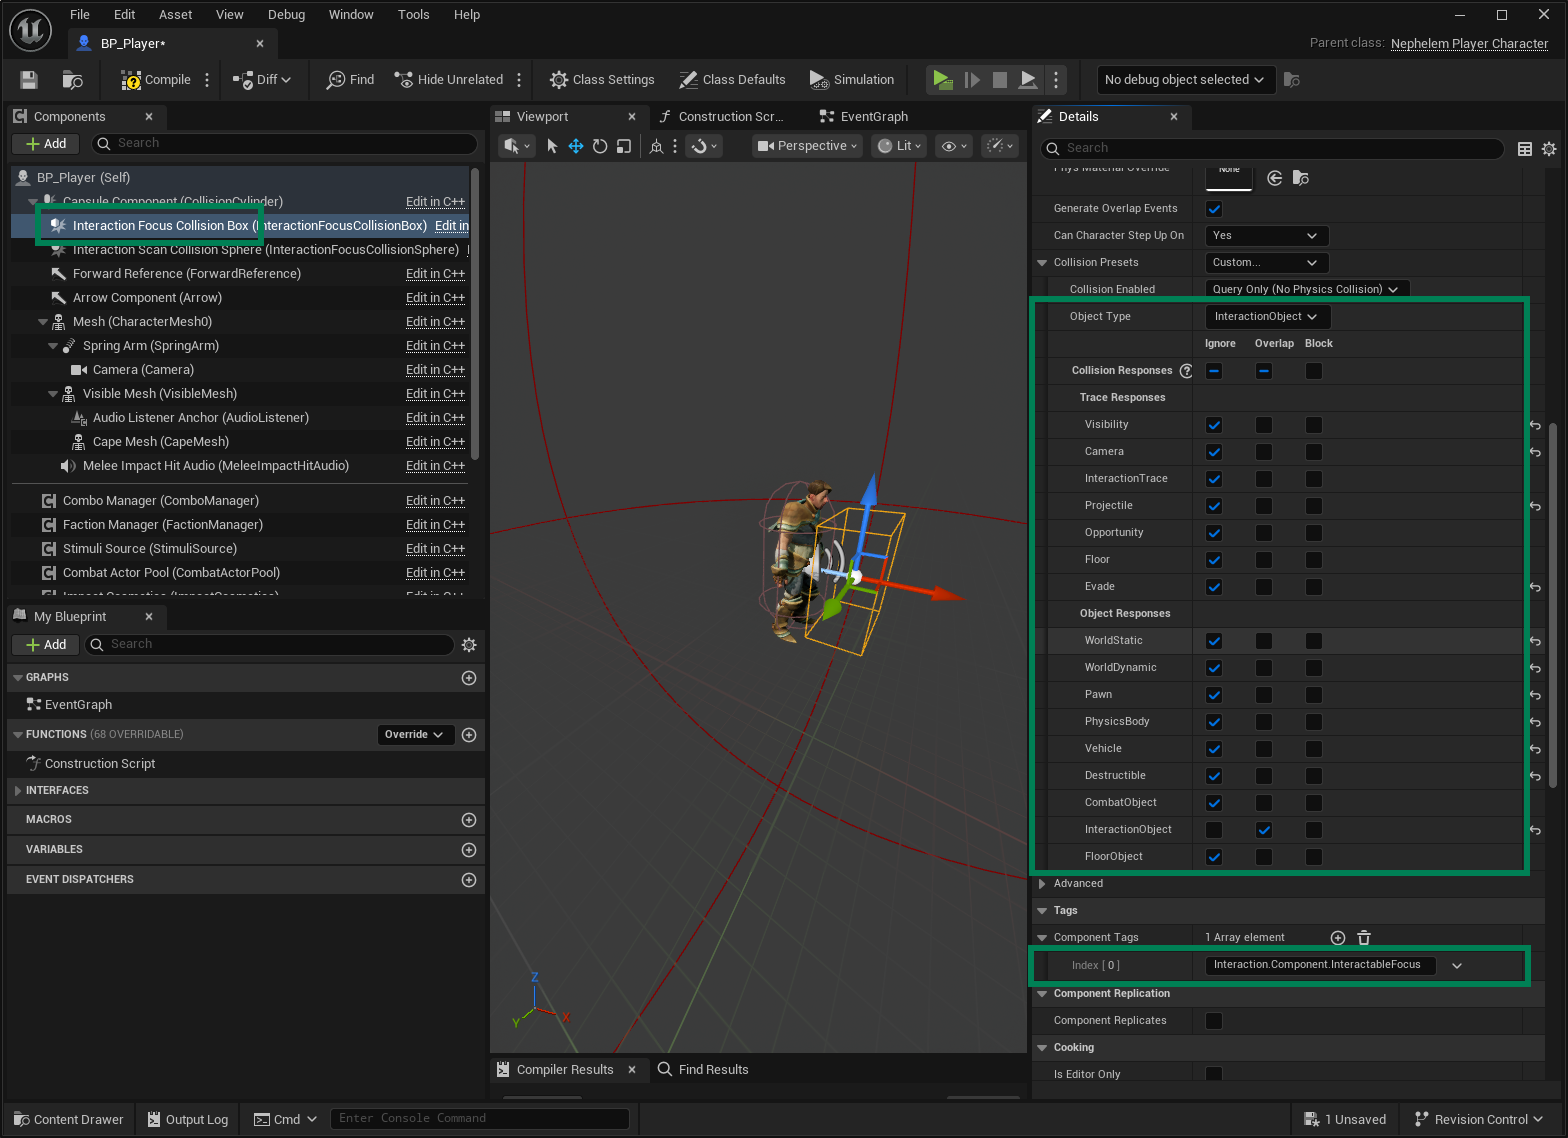
Gameplay Abilities
Two Gameplay Abilities must be granted to the Interaction Source so it can scan and execute interactions:
InteractionAbility_FindInteractableActor: Scans the list of registered targets and, based on the provided Scan Task, selects the best candidate for focus or interaction.InteractionAbility_ExecuteInteraction: Executes the selected interaction by bridging communication between the source and the target components.
Grant Interaction Abilities
Create a new Gameplay Ability Blueprint, extending from
InteractionAbility_FindInteractableActor. Name itGA_Interaction_Scan.If you are using the focus box collision, you can use the default Interaction Task Class (
AbilityTask_FindClosestInteractionTarget).If you'd rather apply focus using the player camera, then change the task to
AbilityTask_TraceInteractionTarget.
Create a new Gameplay Ability Blueprint, extending from
InteractionAbility_ExecuteInteraction. Name itGA_Interaction_Execute.Create a Gameplay Effect Blueprint and name it
GE_InteractionSetup. This will allow you to easily reuse the Interaction Setup across different Ability Setup assets.Open the Gameplay Effect and add a Grant Gameplay Abilities component.
Add both Interaction Abilities to the list of granted abilities.
In your G.A.S. Setup, add the Interaction Setup Gameplay Effect.
Player Input
To start or interrupt interactions, all you need to do is call the related functions in the Interaction Manager component:
TryInitializeInteractionWithCurrentTarget: Attempts to initialize an interaction with the target currently selected. An optional Gameplay tag can be used to specify a slot, when more than one is available.TryCancelCurrentInteraction: Attempts to cancel an ongoing interaction with a target. An optional Gameplay Tag can be used to inform the cancellation reason.
These can be invoked by players, as a result of Input Actions, or by AI agents, from Behavior or State Tree tasks. When using Ninja Input, you can create a dedicated Input Handler to handle both states. The procedure below shows how to create that handler, but the same manager functions can be called from any input binding.
Create the Interaction Input Handler
Create an Input Action (e.g.,
IA_Interact).Add a Pressed trigger.
Optional: add a Released trigger for hold-to-activate / cancellable interactions.
Create an Input Handler that extends
NinjaInputHandler(from Ninja Input), and implementHandleTriggeredEvent.Retrieve the Interaction Manager from the pawn associated with the Input Manager, and verify it is valid.
Branch on the incoming Input Action Value (convert to bool):
true→ callTryInitializeInteractionWithCurrentTargetfalse→ callTryCancelCurrentInteractionwith reason tagInteraction.Event.CancelledButtonPress
Bind the handler in your input setup (mapping context / action bindings) so it runs for
IA_Interact.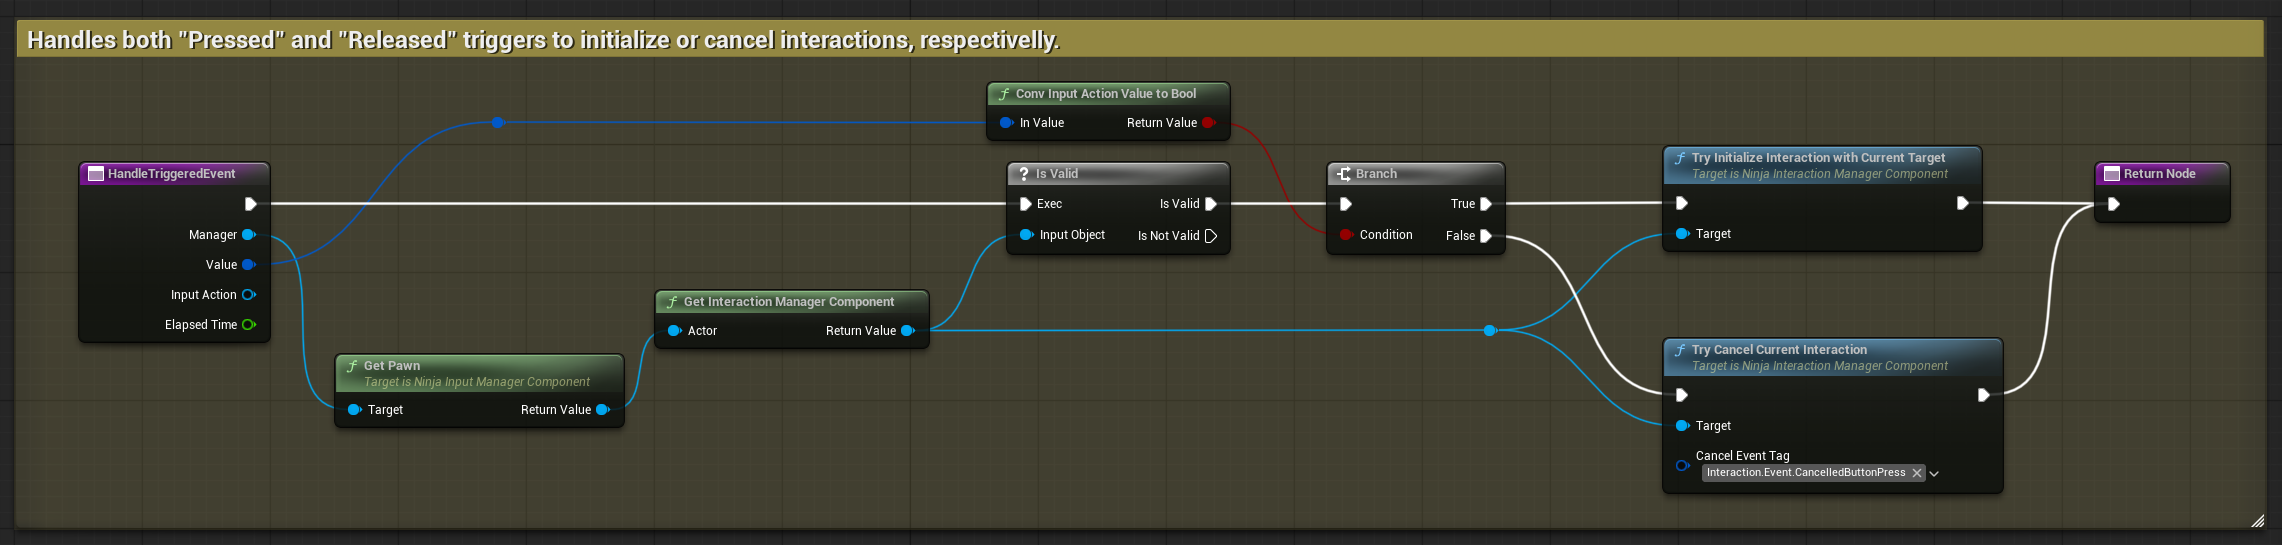
Next Steps
At this point, you have an interactable actor that can be detected by both players and AI agents, and can be interacted with, using a dedicated Input Handler or equivalent input code.
The interaction target actor was configured.
The interaction source can register and focus targets.
The interaction abilities can scan and execute interactions.
Player input can start or cancel interactions.
From here, you can:
Learn more about Interaction Targets, their assets and features.
Learn more about Interaction Sources and their features.
Add Animations to your interaction State Trees.