Creating Melee Attacks
This guide shows how to create a basic melee attack using an Gameplay Ability, an Animation Montage, a Melee Scan, and optional Motion Warping.
The setup is agnostic to the melee source. The same flow works for attacks scanned from the combatant, such as punches, claws, or creature attacks, and for attacks scanned from an equipped weapon. The shared pre-requisite is that a melee source must be a valid implementation of ICombatMeleeInterface.
For more information, see the documentation for Melee Attacks.
Prerequisites
Collision and Components
Your collision channels, combat components, and base character setup should already be configured. For more information, see Combat Setup and Combat First Steps.
Input Handling
Make sure your input setup can activate gameplay abilities. For more information, see Combat and Input Integration. Integration with Ninja Input is optional, but input handling for ability activation should already be configured.
Weapon Management
If your melee scans originate from weapons, make sure to configure them first. For more information, see Weapon Management.
Motion Warping
Motion Warping is commonly used by melee attacks to move the attacker closer to the target by adjusting the animation's root motion.
This requires adding the Motion Warping Component to your character and implementing the appropriate getter function from the Combat System Interface.
Add the Motion Warping Component
In your Character Blueprint or base class, add
NinjaCombatMotionWarpingComponent.Implement
GetMotionWarpingComponentfrom theCombatSystemInterface, returning your Motion Warping Component.
Targeting Preset
Motion Warping can use a Targeting Preset to find the target that the attack should warp toward. We will create a preset that prioritizes the locked target first. If no locked target is available, the preset will collect targets using a fallback area scan.
Create a Targeting Preset
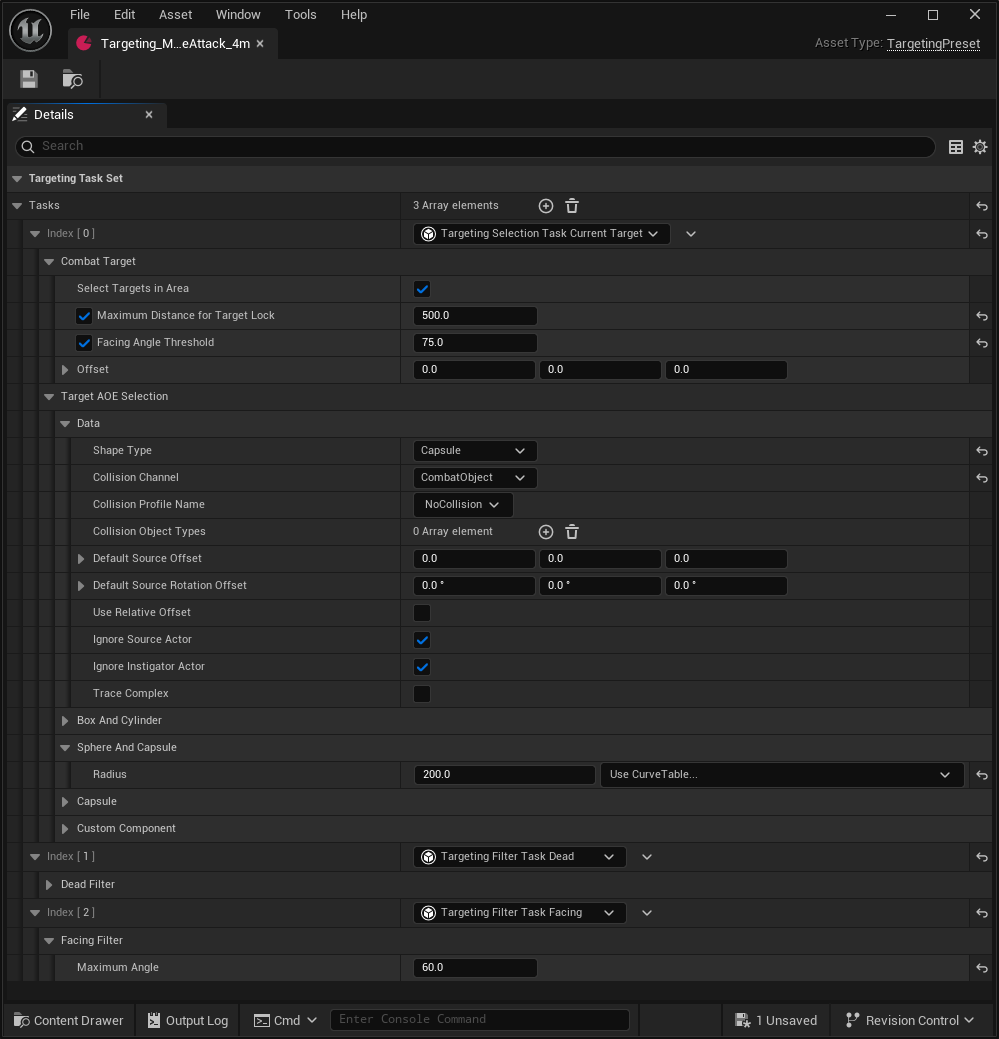
Create a new Targeting Preset asset.
Add the Current Target Selection Task and set the following properties:
Set it to Select Targets in Area, so it will perform a scan as a fallback when no target is locked on.
Set the Maximum Distance for Target Lock to
500.Set the Facing Angle Threshold to
75.Set the Shape Type to Capsule.
Set the Collision Channel to Combat Object.
Set the Radius to
200, or any other value that fits your design.
Add the Dead Filter Task.
Add the Facing Filter Task and set the Maximum Angle to
60.Add the Distance Sort Task.
Owner-Based Scans
Owner-based scans are used when the melee source is the combatant instead of an equipped weapon. This is a good fit for punches, kicks, claws, bites, tail attacks, creature attacks, and any melee hit that should be scanned from the character's own mesh.
In this setup, the Animation Montage defines both the movement correction and the active hit frames for the melee attack. It usually includes three types of Animation Notify States: Track Motion Warp Target, Motion Warping, and Melee Scan.
Configure the Attack Montage (Owner)
Select the Animation Sequence that represents the Melee Attack Ability and create an Animation Montage from it.
If applicable, select the correct Slot for the Animation Montage, based on the setup in your Animation Instance.
Add a Track Motion Warp Target notify state during the part of the animation where the target should be resolved or tracked.
Set
Combat Warpas the Warp Name and assign the Targeting Preset created earlier.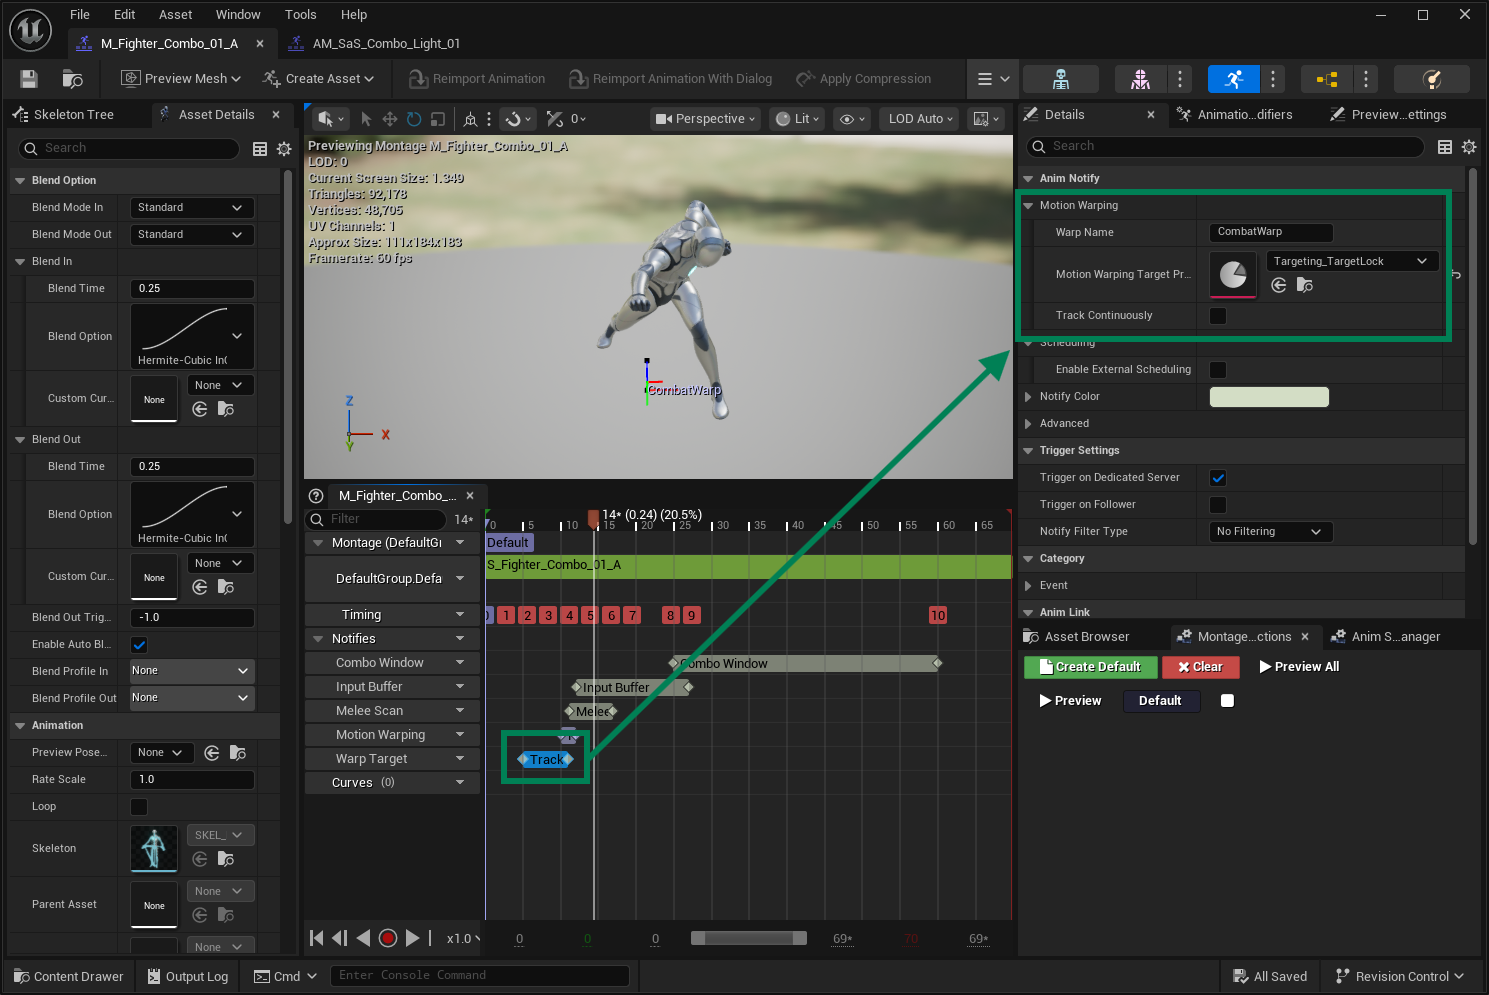
Add a Motion Warping notify state during the root motion section that should be adjusted.
Set the Root Motion Modifier to Skew Warp and set
Combat Warpas the Warp Name.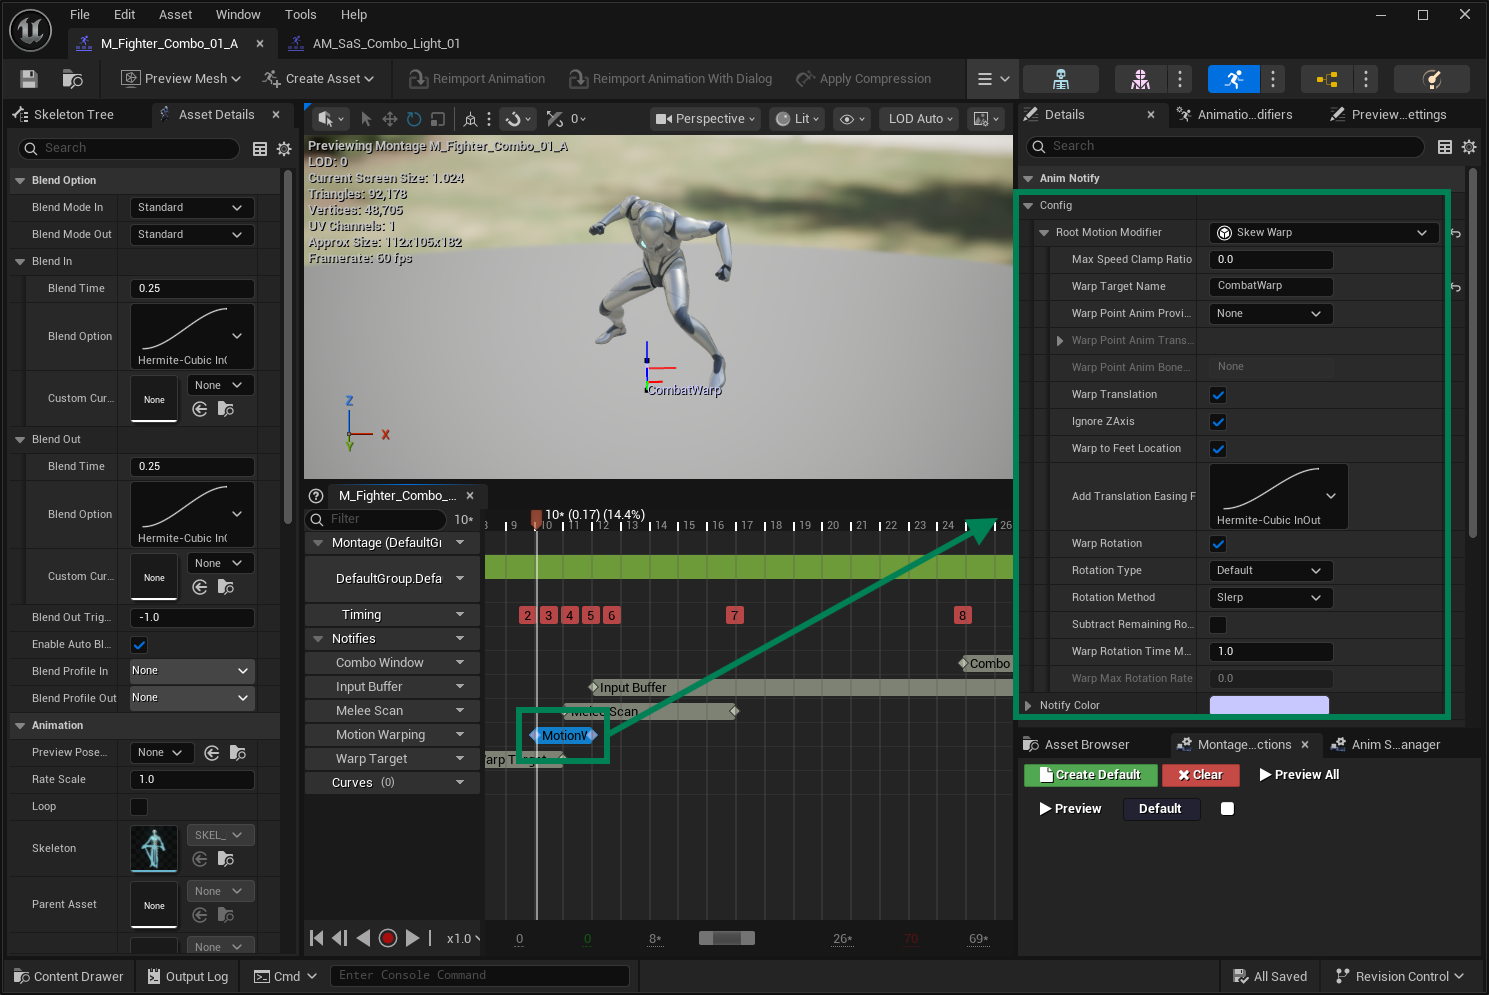
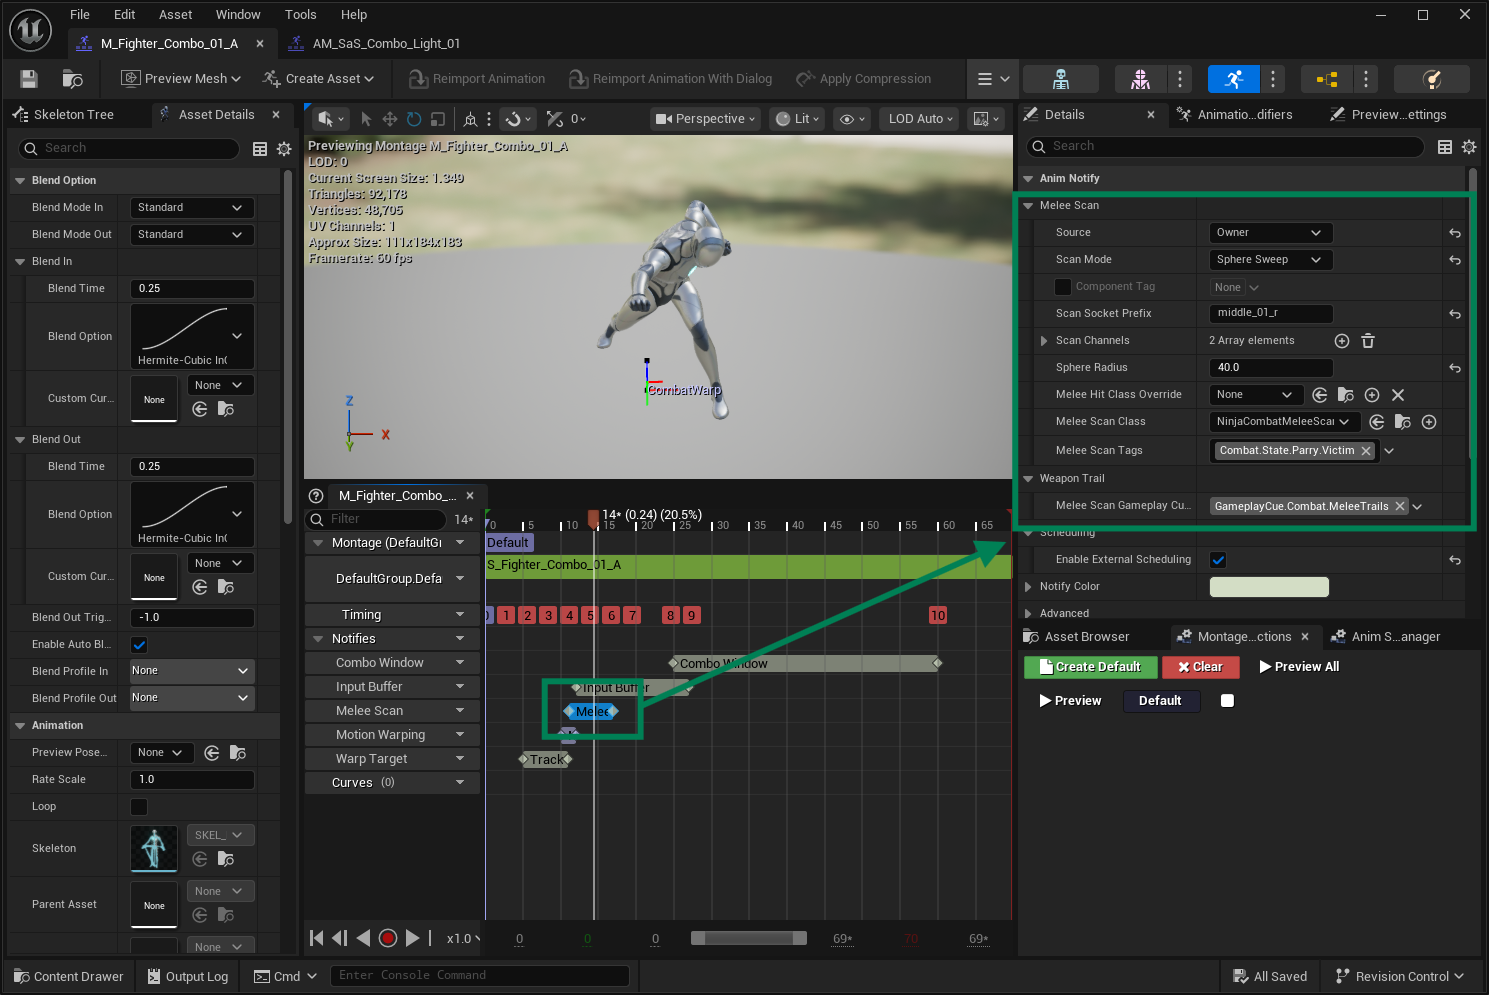
Add a Melee Scan notify state over the frames where the attack should be active. Configure the following properties:
Set the Source to Owner.
Set the Scan Mode to Sphere Sweep.
Set the Scan Socket to
middle_01_r, or the appropriate bone or socket name for your skeleton.Add CombatObject and Destructible as the Scan Channels.
Set the Sphere Radius to
40, or another appropriate size.
Weapon-Based Scans
Weapon-based scans are used when the melee source is an equipped Weapon instead of the combatant. This is the usual setup for swords, axes, spears, shields, and other attacks where the hit area should follow a weapon mesh.
In this setup, the weapon provides the mesh and scan sockets, while the Weapon Manager provides the active weapon instance to the Melee Scan. The Animation Montage still controls the attack timing, Motion Warping, and the active scan frames.
This section uses the default Weapon Manager Component and Weapon Actor provided by Ninja Combat. If you are using Ninja Inventory, see the Combat and Inventory Integration page for the inventory-based replacements.
Make sure that you create a proper Melee Weapon. For instructions on how to create a Melee Weapon, please check the Creating Weapons guide
Configure the Attack Montage (Weapon)
Select the Animation Sequence that represents the Melee Attack Ability and create an Animation Montage from it.
If applicable, select the correct Slot for the Animation Montage, based on the setup in your Animation Instance.
Repeat the same steps used by owner-based scans for Track Motion Warp Target and Motion Warping.
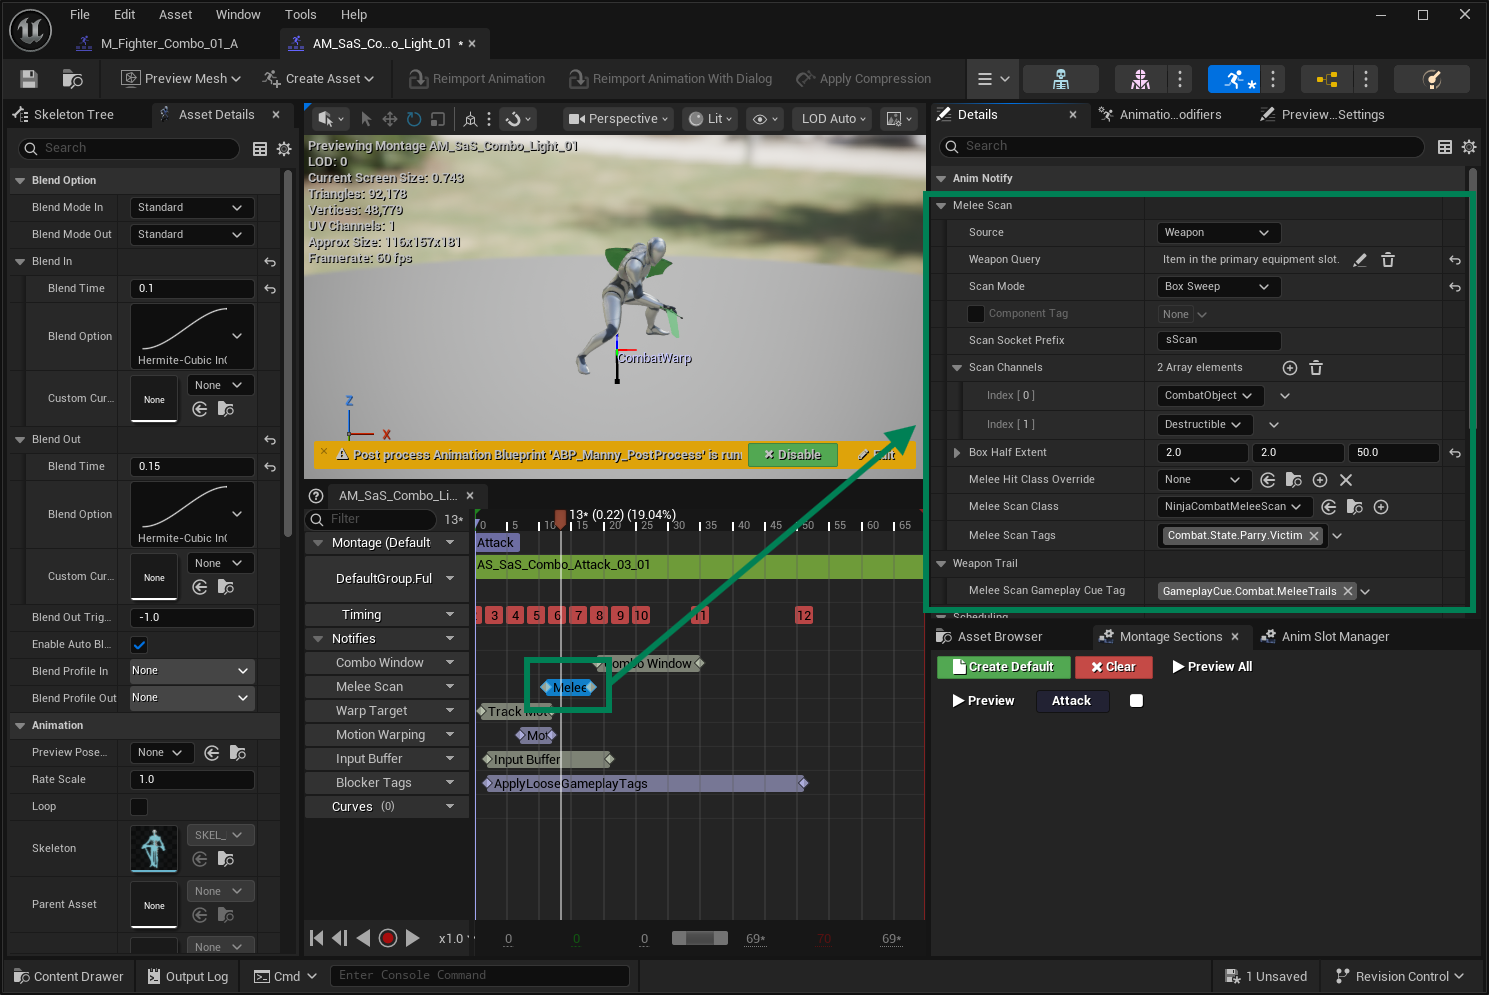
Add a Melee Scan notify state over the frames where the attack should be active. Configure the following properties:
Set the Source to Weapon.
Set the Weapon Query so the Weapon Manager can find the weapon configured earlier.
Set the Scan Mode to Box Sweep, which works well for this sword example.
Set the Scan Socket to
sScan, matching the socket prefix added to the weapon mesh.Add CombatObject and Destructible as the Scan Channels.
Set the Box Half Extent to
2, 2, 50, or another size that fits your weapon. Use the socket gizmo in the weapon mesh to orient these dimensions.
Configure the Attack Ability
The Attack Ability plays the montage, listens for Melee Scan events, and applies damage to valid targets.
Create a Melee Damage Effect
Create a Gameplay Effect that represents the damage applied by the melee attack.
Create the Damage Gameplay Effect
Create a new Gameplay Effect asset based on
CombatEffect_MeleeHit.If the damage or poise values are provided by the melee source, make sure the effect supports the expected Set By Caller magnitudes.
Common Set By Caller tags used by melee sources include:
Tag | Purpose |
|---|---|
| Damage value provided by the melee source. |
| Poise consumption value provided by the melee source. |
Configure the Ability
Configure the Attack Ability
In your Attack Ability folder, create a new Gameplay Ability Blueprint using
CombatAbility_MeleeAttackas the base class.Set the Default Animation Montage to the montage configured earlier.
Set the default Hit Gameplay Effect to the Gameplay Effect created earlier.
Configure the Ability Tags used to activate this Attack Ability.
Optionally, set the Optimal Melee Distance.
Optionally, enable Debug Mode to visualize melee scans and impacts.