Combat and Input
Ninja Combat can benefit from GAS-related Input Handlers provided by Ninja Input.
Forward Reference
Ninja Combat usually needs a Forward Reference to determine angles for directional abilities, such as the Evade Ability. In parallel, Ninja Input might need a Forward Reference as well, usually to orient pawns in top-down perspectives.
Both systems can share the same Forward Reference. This is usually a Scene Component, such as an Arrow Component, configured with absolute rotation.
Add a shared Forward Reference component
In the Character Class, create a new Arrow Component, parented to the Root Component, usually the character's Capsule Component.
Add the
Combat.Component.ForwardReferencetag to the list of Component Tags.Add the
Input.Component.ForwardReferencetag to the list of Component Tags.Set the Transform to use Absolute Rotation, so the component is not affected by its parent rotation.
Implement or override the Combat System interface function,
GetCombatForwardReference, so it returns the Arrow Component.
Gameplay Abilities
Ninja Combat is built on the Gameplay Ability System and therefore it is very ability-centric. Ninja Input provides Input Handlers for ability activation and interruption that can be used out-of-the-box to activate Combat Abilities.
Combo Inputs
The Combo System in Ninja Combat is designed to try to activate a Combo Ability while outside a Combo Window, or send a Gameplay Event to advance the combo, if a Combo Window is open. This is a generic GAS-based design, leveraging Gameplay Tags. Because of that, Ninja Input provides a Combo Input Handler that can be used out-of-the-box.
Configure Combat Combo Handlers
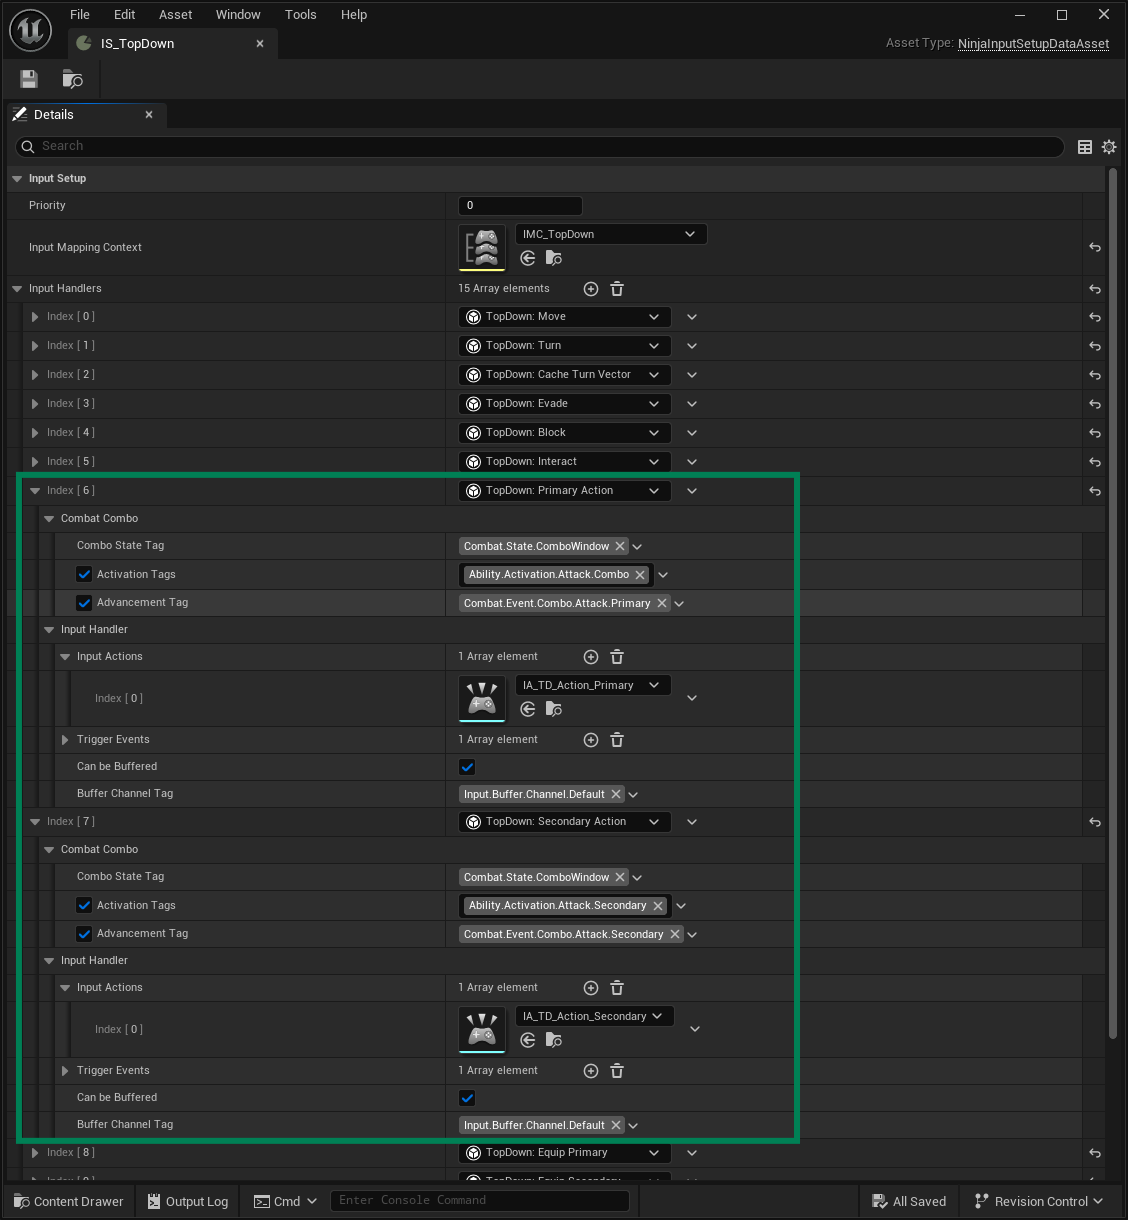
Open your Input Setup and add one Combat Combo handler for each supported Input Action (e.g., Primary and Secondary Actions).
Configure the Activation Tags so they match your Gameplay Ability Tags.
Configure the Advancement Tags so they match your Combo Event Tags.
If the Input Buffer is being used to enhance Combo Windows, check Can Be Buffered.
Optionally, designate a Buffer Channel Tag for combo inputs.
Configure your Input Actions related to your Combo Inputs (e.g., Primary and Secondary Actions).
Add Triggered to the list of Triggered Events, if necessary.
Default, Hold, Combo
This is a unique handler from Ninja Input that allows you to handle the following advanced scenario:
Default Activation: Triggers a default ability, when the input is quickly released.
Hold to Activate: Triggers a different ability, like a "hold" attack.
Combo Event: Sends a Gameplay Event to the active default ability.
Because Ninja Input does not depend on Ninja Combat, the handler cannot determine the current combo state by itself. To enable combo progression, override IsFirstComboAttack and connect it to your combat system.
Integrate with Ninja Combat
Create a new Input Handler based on
InputHandler_DefaultHoldCombo.Override
IsFirstComboAttack.Get the pawn from the Input Manager, using
GetPawn.Get the pawn's Combo Manager, using Ninja Combat's
GetComboManagerComponentfunction.Check the current combo count using
GetComboCount. A count of zero indicates the first attack, while any higher value indicates that the combo has progressed.Optionally, override
IsInComboWindowto connect the handler to Ninja Combat's combo window state.
Ability Targeting
The Gameplay Ability System supports target confirmation and cancellation by using Targeting Actors. While those actors are active, the Ability System Component waits for additional input so it can gather the relevant targets.
Ninja Input provides Input Handlers compatible with this flow. However, by default, they only perform these targeting operations at the Ability System Component level. Since Ninja Combat keeps track of the Targeting Actor currently active, it makes it possible for these flows to also happen at the Targeting Actor level, which might be ideal in some cases.
Integrate the Target Confirmation Handler
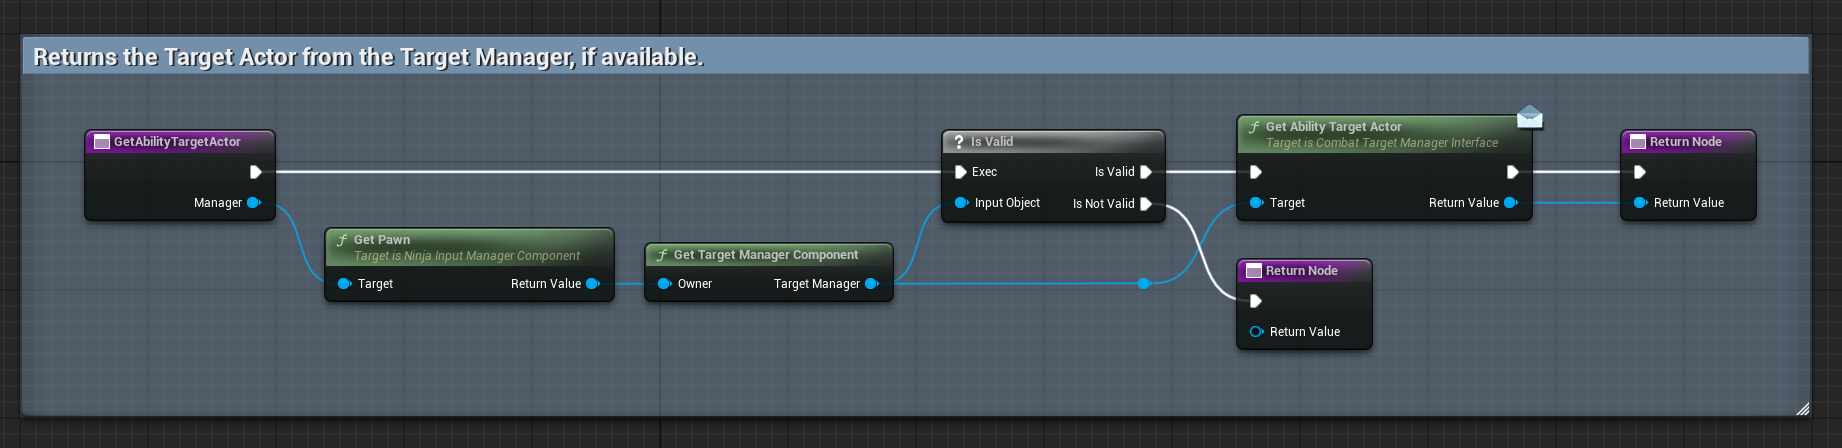
Create a new Input Handler based on
InputHandler_AbilityConfirm.You can create Input Handlers in the Content Browser by clicking Add, then selecting Ninja Bear Studio → Ninja Input → Input Handler, and then selecting the base class.
Override the
GetAbilityTargetActorfunction.Retrieve the Target Manager Component from the Input Manager's Pawn.
Return the current Ability Targeting Actor by calling the Target Manager Component's
GetAbilityTargetActorfunction.Optionally, adjust the Ability Targeting Operation to only execute at the actor level.
Integrate the Target Cancellation Handler
Create a new Input Handler based on
InputHandler_AbilityCancel.Repeat the same integration steps from the Target Confirmation Handler.
Optionally, adjust the Ability Targeting Operation to only execute at the actor level.
Target Lock
Target Lock is executed by the Target Lock Ability, which supports common activation and additional events to scan for targets, cycle between available targets and dismiss the current target.
Common GAS-related handlers from Ninja Input can be used to activate the ability, scan for targets, cycle between targets, and dismiss the current target.
Toggle the Target Lock Ability
Navigate your Target Lock Ability and add
Input.Ability.Toggledto the list of Ability Tags.Create a new Input Handler based on
InputHandler_AbilityTags.In the new Input Handler, configure the Gameplay Ability Tags used for activation of the Target Lock Ability.
Configure the Input Action as usual.
Scan for a Target
Create a new Input Handler based on
InputHandler_GameplayEvent.Set
Combat.Event.Target.Scanas the Event Tag.Configure the Input Action as usual.
Cycle Available Targets
Create two new Input Handlers based on
InputHandler_GameplayEvent.In the first Input Handler, set
Combat.Event.Target.Leftas the Event Tag.In the second Input Handler, set
Combat.Event.Target.Rightas the Event Tag.Configure the Input Actions as usual.
Fire Intent
The Firearms Module handles Fire Intent using functions from the Firearm Component. These functions are responsible for requesting activation or deactivation of the Shoot Ability.
Once this handler is created, you can reuse it across different projects by adding it to the Input Setup and mapping it to the appropriate Input Action. This handler expects an Input Action with both Pressed and Released triggers.
Create the Fire Intent Handler
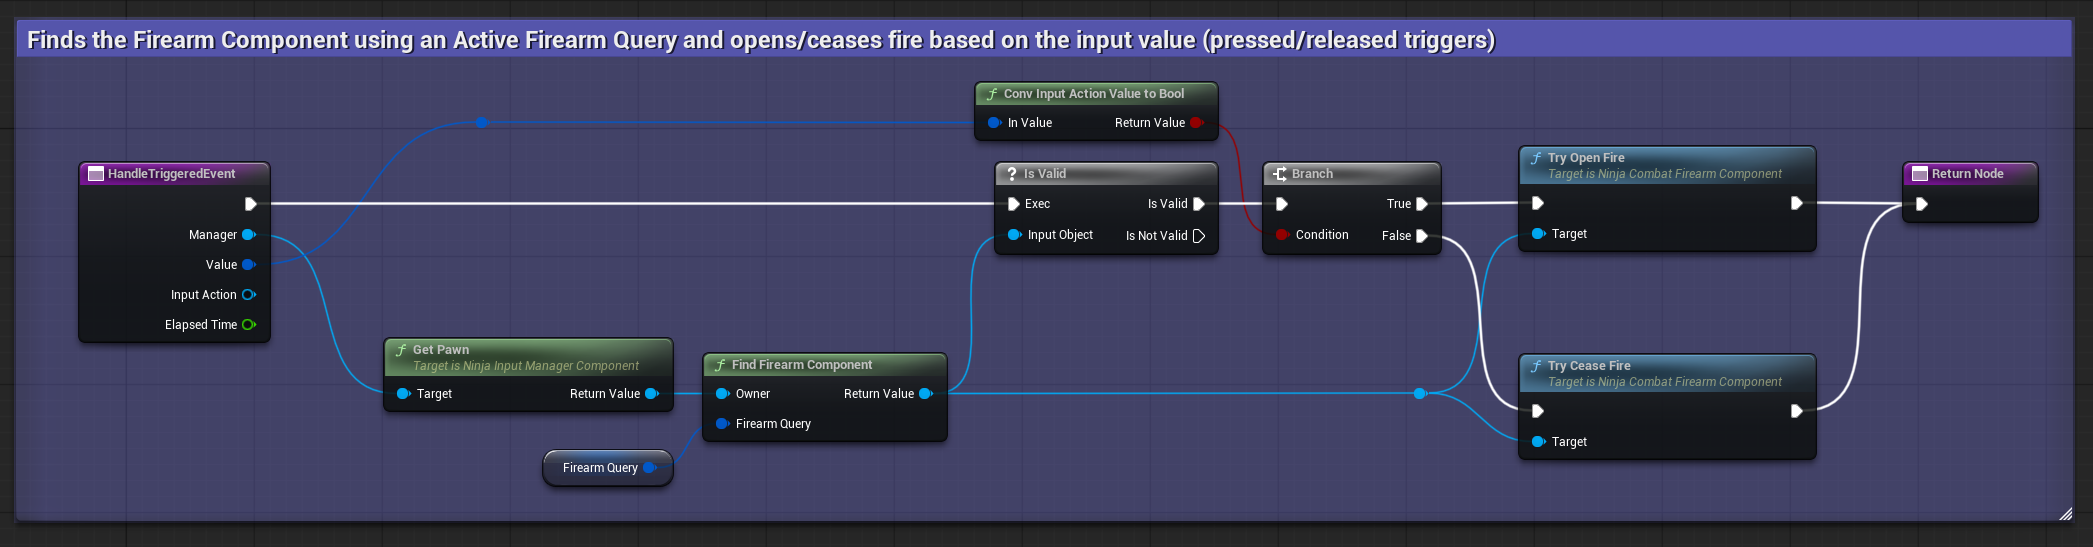
Create a new Input Handler based on
NinjaInputHandler.You can create Input Handlers in the Content Browser by clicking Add, then selecting Ninja Bear Studio → Ninja Input → Input Handler, and then selecting the base class.
Create a Gameplay Tag Query property, which will be used to retrieve the active firearm.
Override
HandleTriggeredEventso it retrieves the Firearm Component by query.Then, based on the input value, invoke
TryOpenFireorTryCeaseFire, respectively.Add
Triggeredto the list of Trigger Events.Optionally, set Manage Fire Intent as the Display Name.
Disabling Input
Ninja Input can block movement, camera and rotation input based on the presence of the respective blocking tags. This can be used by certain Gameplay Abilities to block specific input categories. For example:
The Target Lock Ability has tags to block camera input, since while locked on a target, the camera yaw should be locked, facing the target.
The Opportunity Attack Ability has tags to block input for movement and camera, so the participants in the paired animation remain in their predefined positions and the cinematic camera is not affected.
Input Buffer
Ninja Input provides an Animation-Based Input Buffer, which is a common requirement for certain combat systems. This allows players to be less precise with their inputs while still getting the desired outcome, which tends to create a more responsive input feel. Common examples are:
Buffering an attack input pressed while the Evade Ability is still executing, so the attack starts as soon as the evade can transition.
Buffering a combo input pressed slightly before the Combo Window opens, so the next combo step still activates when the window becomes valid.