Orchestrating Combos
This guide shows how to build a basic combo flow where Gameplay Abilities advance from one attack to the next using the Combo Ability, Combo Manager, and Combo Windows.
For a deeper explanation of the systems and settings used by these examples, see the related concepts.
Prerequisites
Activatable Abilities
A combo requires abilities that can be activated. These are usually Attack or Cast Gameplay Abilities, but you can activate any type of ability required by your scenario.
Input Handling
Make sure your input setup can activate the Combo Ability and advance the combo by sending the appropriate Gameplay Events. For more information, see Combat and Input Integration.
Integration with Ninja Input is optional, but input handling for ability activation should already be configured.
Combo Manager
Combos are orchestrated by the Combo Manager, an Actor Component that implements CombatComboManagerInterface. The default implementation uses the State Tree Component, and combos are authored as State Tree assets.
To start using the Combo System, add a Combo Manager Component to your character and implement the appropriate getter function from the Combat System Interface.
Add the Combo Manager Component
In your Character Blueprint or base class, add
NinjaCombatComboManagerComponent.Implement
GetComboManagerComponentfrom theCombatSystemInterface, returning your Combo Manager Component.
Combo Windows
The first step in authoring a combo is configuring the Animation Montages used by the combo abilities to include a Combo Window Animation Notify State, which marks the frames during which transitions to the next combo state are allowed.
Add Combo Windows
Open the Animation Montage used by your first Gameplay Ability in the combo (e.g. a melee attack).
Add a Combo Window Notify State to the Animation Montage. It should cover the range of frames during which the next combo input can be triggered.
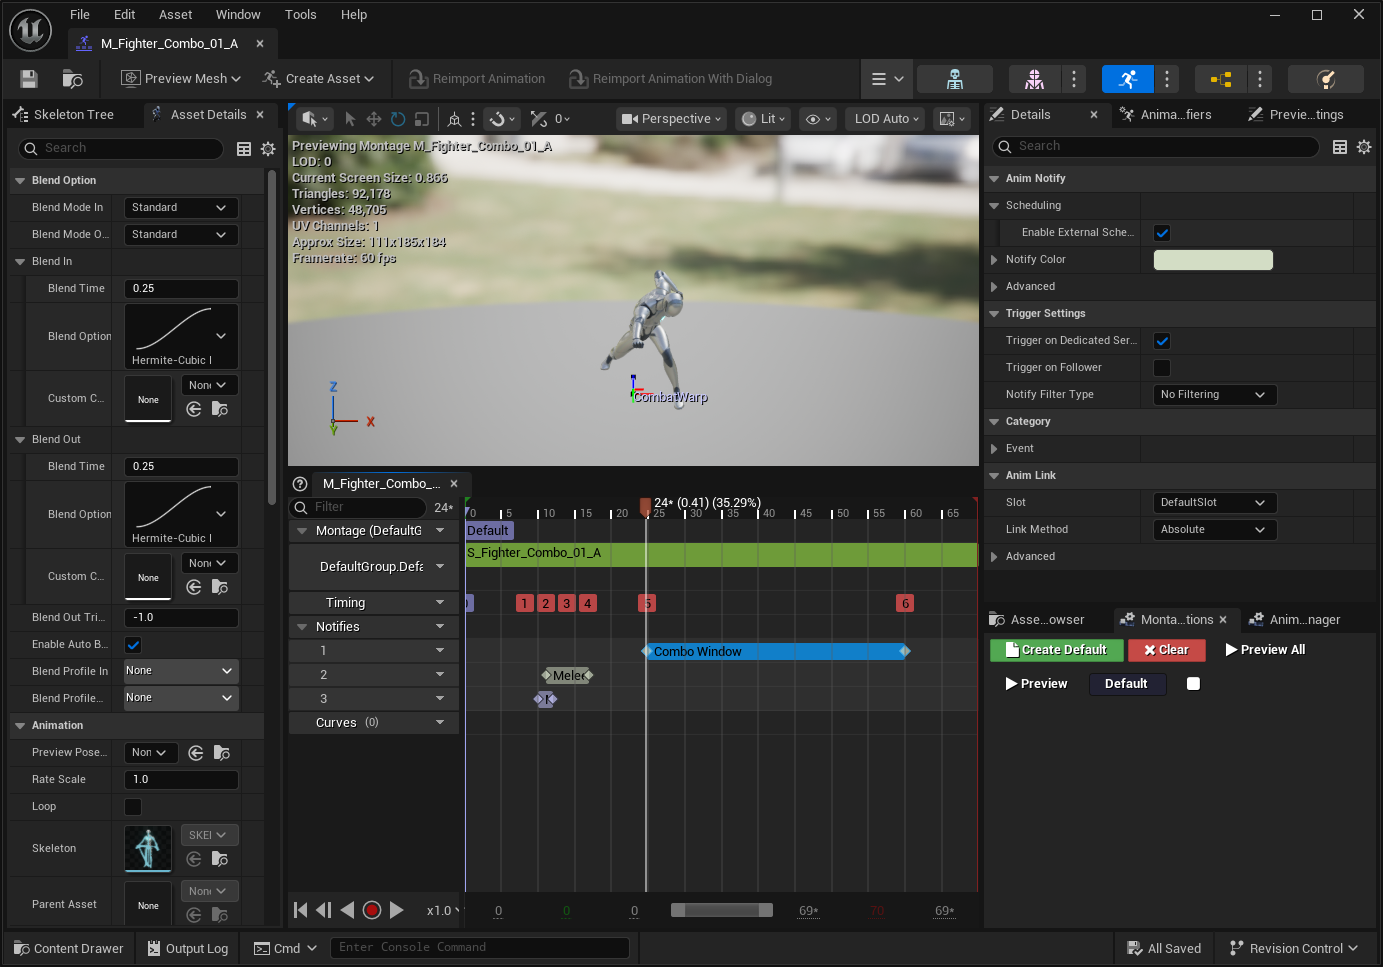
Repeat this step for all Animation Montages used in the combo.
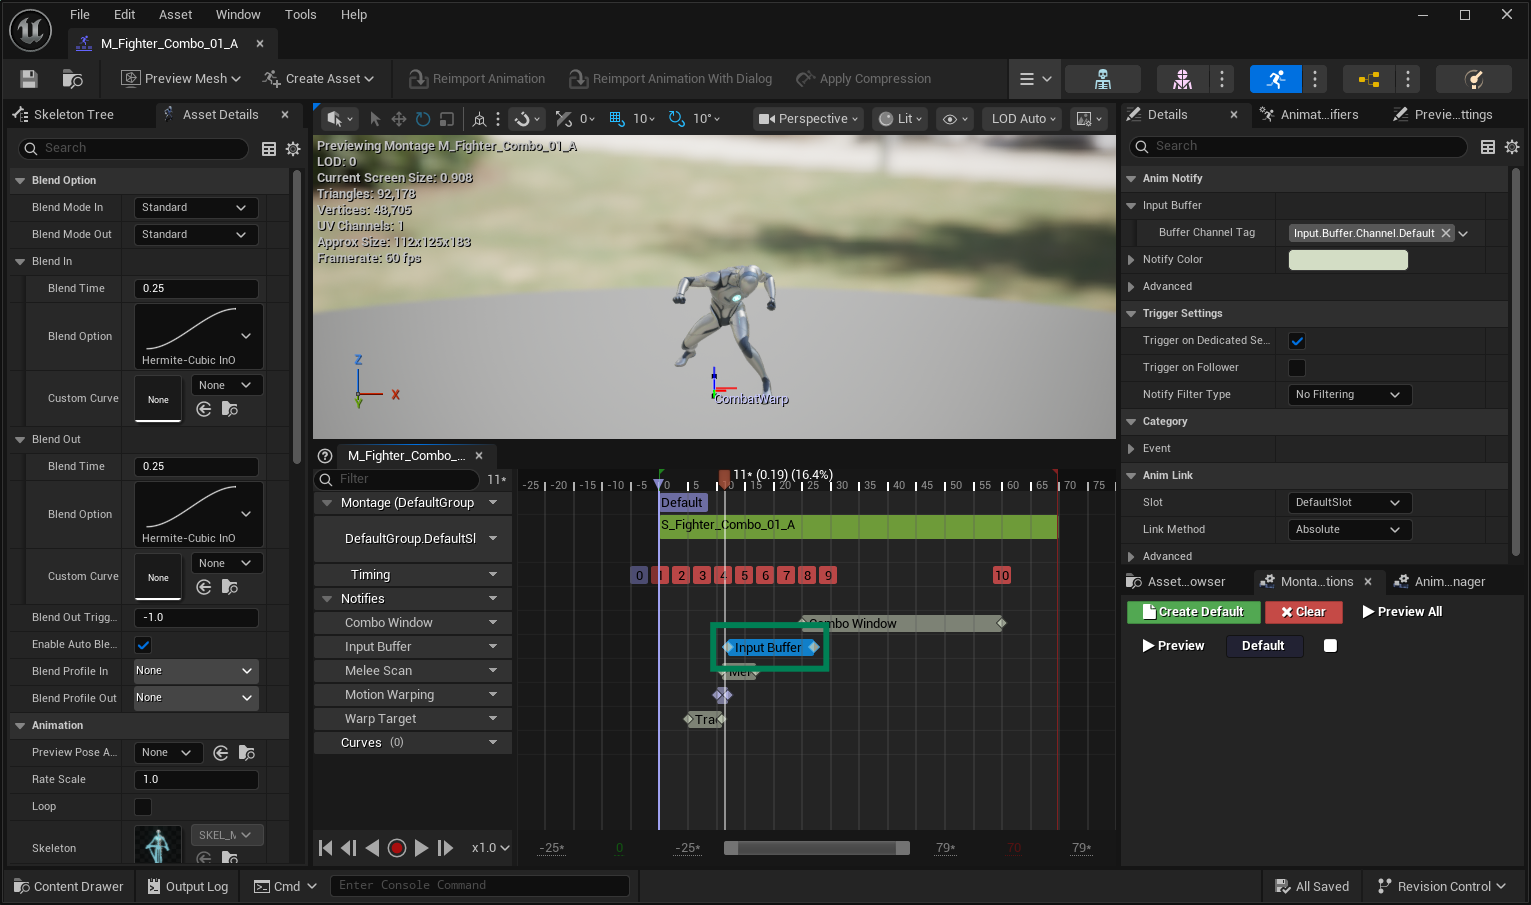
Optionally, with Ninja Input, you can add the Input Buffer Notify State to the same Animation Montage.
This buffer should start at some point before the Combo Window and end a few frames after the Combo Window opens.
Linear Combo
Combos are defined using a State Tree that uses the Combat Combo Tree Schema. The simplest type of combo is the linear combo, which uses one transition path where each successful combo input advances to the next attack in sequence.
Create a Linear Combo Tree
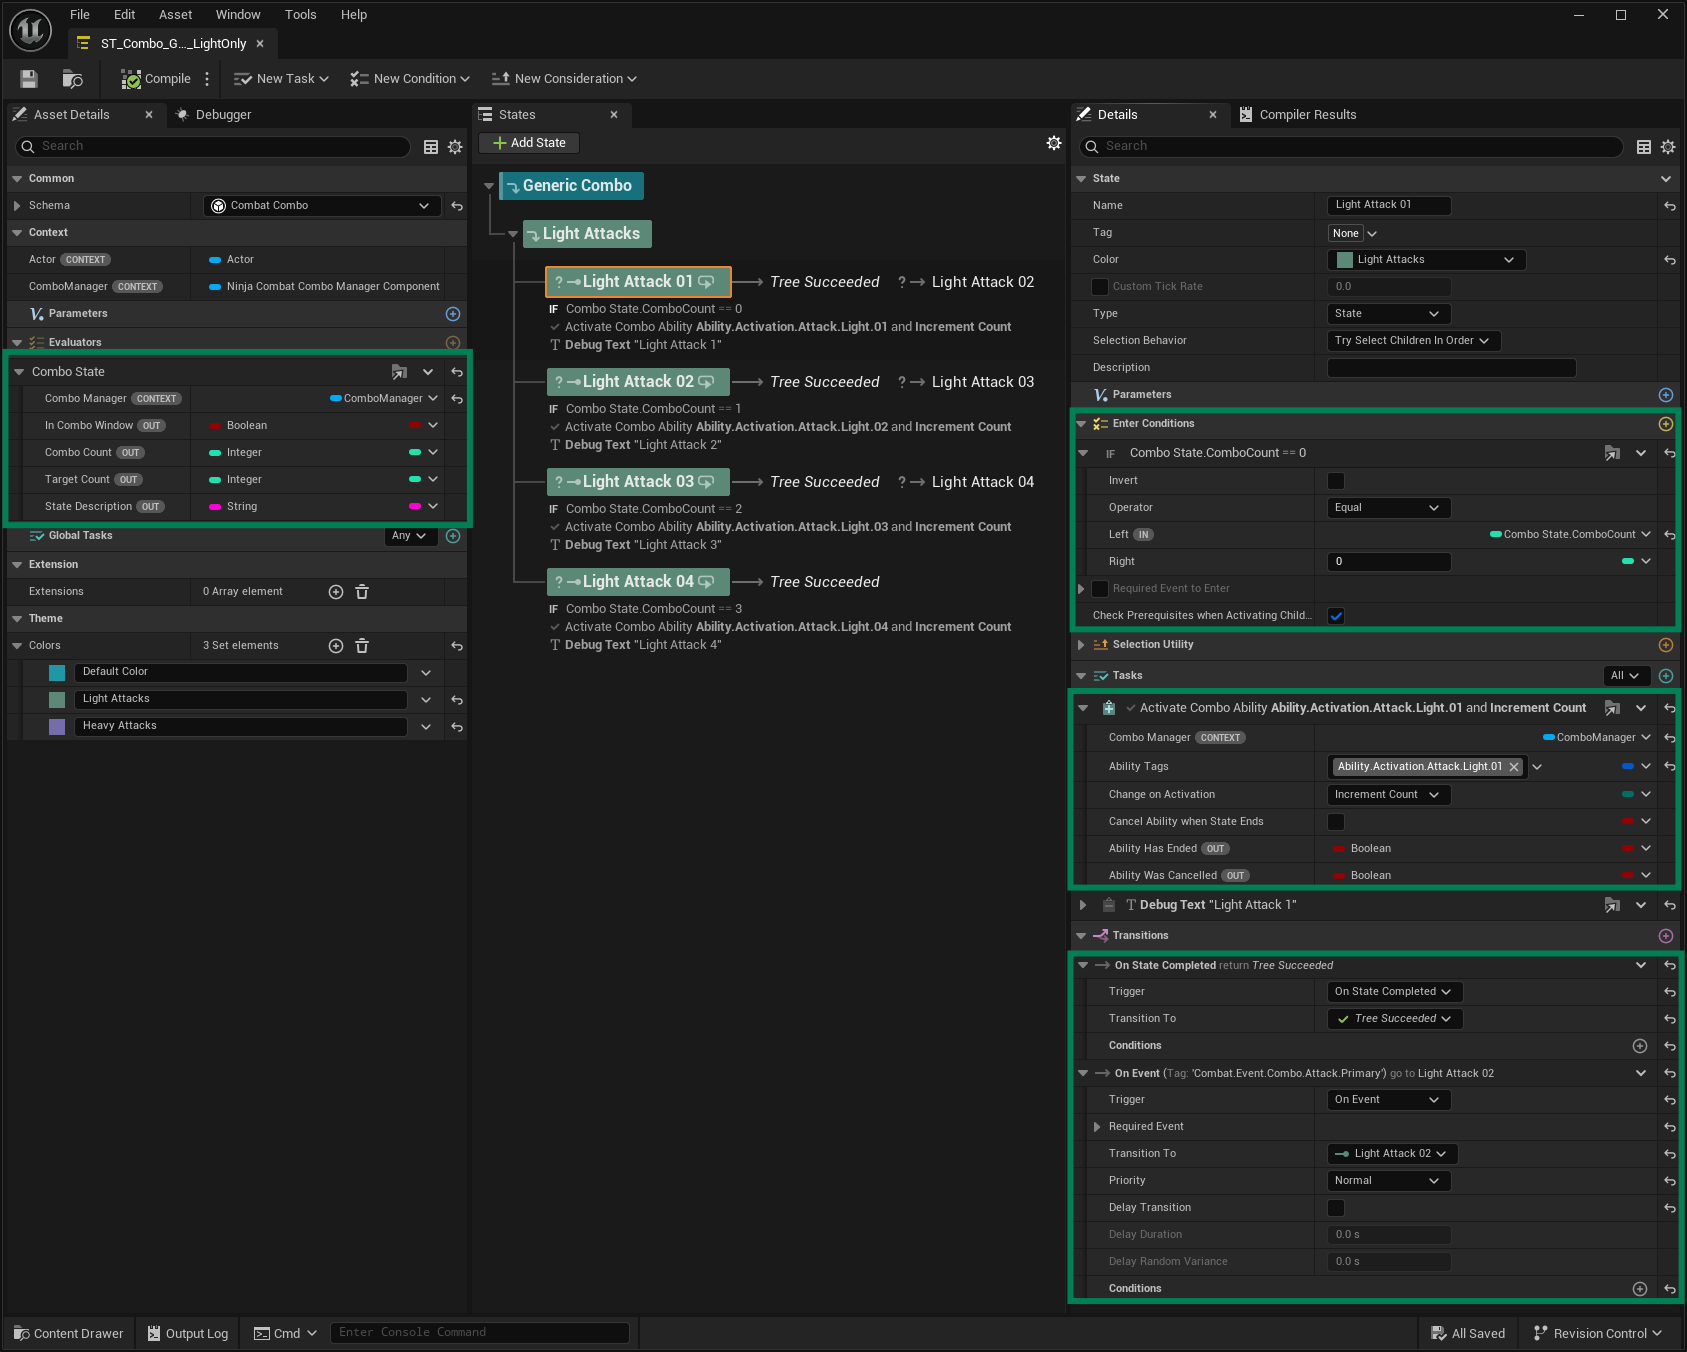
In your Content Browser, create a new State Tree and set its Schema to Combat Combo.
Add a new Evaluator, select Combo State, and bind the Combo State to the one available from the Context.
From the Root Node, add a new Child State for the Light Attacks.
From the Light Attacks node, add a new Child State for the first attack.
Add an Activate Combo Ability Task, bind the Combo Manager, and set the correct
Ability Tags(e.g.,Combat.Ability.Attack.Light.01).This tag matches the Activation Tag from the Gameplay Ability that represents this attack.
Add a Sibling State for the second attack and configure it with the next
Ability Tag(e.g.,Combat.Ability.Attack.Light.02).Add an Enter Condition checking if
ComboState.ComboCountequals1.Create additional states as needed for your combo sequence. Make sure each state uses the correct
Ability Tagand increments its Enter Condition appropriately.Return to the first attack state and add two Transitions.
For the first one, set the Trigger to Event, use
Combat.Event.Combo.Attack.Primaryas the Event Tag, and point it to the second state.For the second one, set the Trigger to On State Complete and configure the transition to Tree Succeeded.
Repeat this for all attack states, using the same Event Tag, but pointing each transition to the next state in the sequence.
Branching Combo
A branching combo allows different inputs or events to transition into different follow-up attacks from the same state.
Create a Branching Combo Tree
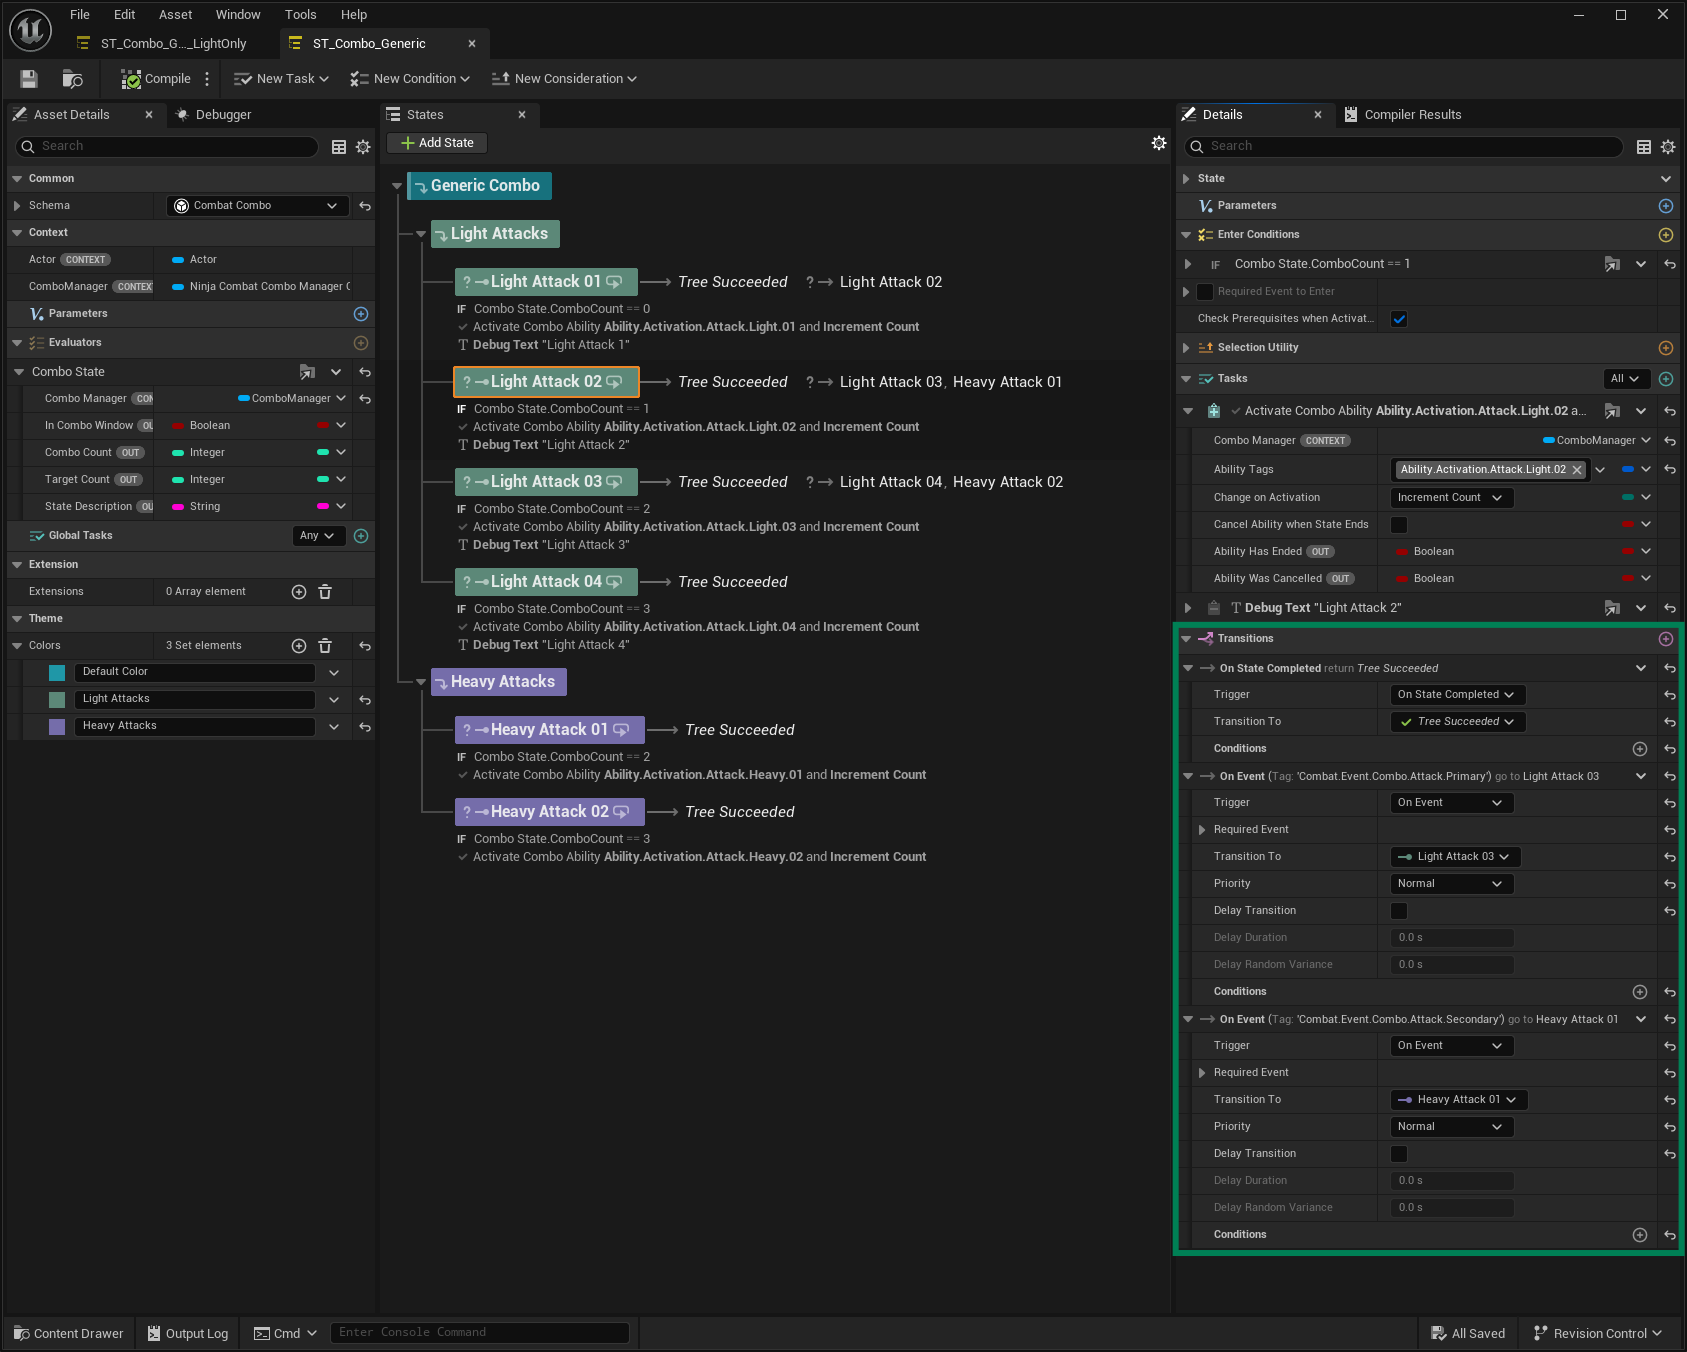
Duplicate your Linear Combo Tree.
From the Root Node, add a new Child State for the Heavy Attacks.
From the Heavy Attacks node, add a new Child State for the first attack.
Add an Activate Combo Ability Task, bind the Combo Manager, and set the correct
Ability Tags(e.g.,Combat.Ability.Attack.Heavy.01).Add an Enter Condition checking if
ComboState.ComboCountequals2, or any other number that represents this attack's index in your own combo.Create additional states as needed for your combo sequence. Make sure each state uses the correct
Ability Tagand increments its Enter Condition appropriately.Return to the Light Attack 02 state and add a new Transition.
Set the Trigger to Event, use
Combat.Event.Combo.Attack.Secondaryas the Event Tag, and point it to Heavy Attack 01.Add Event transitions between heavy attack states as needed, using
Combat.Event.Combo.Attack.Secondaryas the Event Tag.For each heavy attack state, also add an On State Complete transition to Tree Succeeded.
Multiple Starting Points
A combo can also support multiple entry states, allowing different abilities or inputs to begin different combo paths.
To accomplish this, two things must be configured:
The Combo Ability must activate automatically. This can be done by adding the
Ability.Passivetag to the list of Ability Tags.The Combo State Tree must start in a waiting state that keeps the Combo Window open and listens for Combo Events.
Create a Combo Tree with Multiple Starting Points
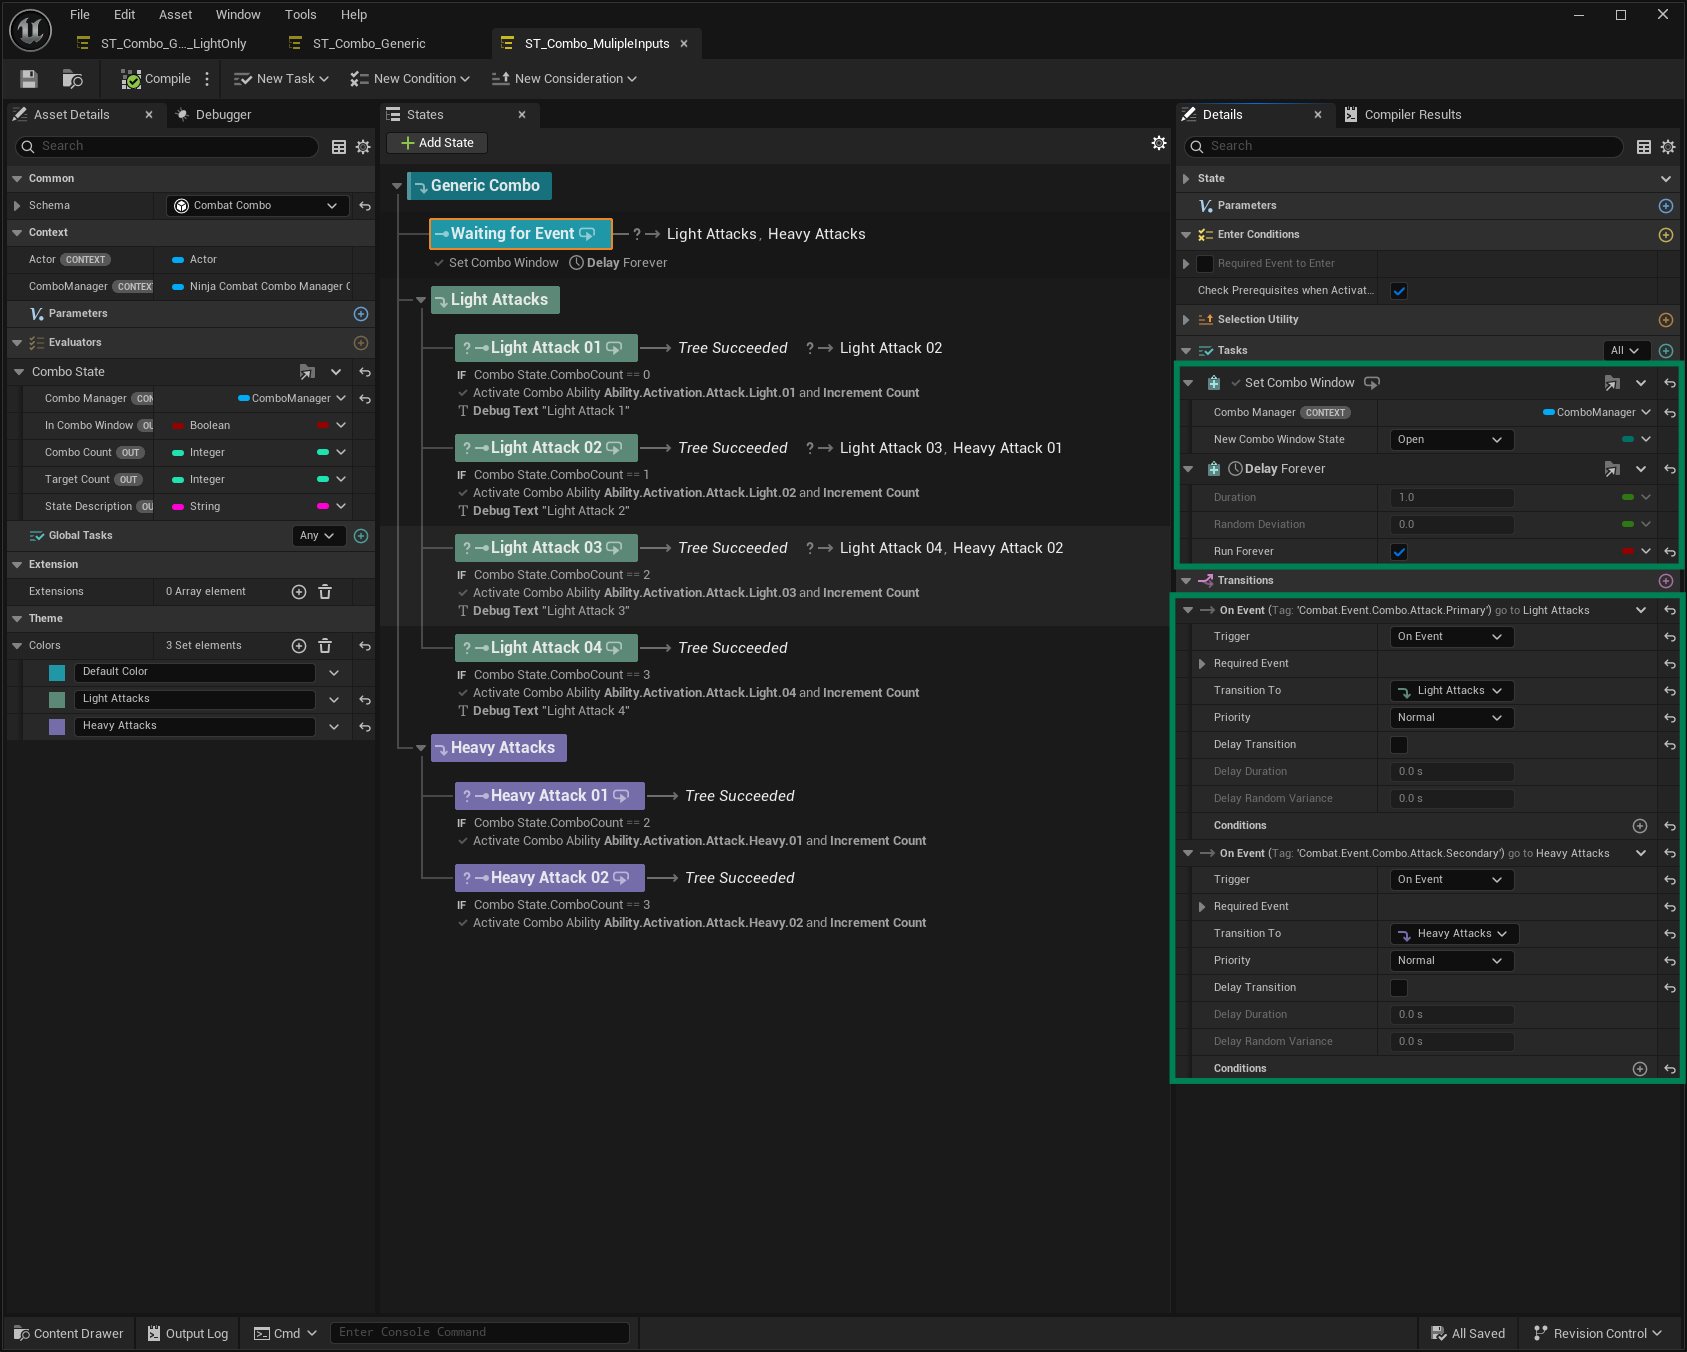
Duplicate your Branching Combo Tree.
From the Root Node, add a new Child State named Waiting for Event that will wait for any supported Combo Events.
Add a Set Combo Window task and set the New Combo Window State to Open.
Add a Delay task and set it to Run Forever.
Add transitions for each Combo Event supported by the Combo Tree.
For events tagged with
Combat.Event.Combo.Attack.Primary, add a transition to the Light Attacks node.For events tagged with
Combat.Event.Combo.Attack.Secondary, add a transition to the Heavy Attacks node.
Combo Gameplay Ability
The Combo Ability references the Combo Tree and grants the Gameplay Abilities that can be triggered by the combo. Once configured, it acts as the orchestration ability that starts and drives the Combo Manager.
Configure the Combo Gameplay Ability
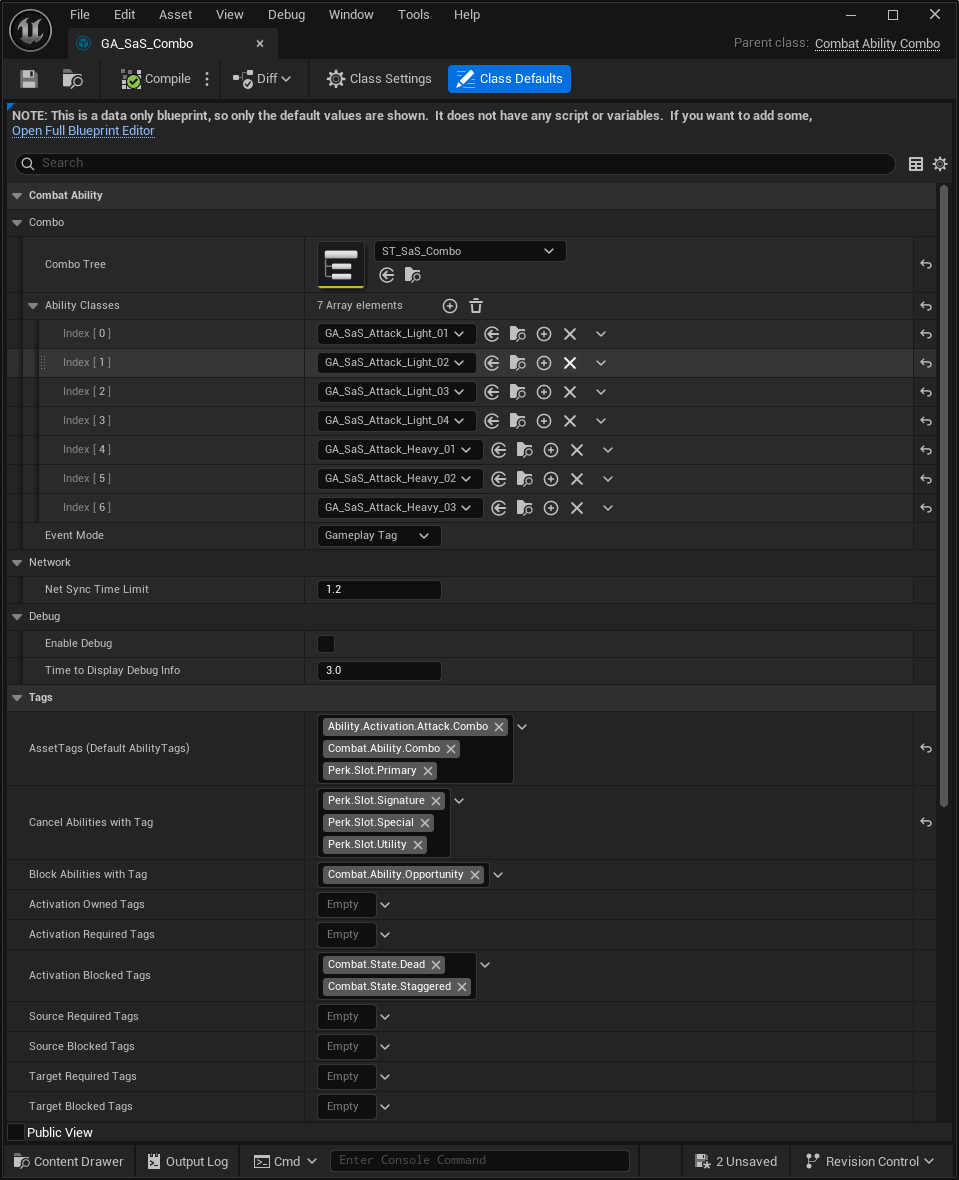
In your Combo Ability folder, create a new Gameplay Ability Blueprint using
CombatAbility_Comboas the base class.Set the appropriate Combo State Tree asset as the ability's Combo Tree.
Add all Gameplay Abilities orchestrated by this combo to the list of Ability Classes.
Configure the Ability Tags used to activate this Combo Ability.
Once the Combo Ability is granted, activating it will start the configured Combo Tree. From there, Combo Windows and Gameplay Events determine which ability is triggered next.