Building Cast Flows
This guide shows how to build common Cast Flows using the Cast Ability, Targeting Presets, Ability Targeting Actors, and Cast Actors.
For a deeper explanation of the systems and settings used by these examples, see the related concepts.
Prerequisites
Player Vitals Widget
Before following this guide, consider setting up your combat UI so you can track resource changes, such as mana costs and regeneration delays, while testing the examples. Alternatively, you can use the Gameplay Debugger for this purpose.
Input Handling
Make sure your input setup can activate the ability and confirm or cancel targeting for interactive Cast Flows. For more information, see Combat and Input Integration.
Integration with Ninja Input is optional, but input handling for ability activation should already be configured.
Gameplay Targeting System
Use this approach when the ability can rely on a Targeting Preset to find and filter valid targets. This is the most direct Cast Ability setup: the preset collects the targets, then the ability applies its configured Gameplay Effect to the results.
Create the Targeting Preset
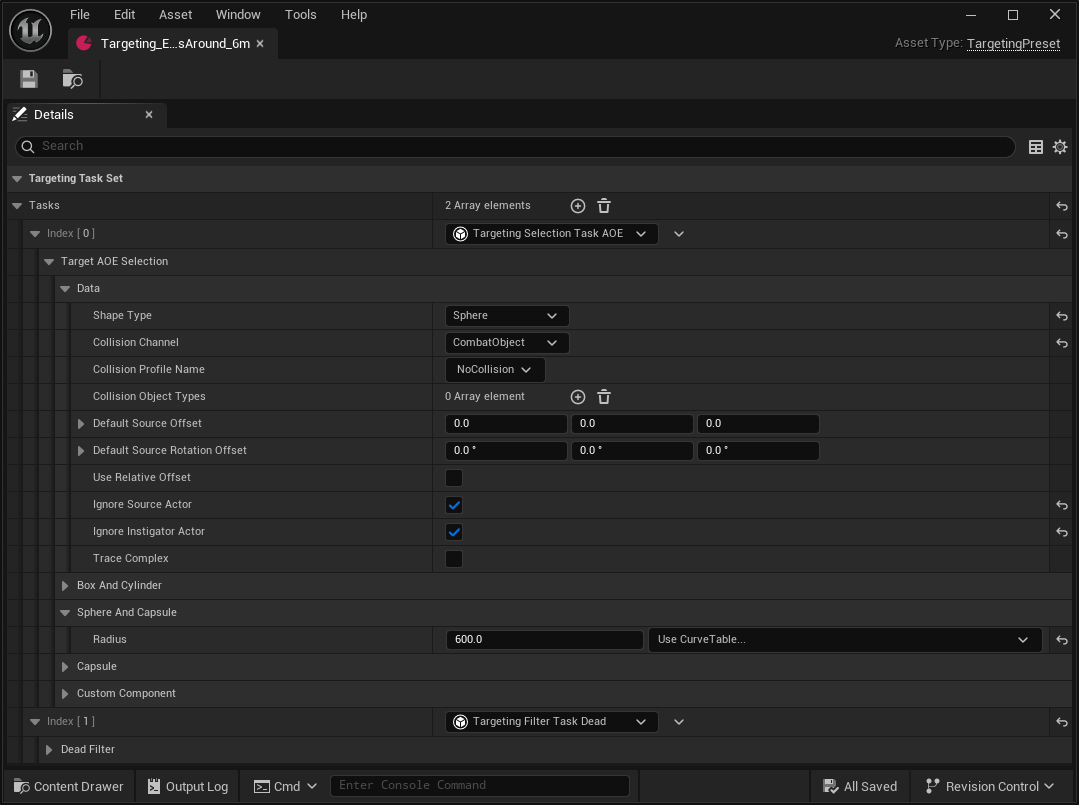
In your Targeting data folder, create a new Data Asset using
TargetingPresetas the base class.Add Targeting Selection Task AOE to the list of Tasks.
Configure the AOE task with the following values:
Shape Type: Sphere
Collision Channel:
CombatObjectIgnore Source Actor: enabled
Ignore Instigator Actor: enabled
Radius:
600
Add Targeting Filter Task Dead to the list of Tasks.
Create the Damage Gameplay Effect
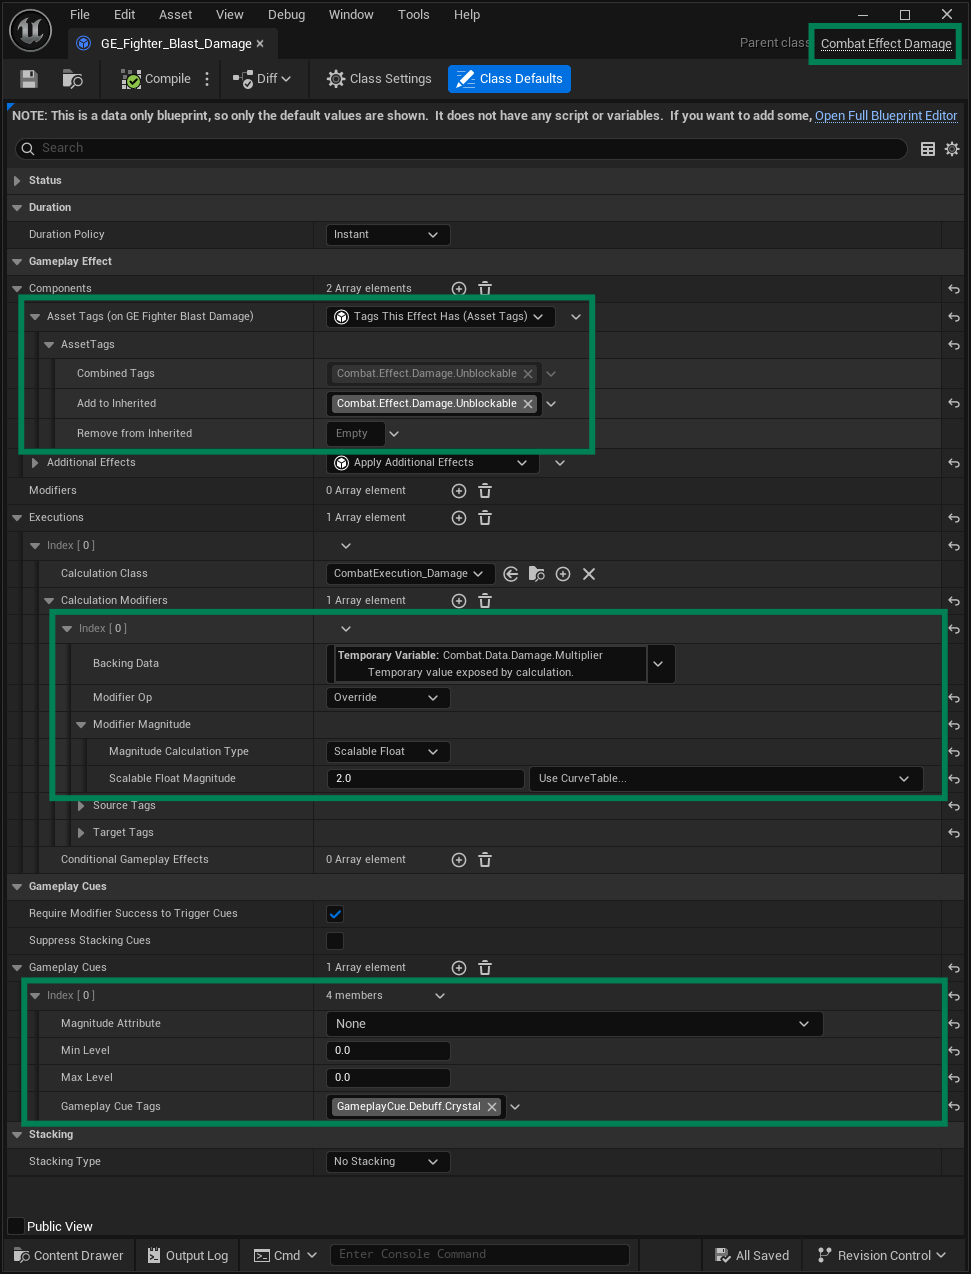
In your Cast Ability folder, create a new Gameplay Effect Blueprint using
CombatEffect_Damageas the base class.Add
Combat.Effect.Damage.Unblockableto Tags This Effect Has.Add a Calculation Modifier for the Calculation Class. Select Damage Multiplier Backing Data and set Scalable Float Magnitude to
2.0.Optionally, add a Gameplay Cue that should be applied to each target affected by the cast.
Create the Success Gameplay Effect
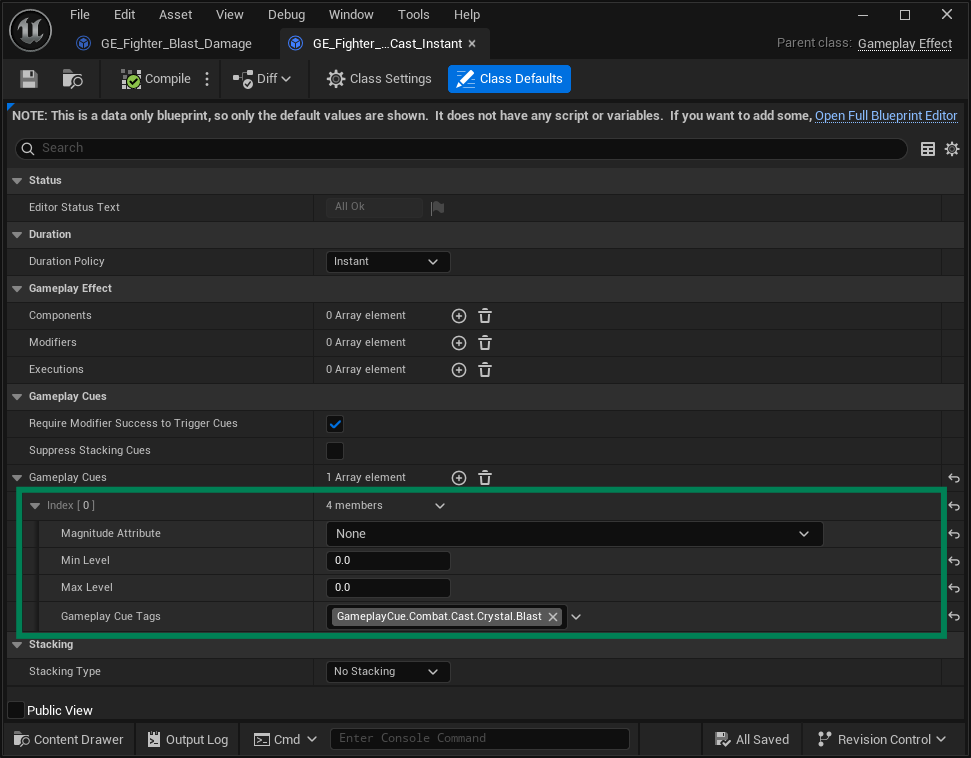
In your Cast Ability folder, create a new Gameplay Effect Blueprint using
GameplayEffectas the base class.Add a Gameplay Cue that should be applied to the instigator when the cast succeeds.
Create the Cost Gameplay Effect
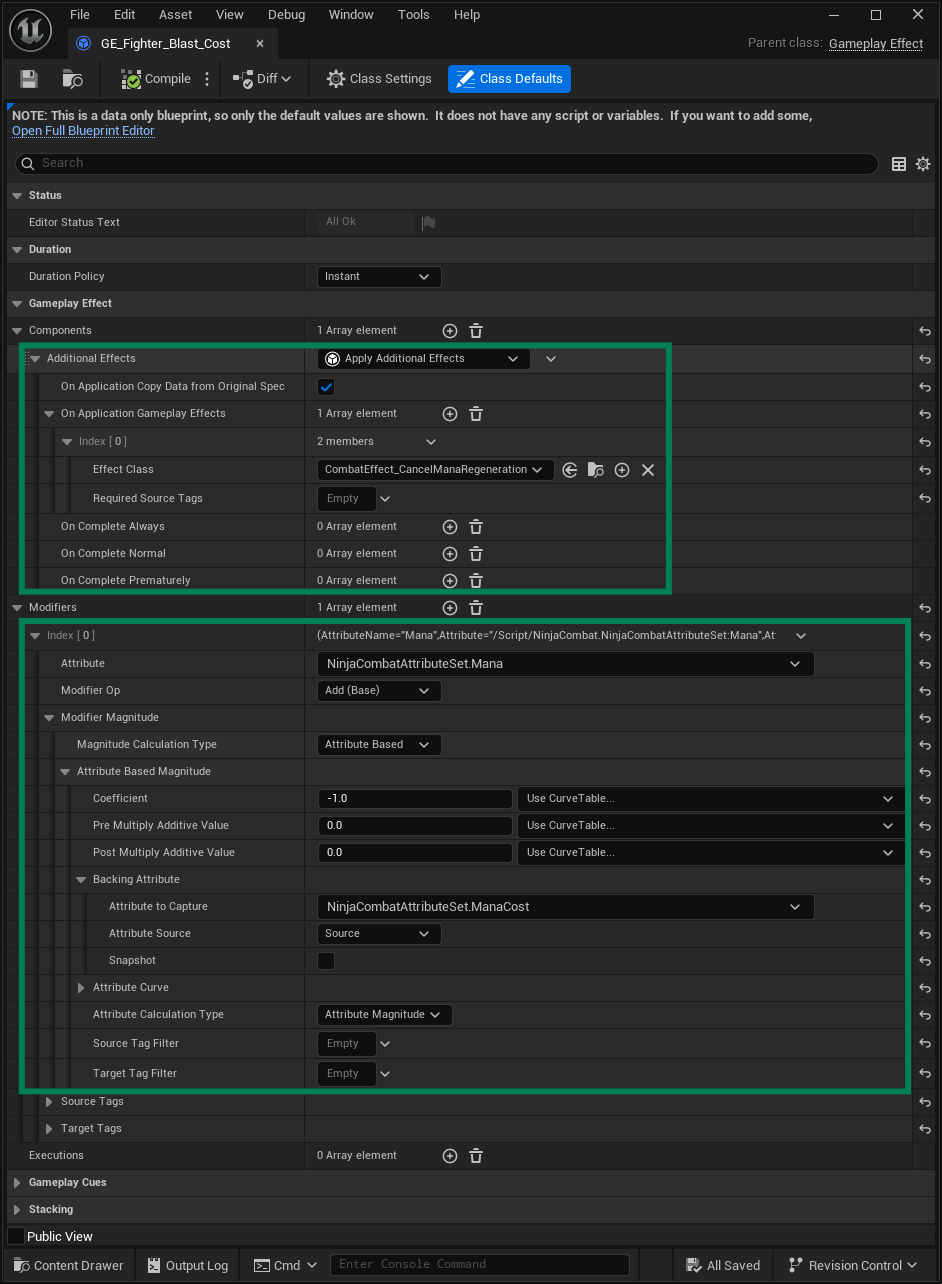
In your Cast Ability folder, create a new Gameplay Effect Blueprint using
GameplayEffectas the base class.Add an Apply Additional Effects component and add
CombatEffect_CancelManaRegeneration.This briefly interrupts mana regeneration, based on the
ManaRegenDelayattribute, after the mana cost is applied.Add a new Modifier and set the
ManaGameplay Attribute.Set Calculation Type to Attribute Based. Set Coefficient to
-1.0and setManaCostas the Attribute to Capture.You can adjust this further by changing the multiplier or connecting the value to a curve.
Create the Animation Montage
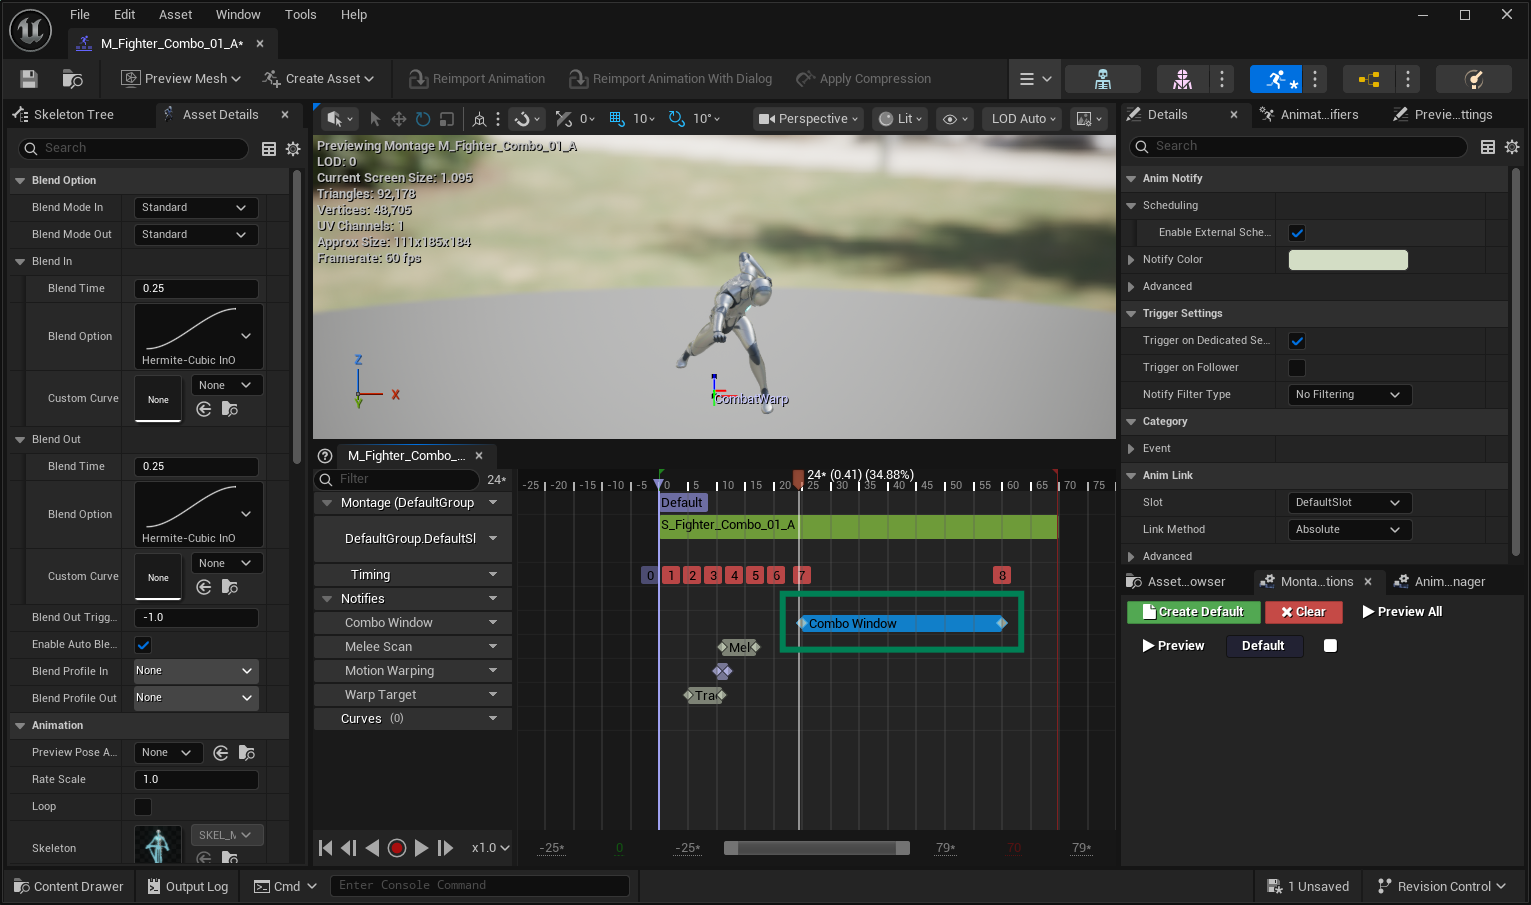
Select the Animation Sequence that represents the Cast Ability and create an Animation Montage from it.
If applicable, select the correct Slot for the Animation Montage, based on the setup in your Animation Instance.
Navigate to the point in the Animation Montage where the cast should trigger, then add the Trigger Cast Animation Notify.
Create the Cast Ability
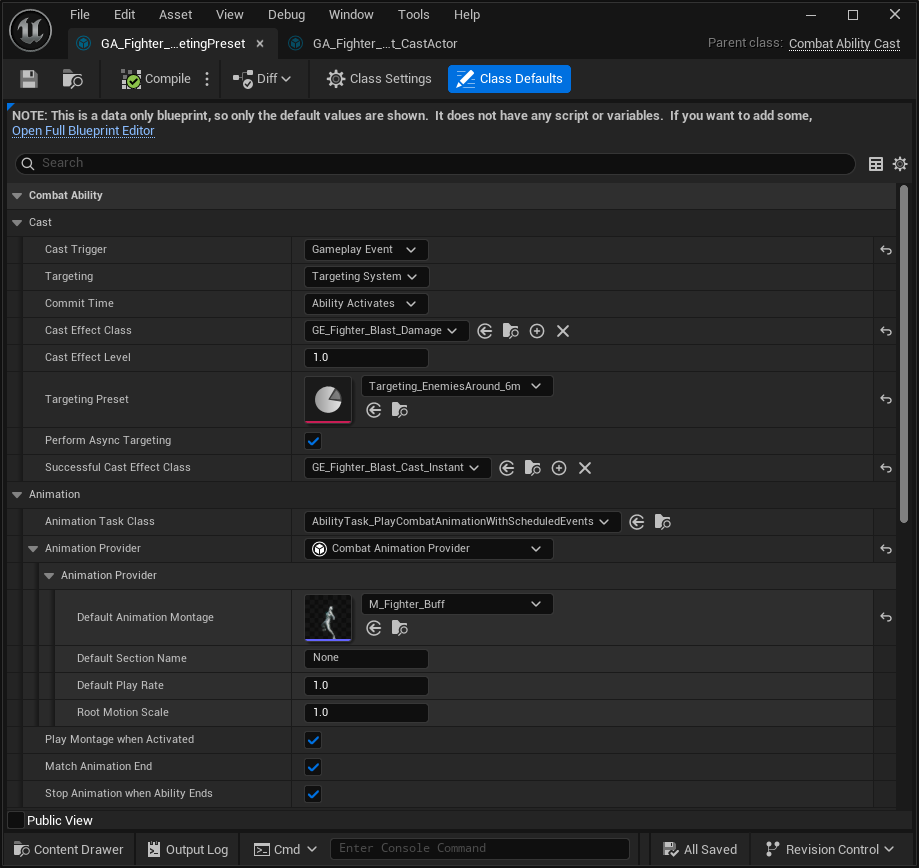
Create a new Gameplay Ability using
CombatAbility_Castas the base class, and name itGA_Cast_TargetingPreset.Configure the Cast Ability with the following values:
Cast Trigger: Gameplay Event
Targeting: Targeting System
Commit Time: Ability Activates
Cast Effect Class: Gameplay Effect created for the cast outcome
Targeting Preset: Targeting Preset created to select targets
Default Animation Montage: Animation Montage with the Trigger Cast Notify
Add any Gameplay Tags required to activate the ability.
Set Cost Effect Class to the Cost Gameplay Effect created for this ability.
Ability Targeting Actor
Use this approach when the ability needs to collect targets through the Gameplay Ability System's Targeting Actors. This supports the target actor types provided by GAS, including custom subclasses, making it useful for abilities that already fit the standard GAS targeting flow.
Create the Looping Animation Montage
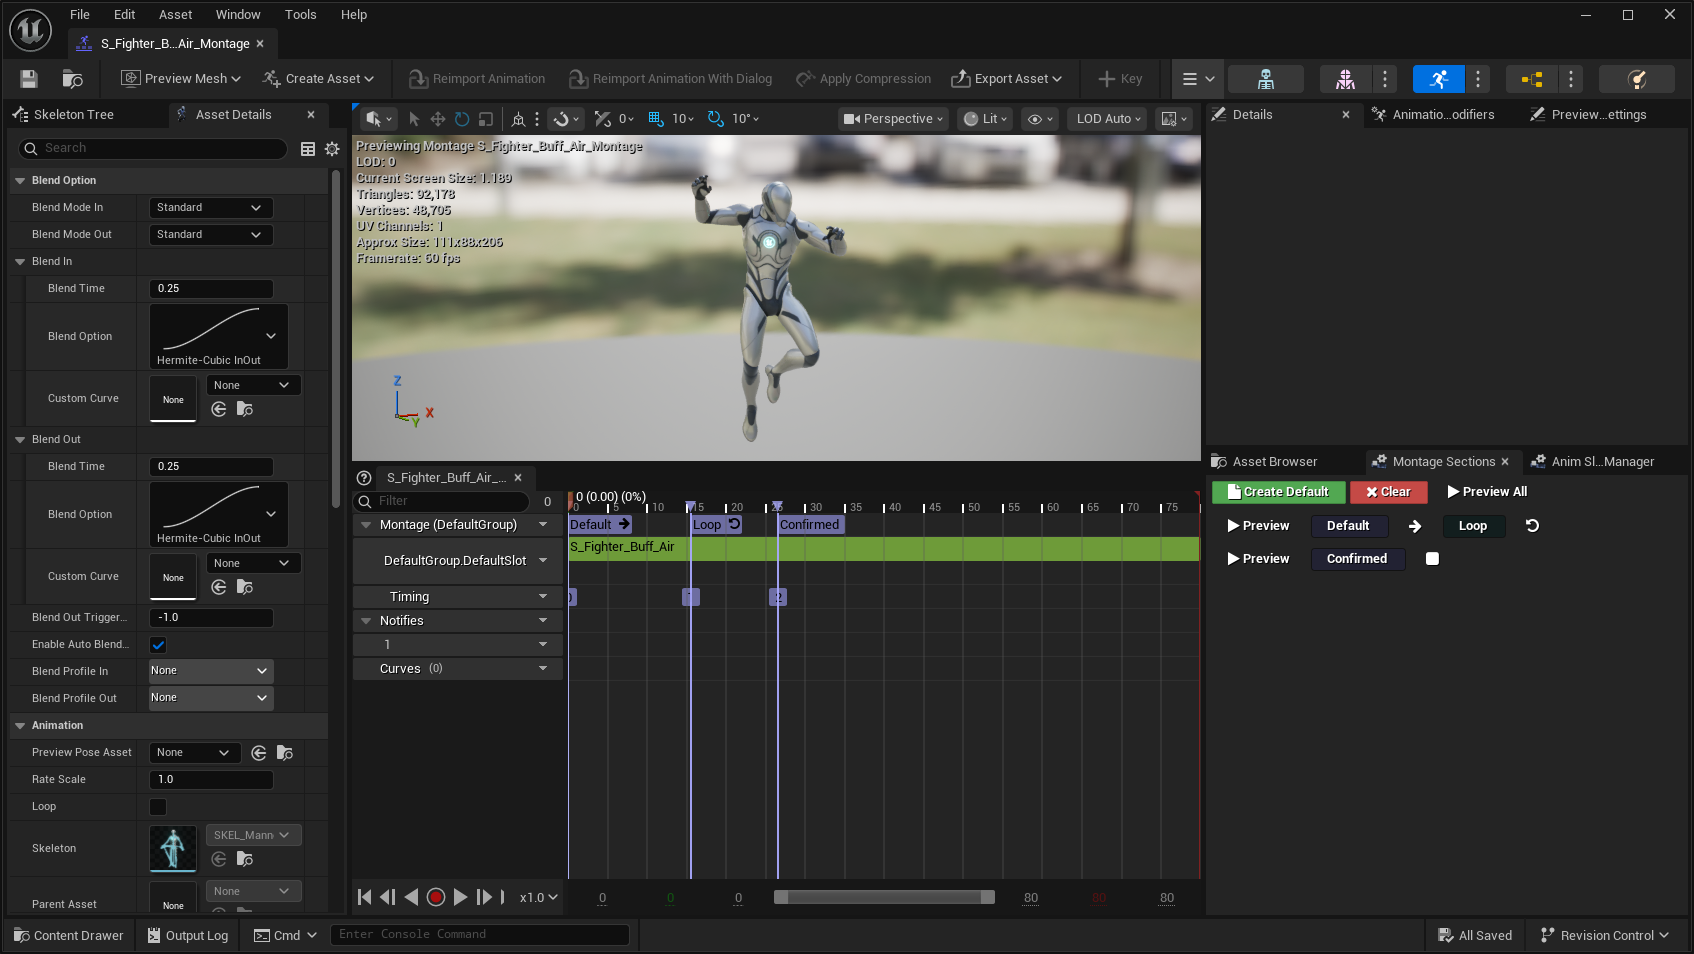
Select the Animation Sequence that represents the Cast Ability and create an Animation Montage from it.
If applicable, select the correct Slot for the Animation Montage, based on the setup in your Animation Instance.
Create a Loop section at the point where the ability should wait for target confirmation.
Create a Confirmed section at the point where the animation should continue after the cast is confirmed.
Configure the montage section transitions so Default transitions into Loop.
Configure the Loop section to transition into itself, so the animation keeps playing while the ability waits for confirmation.
Configure the Confirmed section as the section played after confirmation.
Create the Ability Targeting Actor
Create a new Ability Targeting Actor using
ANinjaCombatAbilityTargetingActoras the base class.Configure any visuals needed by the targeting actor, such as decals, meshes, particle effects, or other placement indicators.
Set Targeting Type to Targeting Preset.
Set Targeting Preset to the Targeting Preset created earlier in this guide.
Create the Cast Ability
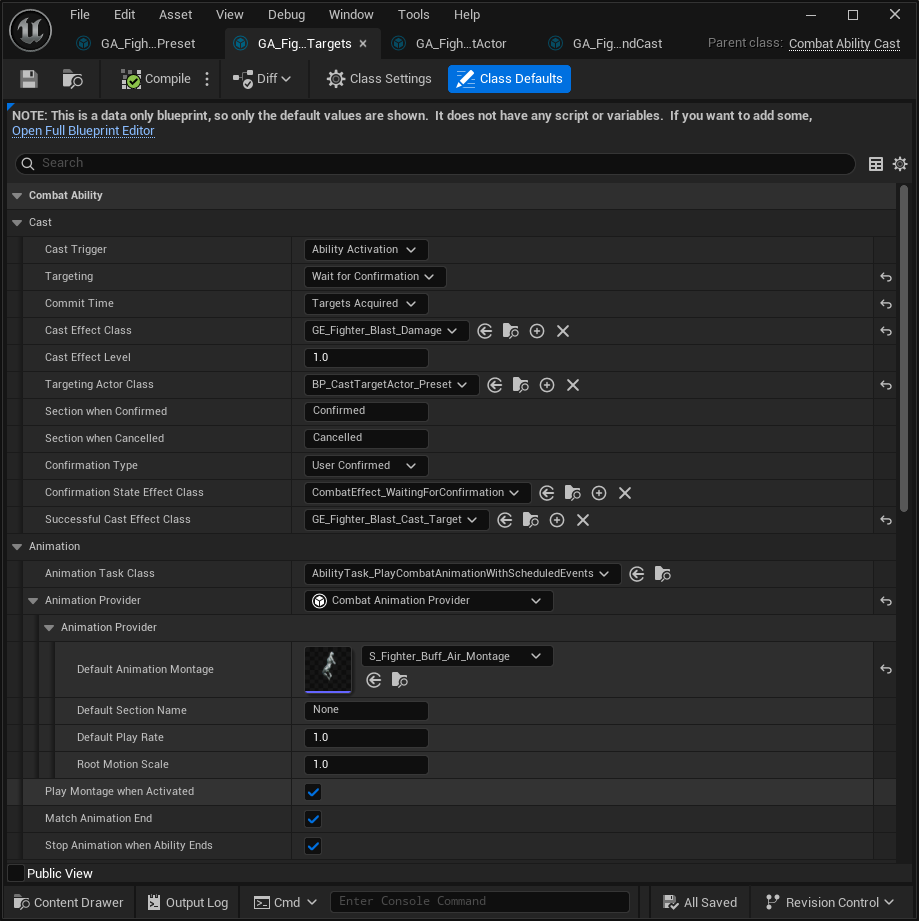
Duplicate the Cast Ability created in the Gameplay Targeting System section,
GA_Cast_TargetingPreset, and name the new abilityGA_Cast_Confirm.Configure the Cast Ability with the following values:
Cast Trigger: Ability Activation
Targeting: Wait for Confirmation
Commit Time: Targets Acquired
Confirmation Type: User Confirmed
Targeting Actor Class: the Ability Targeting Actor created in the previous procedure
Default Animation Montage: the Animation Montage with the Loop and Confirmed sections
Cast Actor
Use this approach when the ability should spawn a dedicated Cast Actor into the world. The Cast Actor is responsible for collecting targets, usually through collision or overlap logic, and applying the Gameplay Effect set in the ability.
Create the Cast Actor
In your Blueprints folder, create a new Cast Actor Blueprint using
NinjaCombatCastActor_Sphereas the base class.Review the default Cast Behaviors and adjust settings as needed:
In the Floor Alignment behavior, set the Floor Trace Channel to
FloorIn the Cast Effect behavior, set the Hit Result Channel to
CombatObjectIn the Dissipation behavior, adjust the Active Duration as needed.
Add a Niagara Component and an Audio Component to the Root Sphere. Set Auto Activate to
falseon both components.In the My Blueprint tab, expand Overridable Functions and select
StartCast. This adds the event to the Event Graph.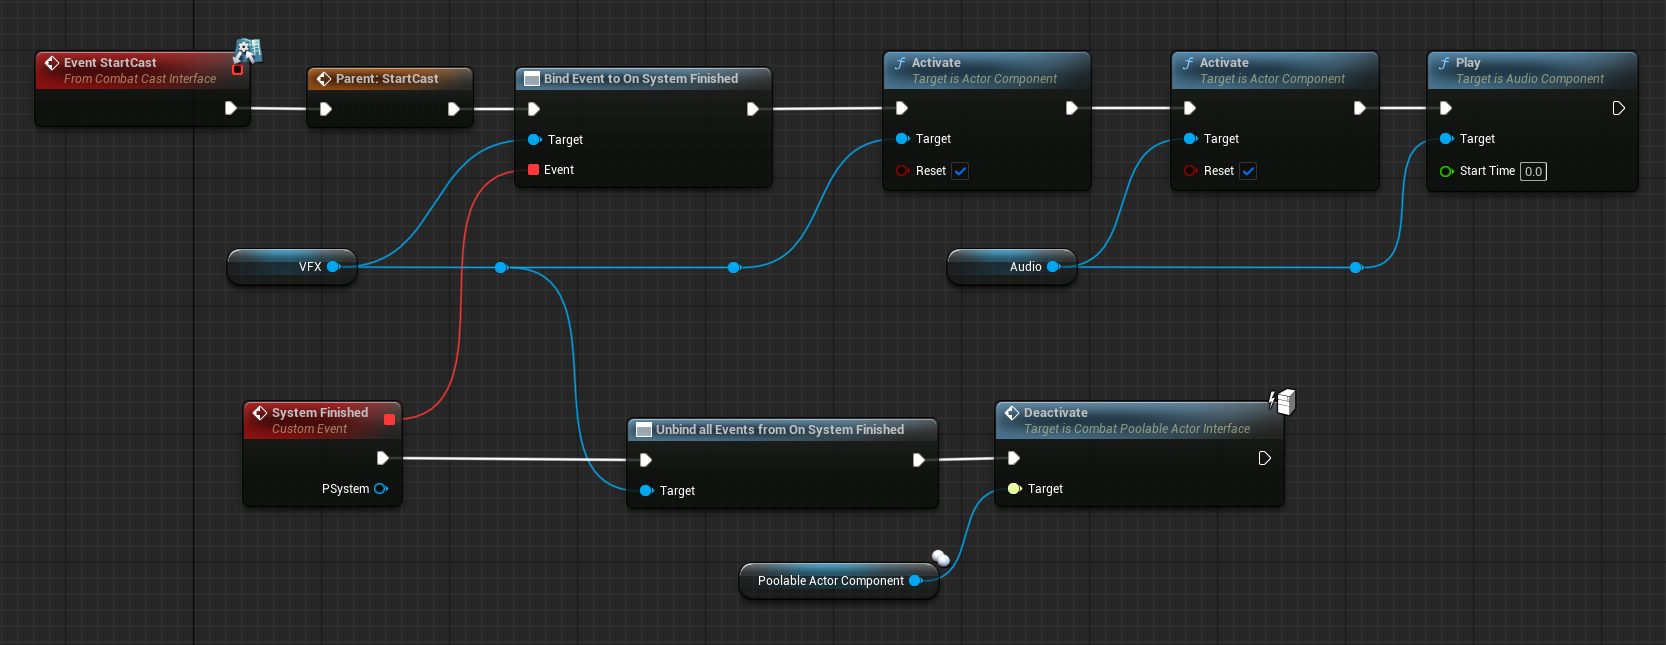
Right-click the
StartCastnode and select Add Call to Parent Function. Connect the parent function call to the event.Bind a new event to the Niagara Component's System Finished delegate.
Activate the VFX and Audio components. Make sure both components are set to Reset, then call Play on the audio component.
In the System Finished event, unbind the callback and deactivate the Poolable Actor through the Poolable Actor Component.
Close the base Blueprint and create a new Child Blueprint. This child Blueprint is the one that will be used by the ability.
Assign the Niagara System and Sound assets that should be used by this Cast Actor.
Set the Gameplay Effect applied by the Cast Actor, to the Cast Effect Class.
Create the Cast Ability
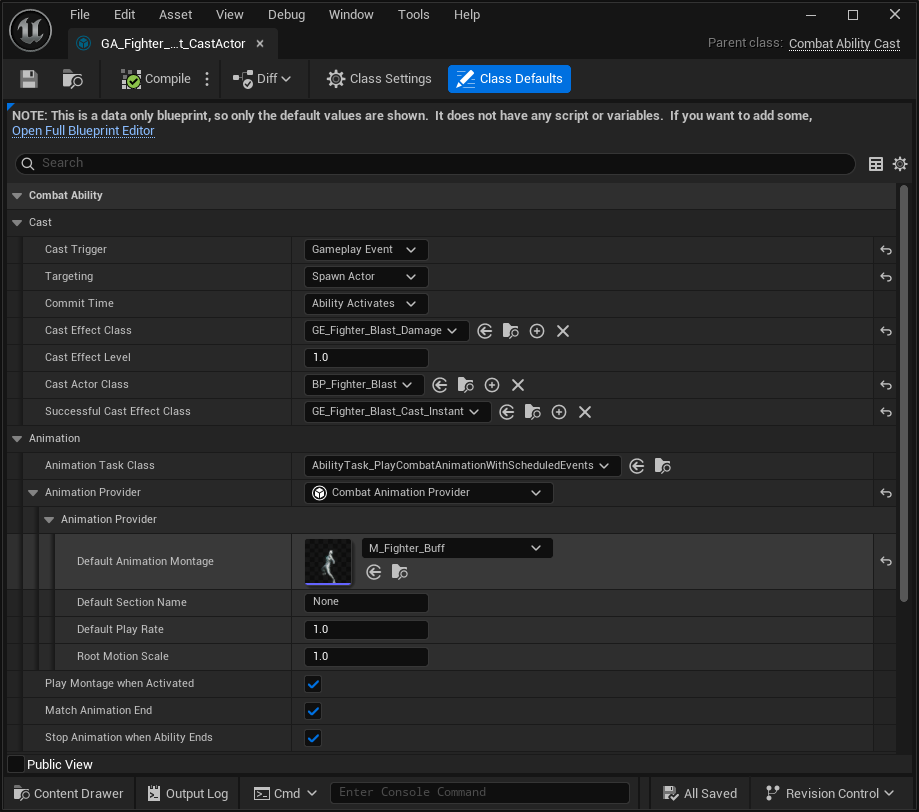
Duplicate the Cast Ability created in the Gameplay Targeting System section,
GA_Cast_TargetingPreset, and name the new abilityGA_Cast_CastActor.Set Targeting to Cast Actor.
Set Cast Actor Class to the Cast Actor created in the previous procedure.
Make sure Successful Cast Effect Class is set to the Success Gameplay Effect created earlier in this guide.
This is the same Gameplay Effect created for the
GA_Cast_TargetingPreset, so no changes should be needed here.
Targeted Cast Actor
Use this approach when the ability needs a targeting step before spawning the Cast Actor. The Ability Targeting Actor selects where the cast should happen, then the ability spawns a Cast Actor at that location to collect targets and apply the configured Gameplay Effect.
Create the Ability Targeting Actor
Create a new Child Blueprint using the Ability Targeting Actor created in the previous section as the parent class.
Set Targeting Type to Targeting Preset.
Set Targeting Preset to the Targeting Preset created earlier in this guide.
Create the Cast Ability
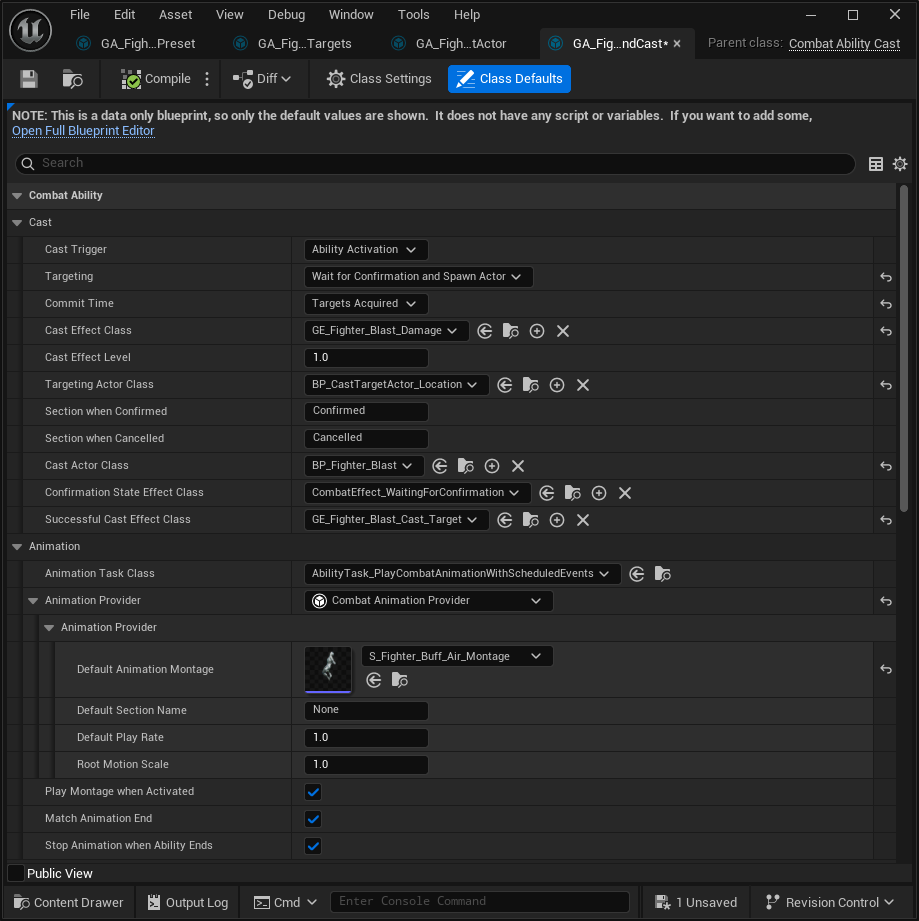
Duplicate the Cast Ability created in the Ability Targeting Actor section,
GA_Cast_Confirm, and name the new abilityGA_Cast_SelectLocation.Set Targeting to Wait for Confirmation and Spawn Actor.
Set Targeting Actor Class to the Ability Targeting Actor created in the previous procedure.
Set Cast Actor Class to the Cast Actor created earlier in this guide.