First Steps with Ninja Inventory
This page guides you through the first steps for Ninja Inventory. Make sure to check the Inventory Setup instructions before continuing.
This page assumes that your project has access to the Gameplay Ability System, but a full GAS implementation is not required for this first inventory setup. If you are using Ninja G.A.S., the same concepts can transfer to other G.A.S. setups.
The following steps aim to provide an inventory owner with an initialized Inventory Manager, a default container, and a simple item stored in that container.
It is also recommended that your Gameplay Debugger is configured, so you can inspect the inventory state during gameplay.
Inventory Attributes
Ninja Inventory can use Gameplay Attributes for inventory-related gameplay values, such as capacity, weight, and wealth.
For this first setup, inventory attributes are optional. You can skip this section if your project does not need attribute-driven inventory behavior yet.
Add Inventory Attributes using Ninja G.A.S.
Create a new Data Table for your Inventory Attributes, using
AttributeMetaDataas the table row structure.Download the Sample Initialization Data and use it as the table data.
Create a new G.A.S. Setup Data Asset and add a new Default Attribute Set entry.
You can do so by right-clicking an empty area in the Content Browser, then navigating to Ninja Bear Studio → Ninja G.A.S. → G.A.S. Setup.
Add the Ninja Inventory Attribute Set,
NinjaInventoryAttributeSet, and the data table as the Attribute Table.Set the new GAS Setup Data to the character's Ability System Component.
Default Container
Containers define where items can be stored. For this first setup, we will create a simple default container using the Simple Layout, which is a position-based type of storage.
Create a Default Container
Create a new Container Definition Data Asset in the Containers folder configured in the Asset Manager.
You can do so by right-clicking an empty area in the Content Browser, then navigating to Ninja Bear Studio → Ninja Inventory → Container Definition.
Name it
Container_Backpack.Add
Inventory.Container.Trait.DefaultandInventory.Container.Type.Backpackas the Gameplay Tags that define and identify this container.Configure the Layout as a Simple Layout and set Slots to
12.Set the Priority to
10so other high-priority containers can take precedence.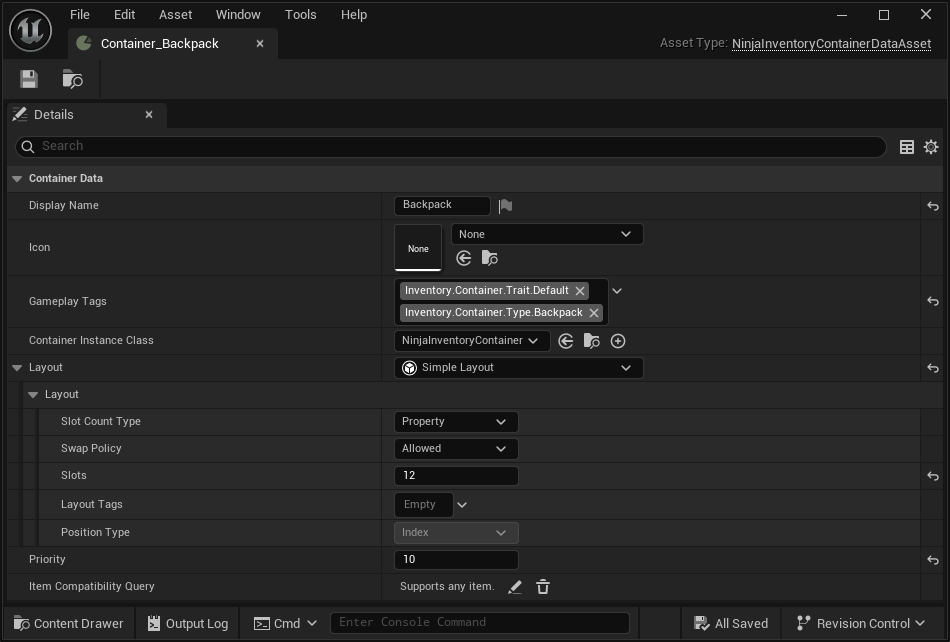
Simple Item
Items are defined via aggregation, through Item Fragments. For this first setup, we will create a simple stackable item that can be stored in a container and displayed in the user interface.
Create a Simple Item
Create a new Item Definition Data Asset in the Items folder configured in the Asset Manager.
You can do so by right-clicking an empty area in the Content Browser, then navigating to Ninja Bear Studio → Ninja Inventory → Item Definition.
Name it
Ammo_Rifle, or another simple item name that fits your project.Add a Container Storage fragment so the item can be stored in inventory containers.
Add a User Interface fragment, set the Display Name, Category, Description and Icon.
Add a Stack fragment, set the Maximum Quantity to
900and the Stack Limit to90.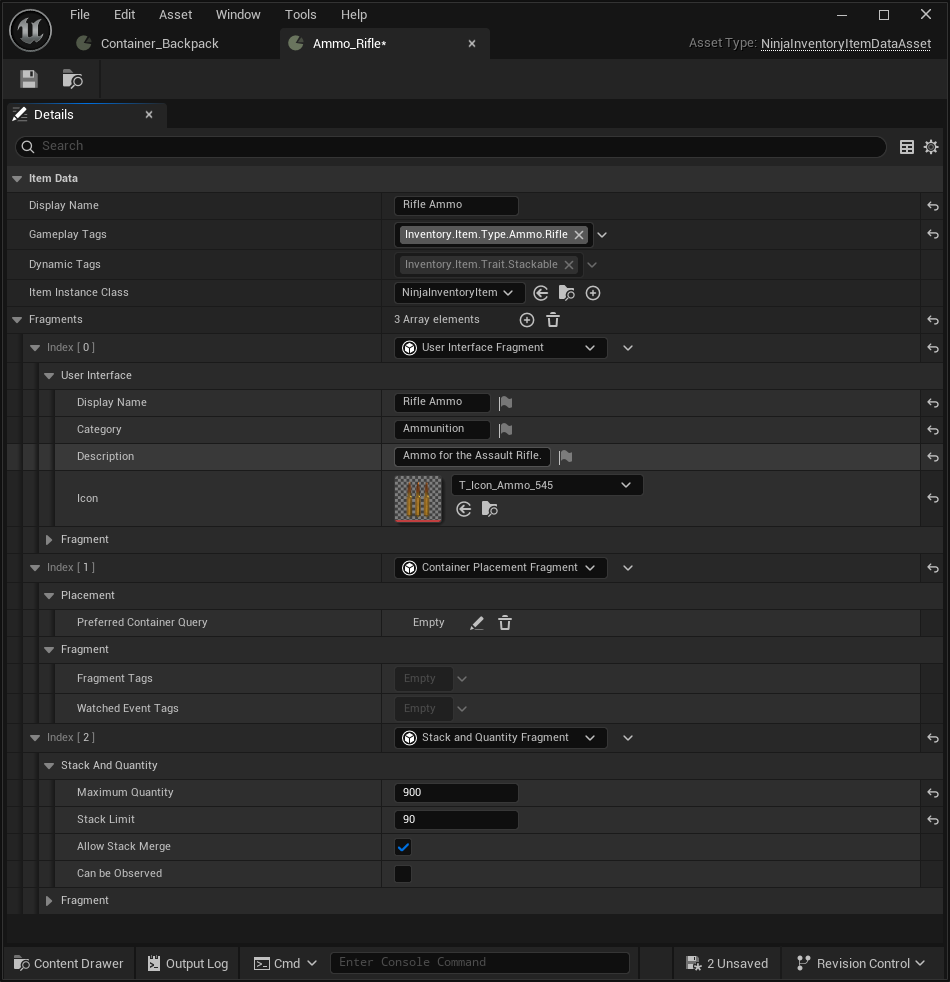
Inventory Manager Component
The Inventory Manager Component owns the runtime inventory state. It should be added to the actor that represents the inventory owner. For players, this usually means one of these options:
Player State: The inventory should persist across pawn changes, respawns, or possession changes.
Player Pawn: The inventory belongs to the current pawn and can reset when the pawn changes.
Add the Inventory Manager Component
Open the Player State or Player Pawn that should own the inventory.
Add the Inventory Manager Component,
NinjaInventoryManagerComponent.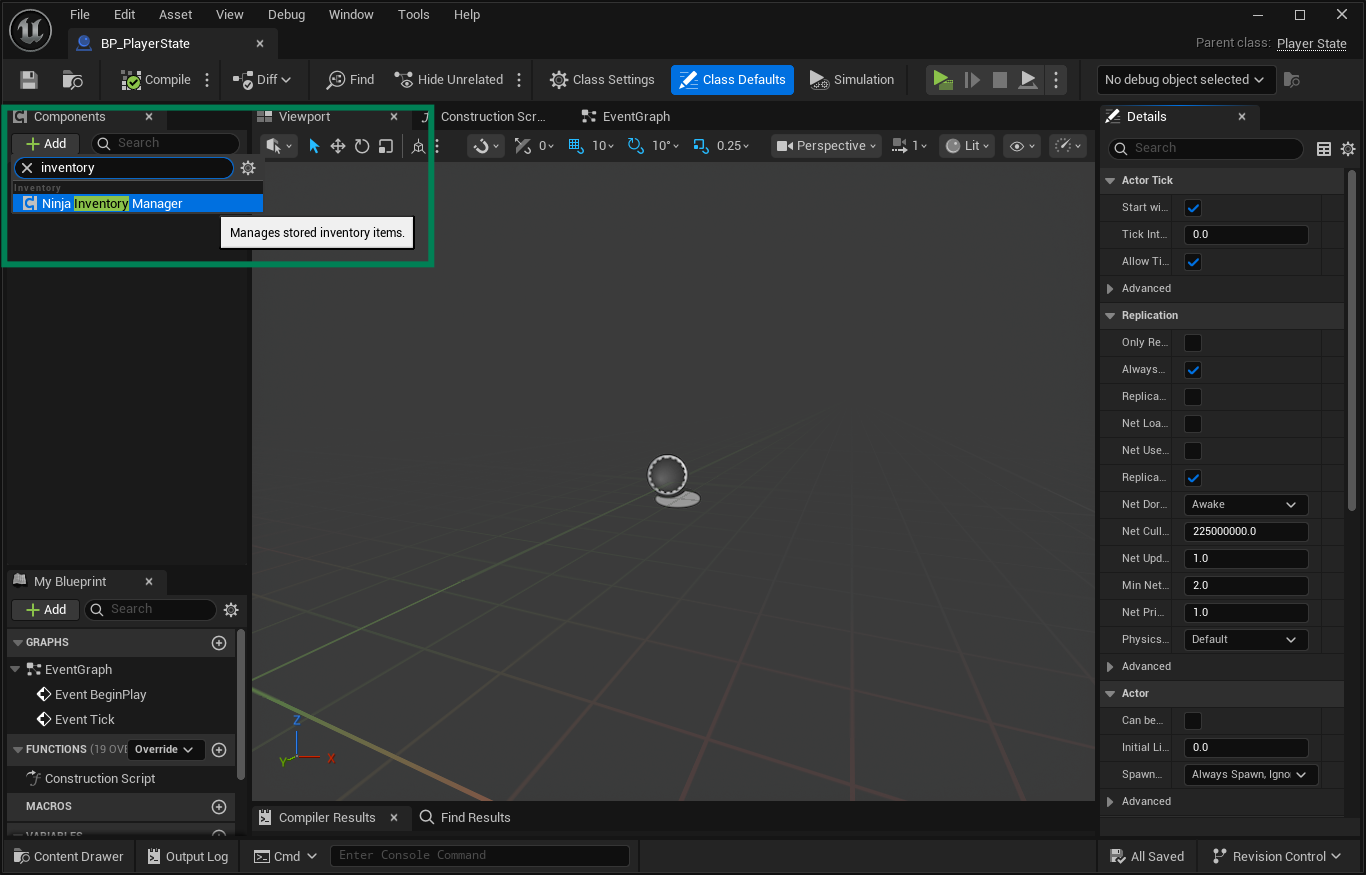
Header
public: ANBSPlayerState(const FObjectInitializer& ObjectInitializer); private: /** Inventory Manager component. */ UPROPERTY(EditDefaultsOnly, BlueprintReadOnly, Category = "Components", meta = (AllowPrivateAccess = "true")) TObjectPtr<UNinjaInventoryManagerComponent> InventoryManager;Implementation
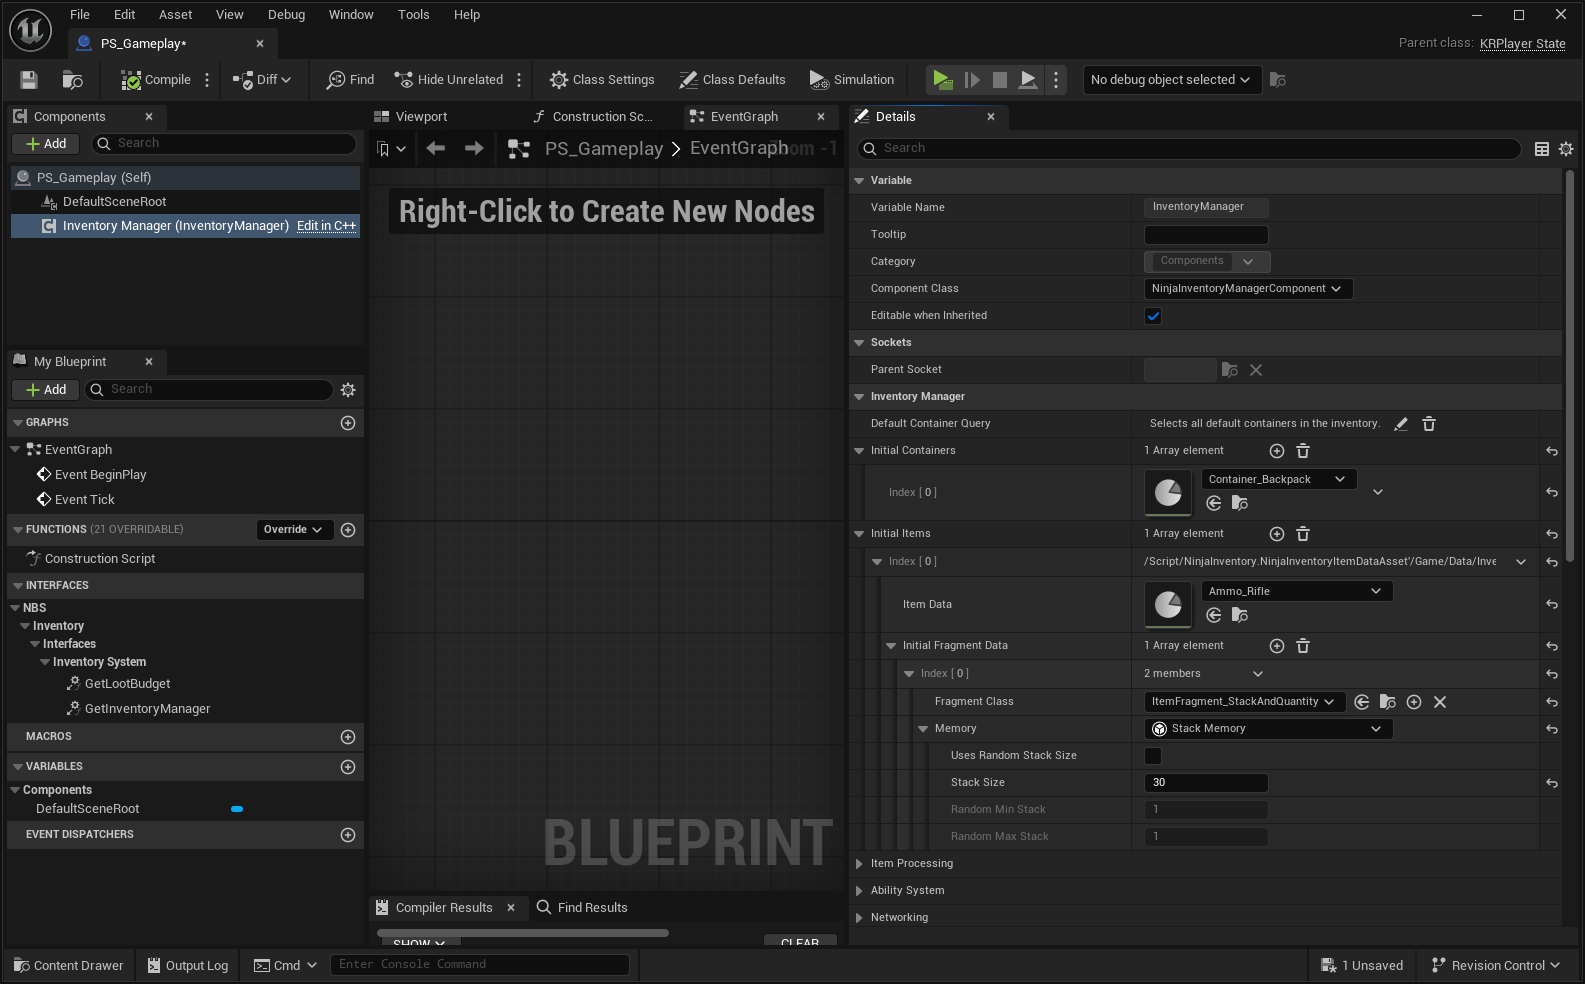
#include "Components/NinjaInventoryManagerComponent.h" ANBSPlayerState::ANBSPlayerState(const FObjectInitializer& ObjectInitializer) : Super(ObjectInitializer) { InventoryManager = CreateDefaultSubobject<UNinjaInventoryManagerComponent>(TEXT("InventoryManager")); }Navigate to the Inventory Manager category in the Inventory Manager Component.
Add the
Container_Backpackasset to the list of Initial Containers.Add the
Ammo_Rifleasset to the list of Initial Items.Add a new entry to the item's Initial Fragment Data.
Select ItemFragment_StackAndQuantity as the Fragment Class.
Select Stack Memory as the Memory and set the Stack Size to
30.
Inventory System Interface
To avoid repeated component lookups, you can optionally have the Actor or Player State implement InventorySystemInterface, which is recommended.
Add the Inventory System Interface
In your inventory owner (Actor or Player State), add the
InventorySystemInterface.Implement the
GetInventoryManagerfunction so it returns the Inventory Manager Component.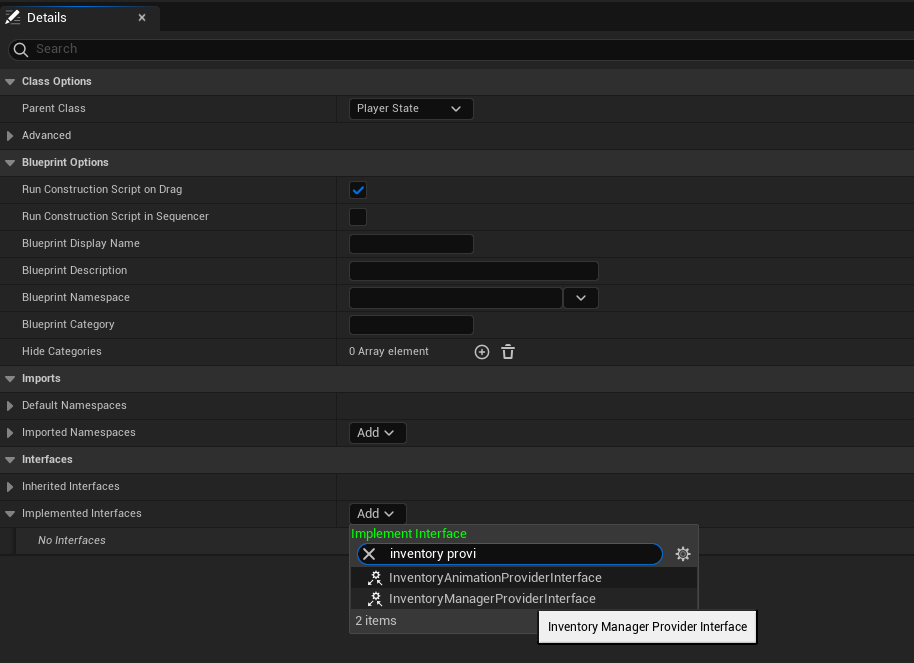
Header
// Ninja Bear Studio Inc., all rights reserved. #pragma once #include "CoreMinimal.h" #include "GameFramework/PlayerState.h" #include "Interfaces/InventorySystemInterface.h" #include "NBSPlayerState.generated.h" class UNinjaInventoryManagerComponent; UCLASS() class NBSTECH_API ANBSPlayerState : public APlayerState, public IInventorySystemInterface { GENERATED_BODY() public: ANBSPlayerState(const FObjectInitializer& ObjectInitializer); // -- Begin InventorySystem implementation virtual UNinjaInventoryManagerComponent* GetInventoryManager_Implementation() const override; // -- End InventorySystem implementation private: /** Inventory Manager component. */ UPROPERTY(EditDefaultsOnly, BlueprintReadOnly, Category = "Components", meta = (AllowPrivateAccess = "true")) TObjectPtr<UNinjaInventoryManagerComponent> InventoryManager; };Implementation
// Ninja Bear Studio Inc., all rights reserved. #include "GameFramework/NBSPlayerState.h" #include "Components/NinjaInventoryManagerComponent.h" ANBSPlayerState::ANBSPlayerState(const FObjectInitializer& ObjectInitializer) : Super(ObjectInitializer) { InventoryManager = CreateDefaultSubobject<UNinjaInventoryManagerComponent>(TEXT("InventoryManager")); } UNinjaInventoryManagerComponent* ANBSPlayerState::GetInventoryManager_Implementation() const { return InventoryManager; }
Evaluating the Inventory State
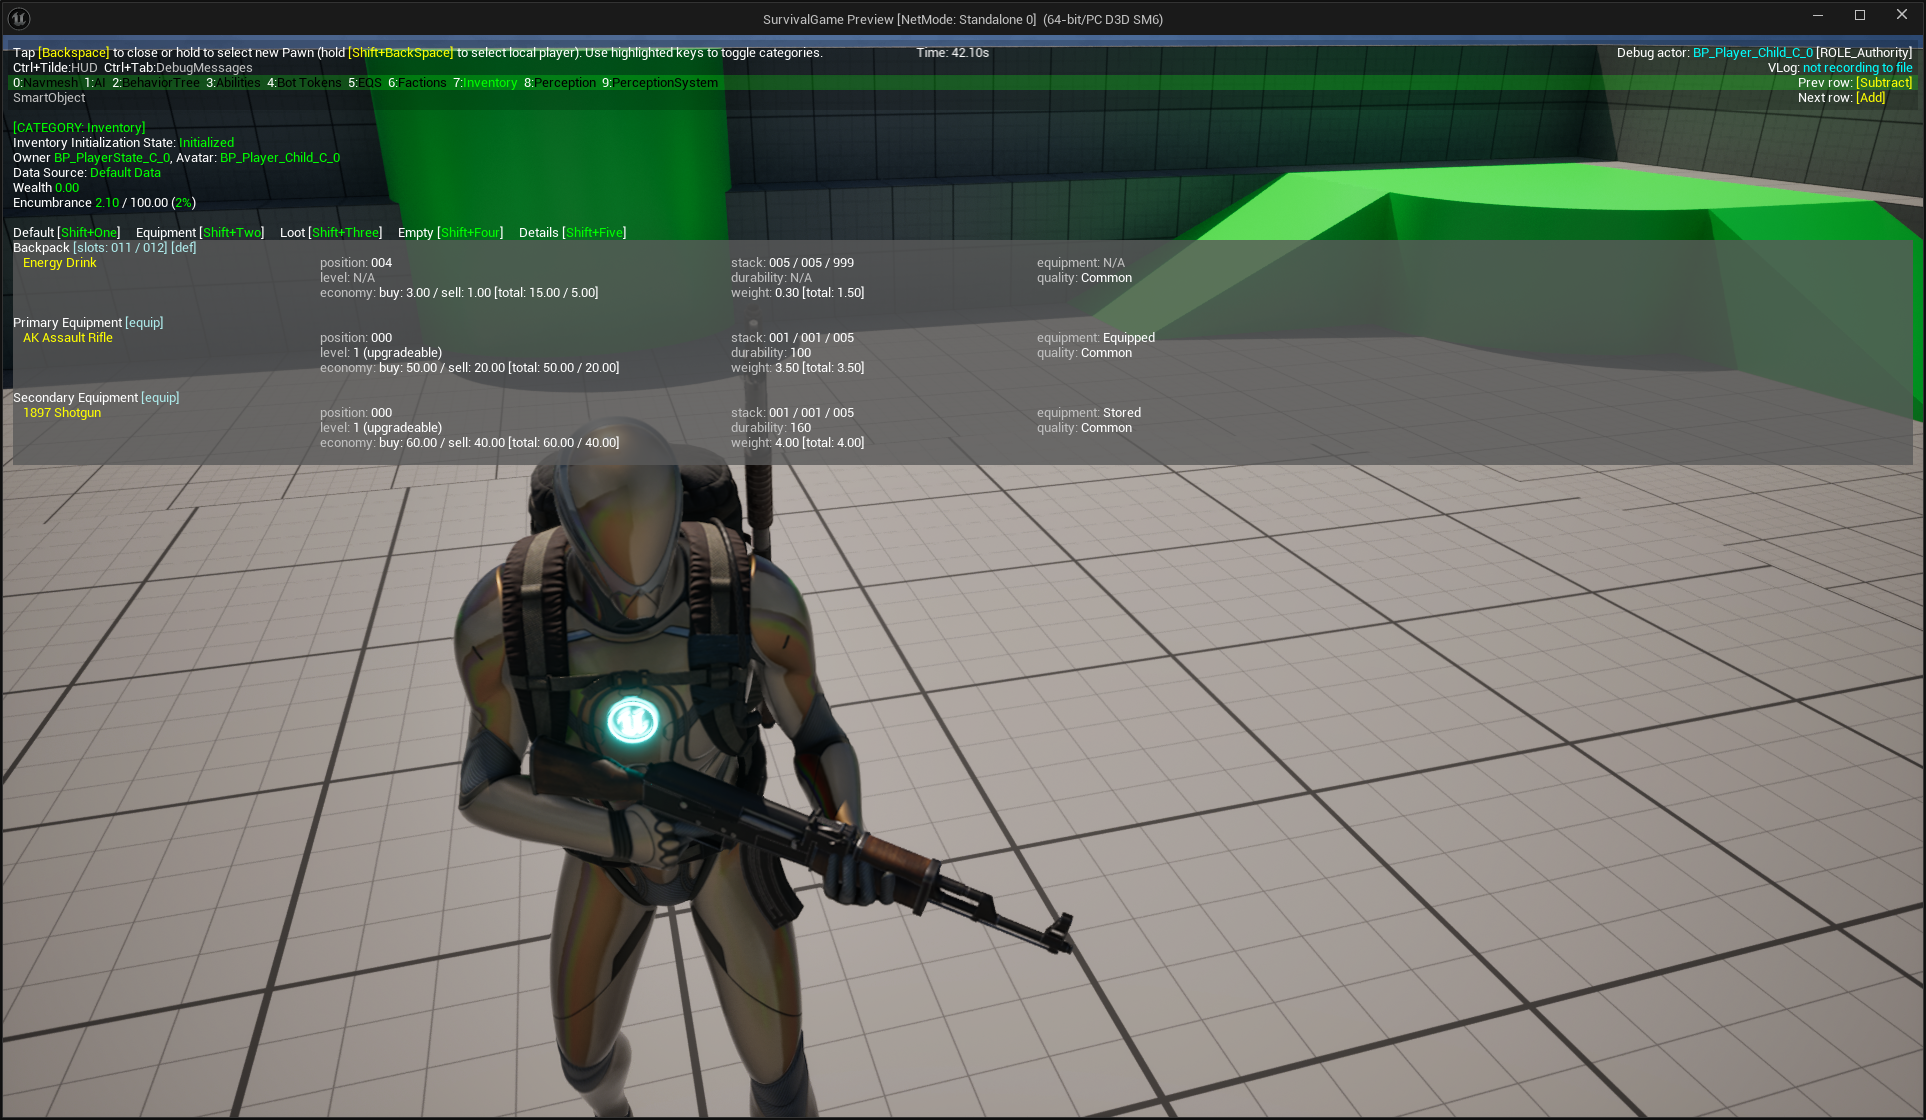
After starting the game, you can use the Gameplay Debugger to confirm that the inventory was initialized correctly.
Inspect the Inventory with the Gameplay Debugger
Start the game in Play-in-Editor.
Open the Gameplay Debugger and expand the Inventory Category.
Select the actor that owns the Inventory Manager Component, if not selected by default.
Check that the Initialization State displays Initialized.
Check that the Owner and Avatar correctly match your Blueprints.
Check that the Data Source displays Initial Data.
Check that the Backpack Container is correctly shown, with the proper amount of slots.
Check that the simple item was properly stored in the container and has the correct stack size.
Next Steps
At this point, you have an inventory owner with an initialized Inventory Manager, a default container, and a simple item stored in that container.
From here, you can:
Learn more about Item Fragments.
Configure Equipment.
Learn about Save and Load functionality.
Integrate Ninja Inventory with Ninja Combat.