Activate Equipment via Inventory Abilities
Last modified: 05 December 2024This how-to guide will expand on the Equipment Definition setup, enabling weapons to be activated.
Part 1: Configuring the Equipment
In this first part, you will create Actors to represent the Active Equipment and update the previously created Equipment Definitions to support the Activated state.
In your Content Browser, navigate to your Blueprint folder.
Create a new Blueprint using
NinjaEquipmentActoras the parent. Name itBP_Weapon_Sword.Add a new Static Mesh Component and set your Sword's mesh to it.
Navigate to the component's Collision settings and set the Collision Preset to
No Collision.
tip
For Melee Weapons, you might want to use some sort of scan to detect hits. Please refer to Ninja Combat for more information.
In your Content Browser, navigate to your Blueprint folder.
Create a new Blueprint using
NinjaEquipmentActoras the parent. Name itBP_Weapon_Shield.Add a new Static Mesh Component and set your Shield's mesh to it.
Navigate to the component's Collision settings and set the Collision Preset to
Custom, ensuring it only blocks your projectile channel, if applicable.
note
You may need to fine-tune your shield's collision settings, but as a general rule, set it to ignore most channels, overlap with melee channels, and block projectiles.
Add a new State Configuration and set the State Tag to
Equipment.State.Activated.In the Activated State Configuration, add a new entry to the Actors array. Set
BP_Weapon_Swordas the Actor Class.Set
Equipment.Slot.MainHandas the Slot Tag.
note
You can add more elements to the state, such as Attack Abilities for the sword, relevant Gameplay Effects, Animation Layers, and more.
Add a new State Configuration and set the State Tag to
Equipment.State.Activated.In the Activated State Configuration, add a new entry to the Actors array. Set
BP_Weapon_Shieldas the Actor Class.Set
Equipment.Slot.OffHandas the Slot Tag.
note
You can add more elements to the state, such as Attack Abilities for the shield, relevant Gameplay Effects, Animation Layers, and more.
Go to your character's Equipment Manager and configure the following Virtual Slots:
Create a Main Hand Slot by mapping the Gameplay Tag
Equipment.Slot.MainHandto thesSword_RHsocket.Create an Offhand Slot by mapping the Gameplay Tag
Equipment.Slot.OffHandto thesShield_LHsocket.When you are done, your Equipment Manager configuration should look like this:
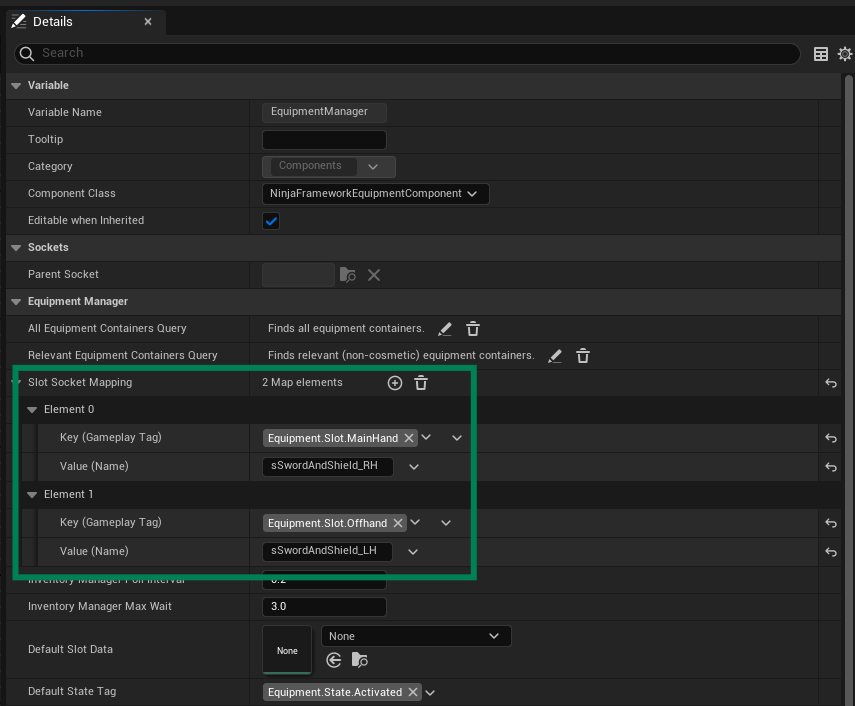
Part 2: Configuring the Gameplay
In this second part, you will configure the Animations, Abilities, and Input to enable equipment to be equipped and stored.
Select the Animation Sequence representing the Activate action. Create an Animation Montage from it and name it
M_WeaponAndShield_Equip.Open your Animation Montage and add the Send Equipment Event Animation Notify to the frame where the Sword should be equipped.
In the Notify, set the Event Tag to
Inventory.Event.Animation.Activateand addInventory.Item.Weapon.Swordto the Equipment Tags.Add another Notify to the frame where the Shield should be equipped.
In the Notify, set the Event Tag to
Inventory.Event.Animation.Activateand addInventory.Item.Weapon.Shieldto the Equipment Tags.Repeat these steps to create another Animation Montage named
M_WeaponAndShield_Store, representing the Deactivate event. In the Animation Notify, set the Event Tag toInventory.Event.Animation.Deactivate.
note
If both weapons should be equipped or stored at the same frame, you can add a single Animation Notify with both tags in the Equipment Tags container.
In your Content Browser, navigate to your data folder and create a new Data Table using
InventoryAnimationTableRowas the Row Structure. Name itTB_Inventory_Animations.Open your new Data Table and add a new row. Set the Montage To Play to
M_WeaponAndShield_Equip.Set the Montage Query to be compatible with an Activation event involving a shield and other one-handed weapons.
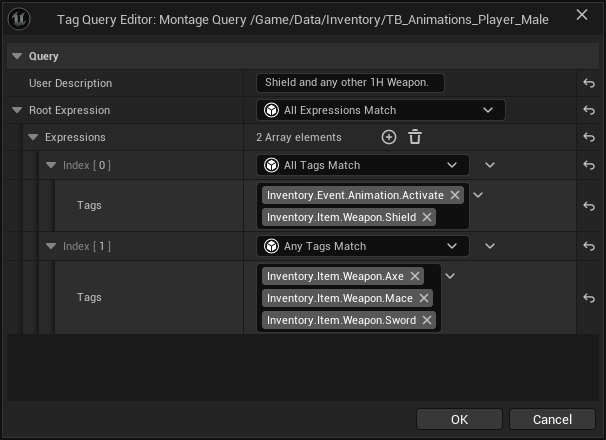
Add another row and set the Montage To Play to
M_WeaponAndShield_Store.Set the Montage Query to be compatible with a Deactivation event involving a shield and other one-handed weapons.
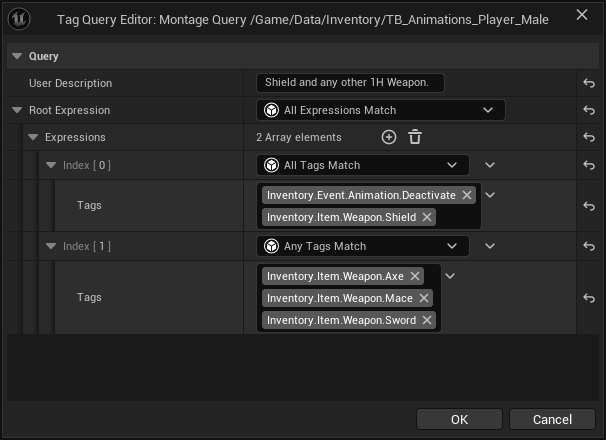
In your Content Browser, navigate to your ability folder and create a new Gameplay Ability using
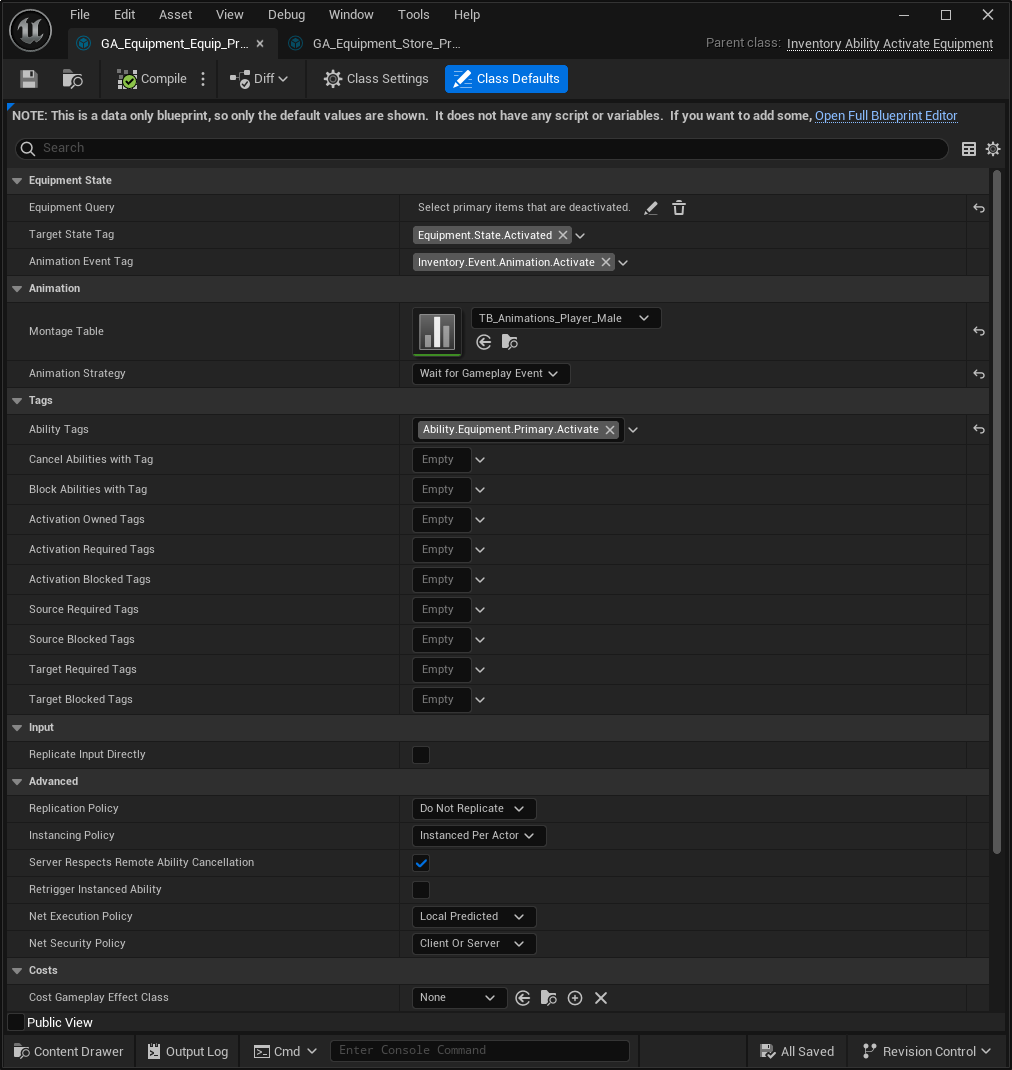
InventoryAbility_ActivateEquipmentas the parent. Name itGA_Equip_PrimaryItems.Open your new ability and configure the Equipment Query as shown below:
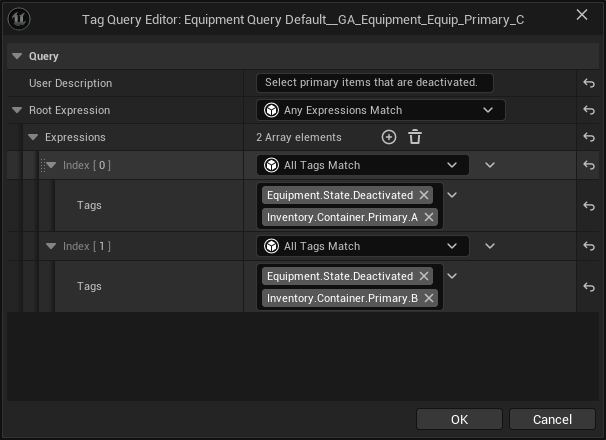
Set
TB_Inventory_Animationsas the Montage Table and chooseWait For Gameplay Eventas the Animation Strategy.Add
Ability.Equipment.Primary.Activateto the Ability Tags.When you are done, your Ability should look like this:
In your Content Browser, navigate to your ability folder and create a new Gameplay Ability using
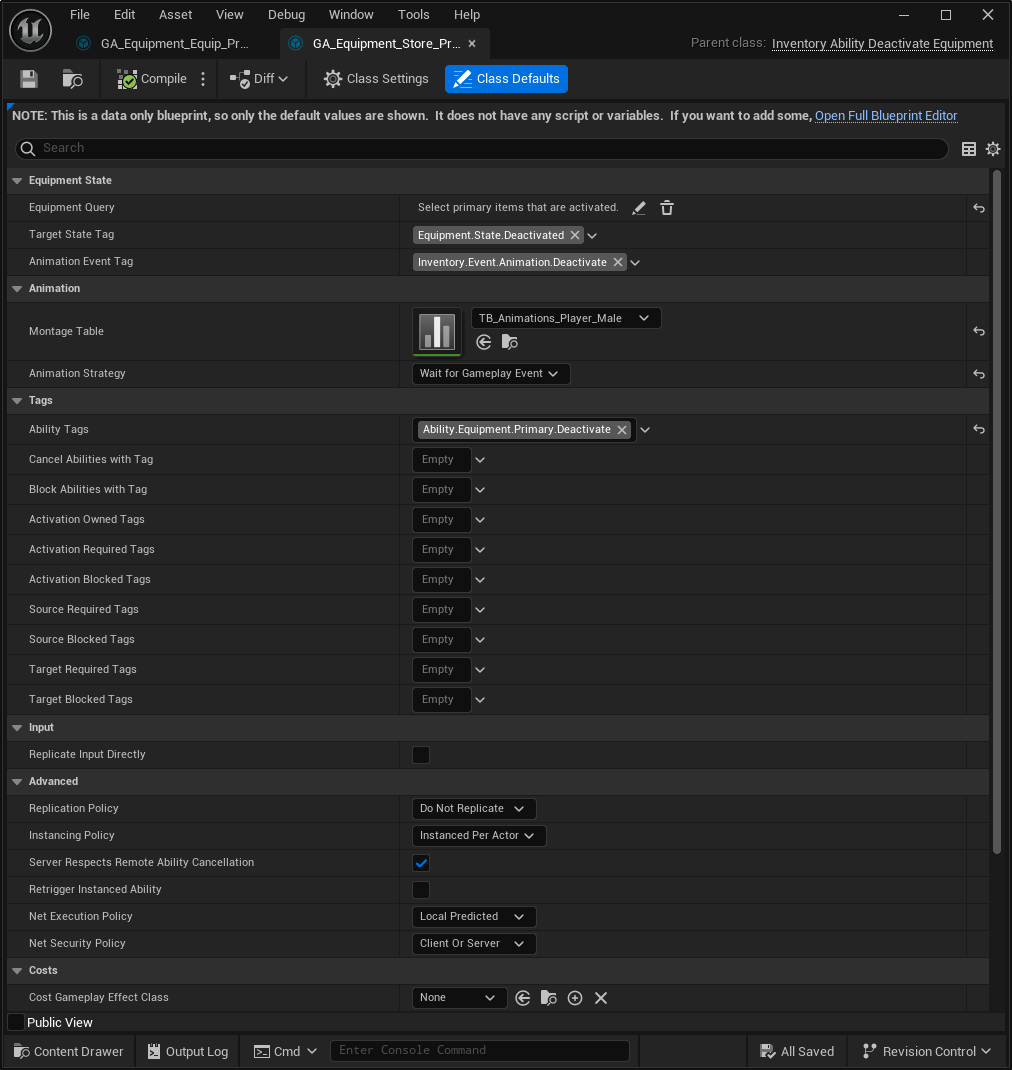
InventoryAbility_DeactivateEquipmentas the parent. Name itGA_Store_PrimaryItems.Open your new ability and configure the Equipment Query as shown below:
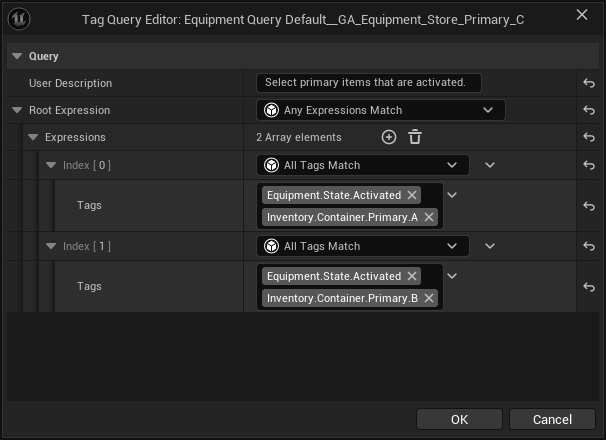
Set
TB_Inventory_Animationsas the Montage Table and chooseWait For Gameplay Eventas the Animation Strategy.Add
Ability.Equipment.Primary.Deactivateto the Ability Tags.When you are done, your Ability should look like this:
Create an Input Action to activate the Equipment.
Add the action to an Input Mapping Context assigned to the Player Character and map it to an appropriate key.
Create the Input Handling logic to activate the Equipment. For simplicity, it will attempt to activate both abilities, but the one with an invalid query result won't activate.
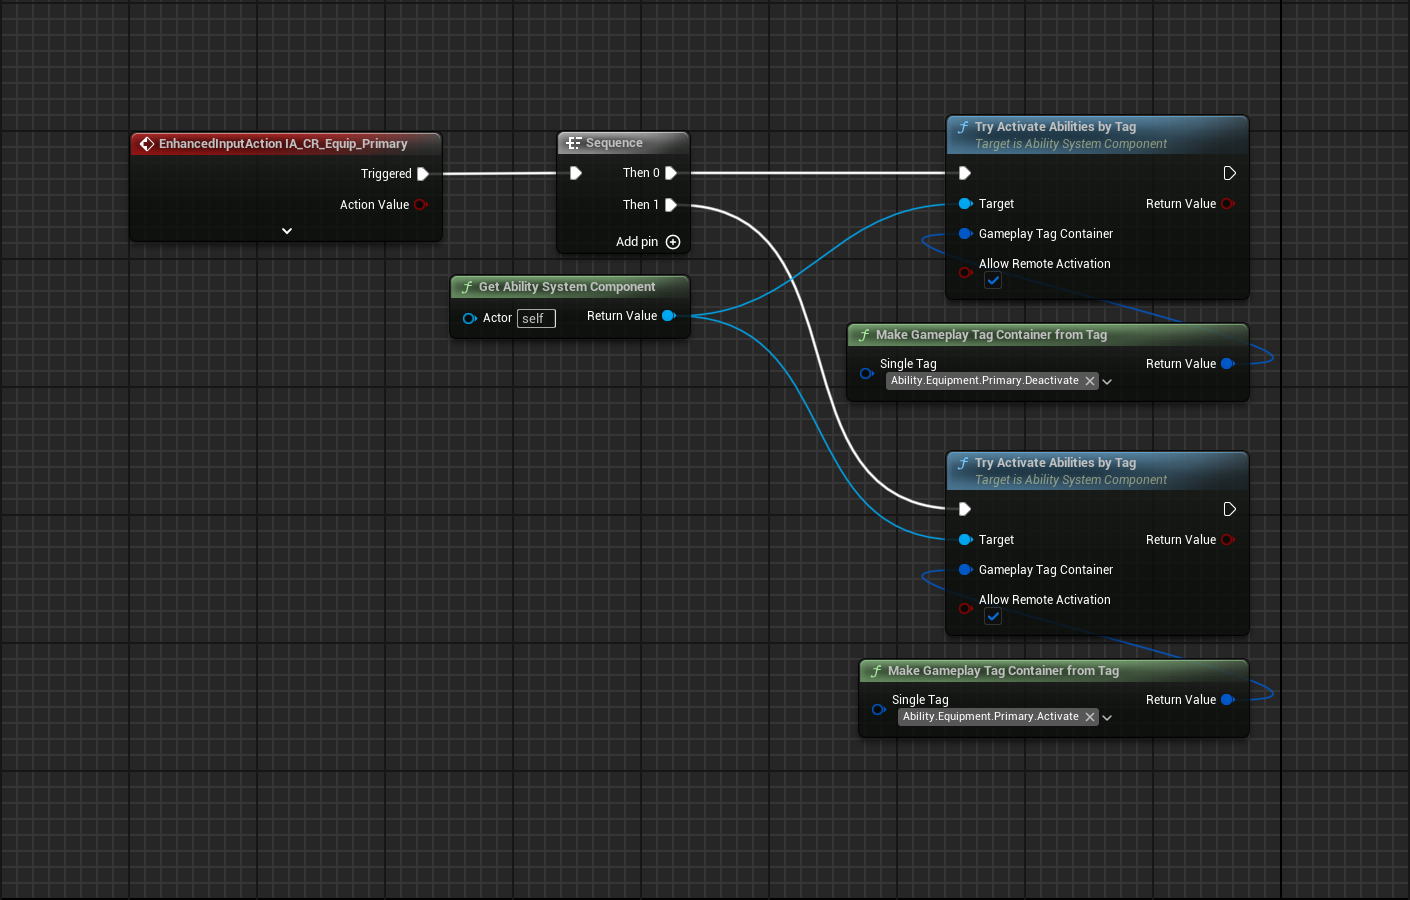
Hit the Play button and press the key you set to activate the equipment. Your animation should play, and the sword and shield should be equipped. Press the key again, and they should be stored.
GifAs you equip and store the weapons, notice that the Equipment column in the Gameplay Debugger will alternate between states.