First Steps with Ninja Input
This page guides you through the first steps for Ninja Input. Make sure to check the Input Setup instructions before continuing.
The following steps aim to provide a player controller, fully configured to use Ninja Input. This includes optional steps to ensure that certain pawns can provide additional input setups when possessed.
This page assumes you are starting from a new project, using something like the Third Person Template, so the plan is to migrate from the default setup to a Ninja Input configuration.
Input Assets
Ninja Input deals with a few different Input Assets, which are covered in detail in the documentation. For now, keep in mind that an input setup involves the following assets:
Input Action: Represents a specific action, its triggers and modifiers. Introduced by the Enhanced Input module.
Input Mapping Context: Maps certain actions to actual keys and may introduce additional modifiers. Introduced by the Enhanced Input module.
Input Handler: Executes on events triggered by actions. Introduced by Ninja Input.
Input Setup: Maps all actions in an Input Mapping Context asset, to specific handlers. Introduced by Ninja Input.
Configure the Input Setup
In the Content Browser, navigate to your Input folder.
Create a new Input Setup.
You can do so by right-clicking an empty area in the Content Browser, then navigating to Ninja Bear Studio → Ninja Input → Input Setup.
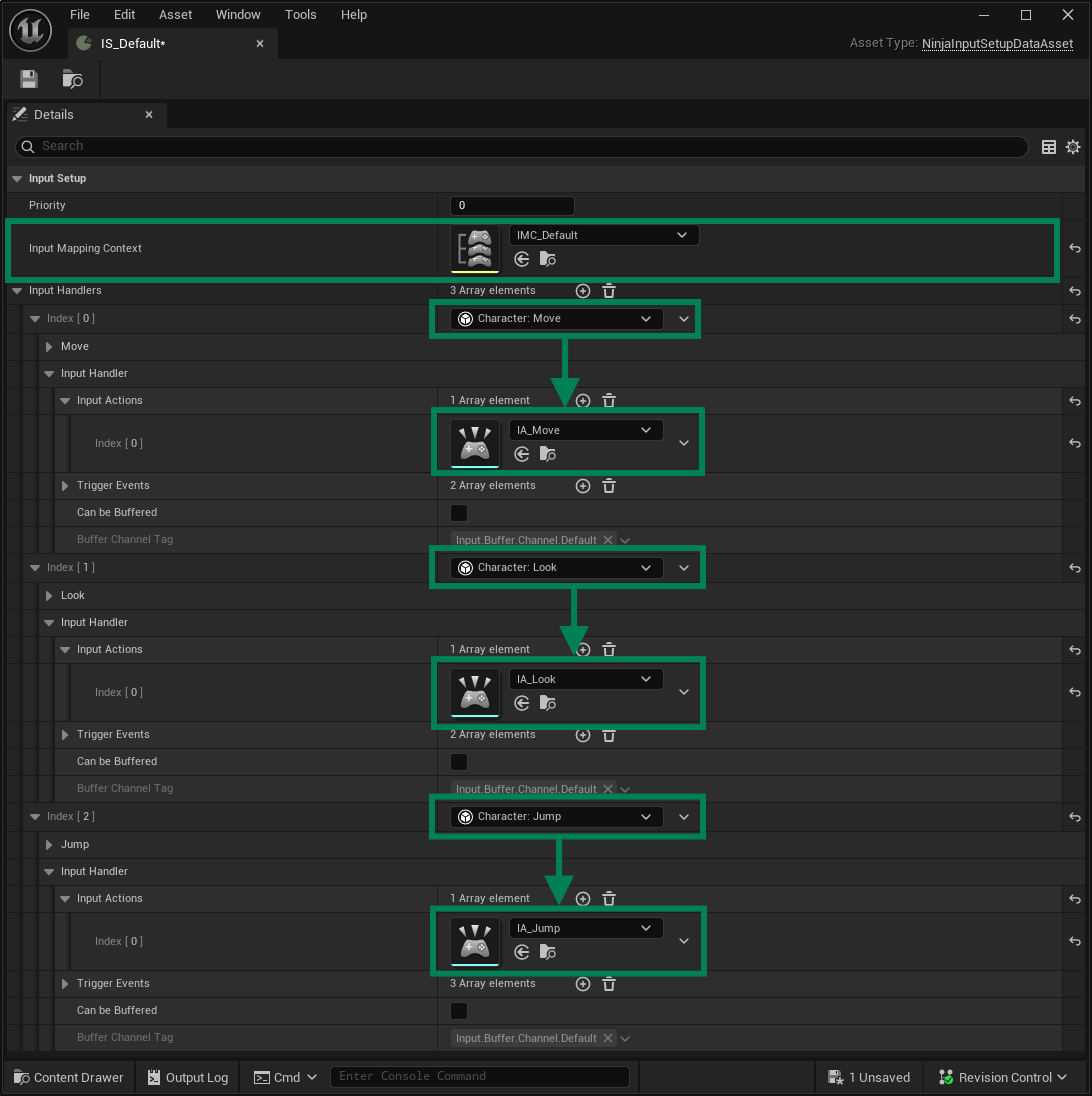
Open the new Input Setup and add your Input Mapping Context.
Add three new entries to the Input Handlers list, selecting:
Character: Move,Character: LookandCharacter: Jump.For each one of these entries, expand their properties and add the appropriate Input Action.
By default, the provided handlers reference Input Actions starting with `IA_NI`, which are included with Ninja Input.
You can either adopt them in your Input Mapping Context, or replace them with your project-related counterparts.
Player Controller
The Input Manager Component is the most important component in the framework. It is responsible for registering, receiving and dispatching Input Actions to the correct Input Handlers, small objects dedicated to handle specific inputs.
This component can be added to either the Player Controller or Player Character, but not both. For prototypes and smaller projects, both are valid options, but in general, the Player Controller is the best choice, since:
It leads to fewer requirements in the Player Character, allowing a leaner character hierarchy.
Offers support for different pawns, providing their own Input Setups when possessed, via
InputSetupProviderInterface.
Add the Input Manager Component
Create a Player Controller if you don't have one in your project yet. Make sure to set this Player Controller in your Game Mode.
Add the Input Manager Component,
NinjaInputManagerComponent, to your Player Controller.Add your Input Setup to the Input Manager Component.
Player Character
Possessed characters (or pawns) can provide additional features that work in conjunction with the Input Manager Component.
Ability System Component
If you plan to use Ninja Input with the Gameplay Ability System, make sure that your character implements the Ability System Interface (IAbilitySystemInterface) and returns a valid Ability System Component.
Forward Reference
Certain types of games, such as a top-down game with WASD movement will require a reference that movement handlers can use to calculate forward and right directions. In Ninja Input, this reference is called Forward Reference.
The Forward Reference is a Scene Component that always points toward the desired world-forward direction, usually world North or Positive X, instead of following the character rotation.
Any Scene Component in the Character can be used as a Forward Reference, but the most common choices are either the Camera or an Arrow Component. To mark a component as the Forward Reference, add the Input.Component.ForwardReference component tag to it.
If you need more control over your Forward Reference component, then you can create your own Forward Reference and assign the appropriate Gameplay Tag.
Add a Forward Reference component
In your Base Character Class, add an Arrow Component.
Set the component's rotation mode to Absolute Rotation.
Add the
Input.Component.ForwardReferencetag to the list of Component Tags.
Input Provider Interface
If you plan on supporting multiple pawns, such as humanoids, vehicles or mounts, where each pawn has a different control scheme, then consider allowing each pawn to support their own Input Setups.
These setups are added when the pawn is possessed, in conjunction to the ones already defined in the Input Manager Component, and removed when the pawn is unpossessed. Duplicated Input Setups are rejected.
Implement the Setup Provider Interface
Add the
InputSetupProviderInterfaceto the pawn or character that will provide specific Input Setups.Create an array of
NinjaInputSetupDataAssetreferences, so you can add Input Setups relevant to the Pawn.Implement the
GetInputSetupsfunction, returning the array of setups.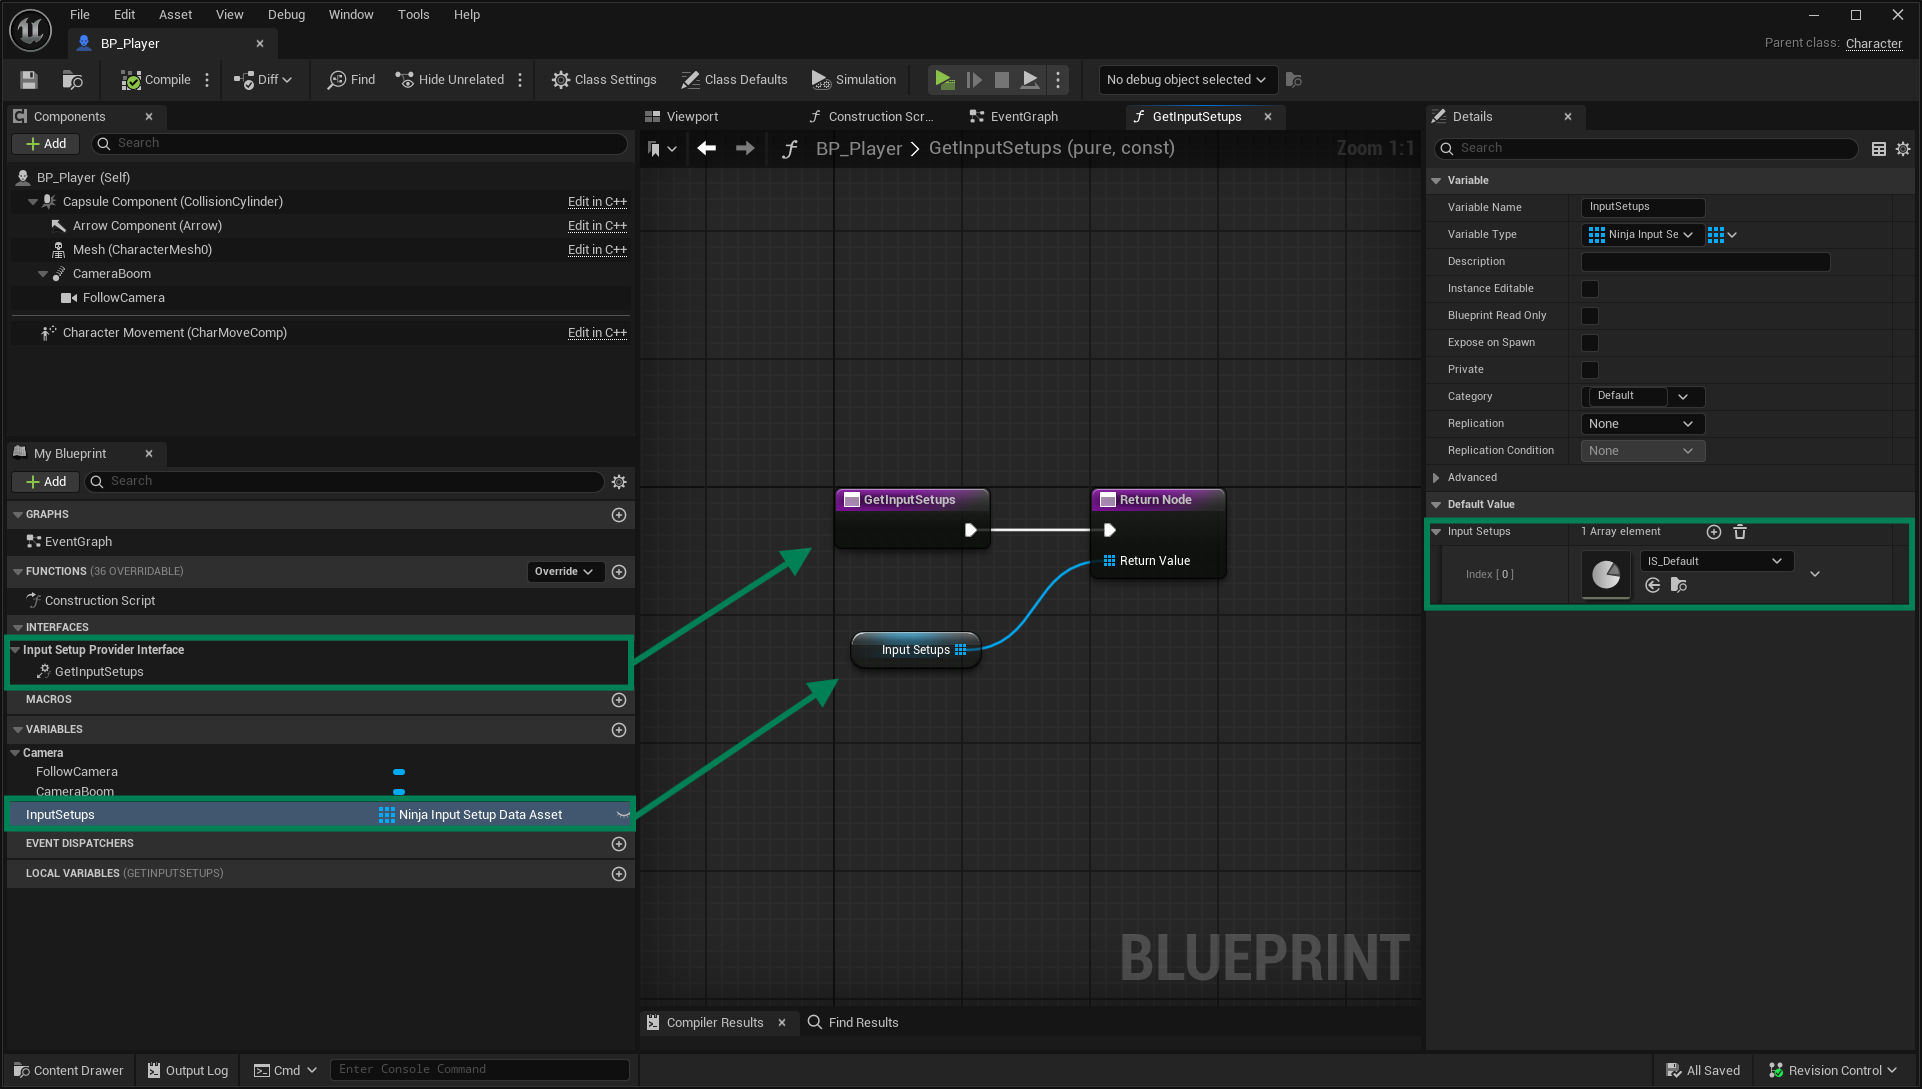
Header
#pragma once #include "CoreMinimal.h" #include "GameFramework/Character.h" #include "Interfaces/InputSetupProviderInterface" #include "PluginLabsController.generated.h" class NinjaInputSetupDataAsset; UCLASS() class PLUGINLABS_API APluginLabsCharacter : public ACharacter, public IInputSetupProviderInterface { GENERATED_BODY() public: // -- Begin Input Setup Provider implementation virtual TArray<UNinjaInputSetupDataAsset*> GetInputSetups_Implementation() const override; // -- End Input Setup Provider implementation protected: UPROPERTY(EditDefaultsOnly, BlueprintReadOnly, Category = "Input Setup") TArray<UNinjaInputSetupDataAsset*> CharacterInputs; };Implementation
#include "GameFramework/APluginLabsCharacter.h" #include "Data/NinjaInputSetupDataAsset.h" TArray<UNinjaInputSetupDataAsset*> APluginLabsCharacter::GetInputSetups_Implementation() const { return CharacterInputs; }
Next Steps
At this point, you have a working input setup with the following features:
Each Input Action activates its own Input Handler.
The Player Controller owns the Input Manager.
Optionally, the base character has a forward reference.
Optionally, the base character can provide its own Input Setup.
From here, you can:
Read more about the Input Manager Component.
Create custom Input Handlers.