Creating Opportunity Attacks
This guide shows how to create an Opportunity Attack using a Gameplay Ability, paired Animation Montages, a Contextual Animation Scene, and an optional Camera Animation.
For an overview of the feature, see Paired Animations.
Required Components
Each character participating in the paired animation must have these components:
A Contextual Animation Scene Actor Component.
A Motion Warping Component, which may already be present if the character uses Melee Attacks.
Add the Required Components
Open your base character class or blueprint.
Click the Add button in the Component List and add
NinjaCombatMotionWarpingComponent.Click the Add button in the Component List and add
ContextualAnimSceneActor.Implement
GetMotionWarpingComponentfromCombatSystemInterface, returning your Motion Warping Component.
Contextual Animation
Contextual animations are configured through a scene asset that plays Animation Montages for each defined role.
To create the scene, define the roles, prepare the montages, and then create the Contextual Animation Scene.
Define Contextual Roles
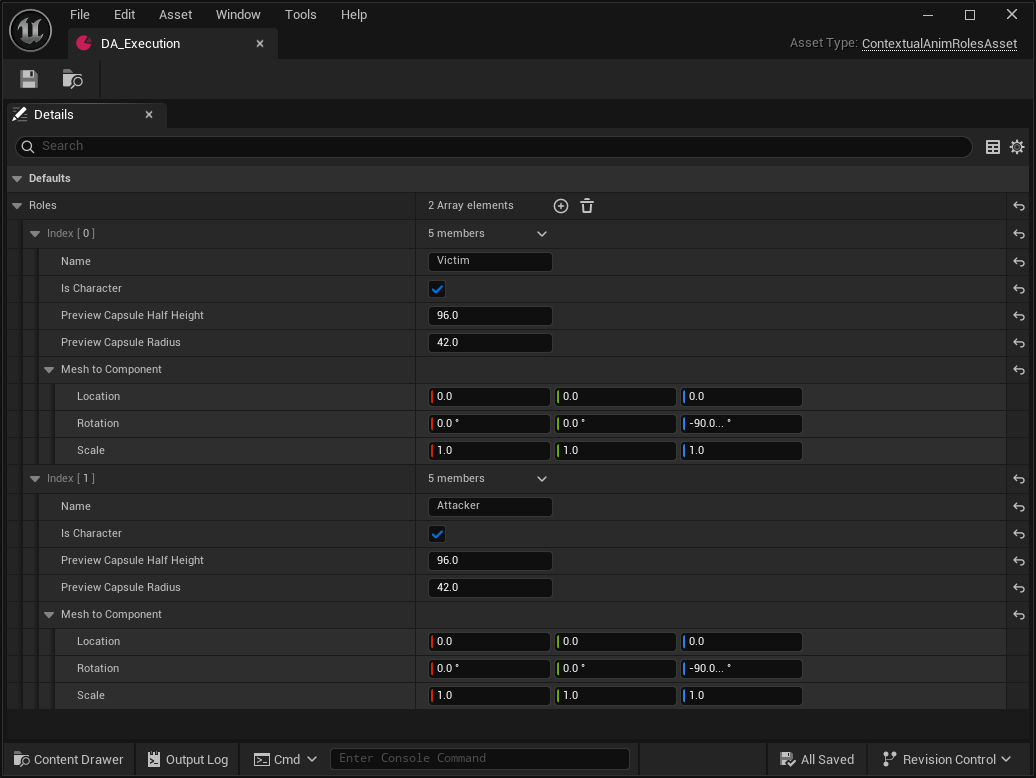
Create a new Data Asset based on
ContextualAnimRolesAsset.Add a new role named Victim.
Configure the role:
Mark it as a Character.
Set the capsule Half Height and Radius to match the character's Capsule Component.
Set Mesh Rotation Yaw to
-90, matching the common mesh rotation used by Character Blueprints.
Add a new role named Attacker and configure it with the same values used by the Victim role.
Create the Attacker Montage
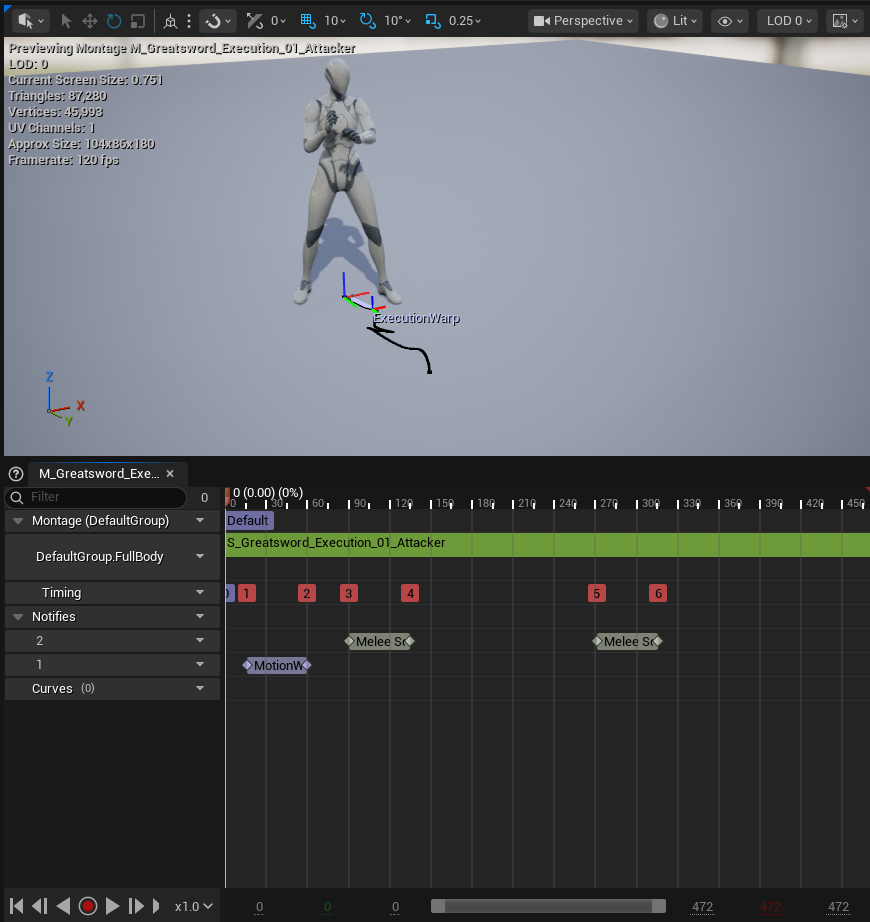
Create an Animation Montage for the attacker.
Set the montage to use the correct full-body Slot.
Make sure the source Animation Sequence has Root Motion enabled.
Add Melee Scan Animation Notify States as needed.
You can use different Gameplay Effects for each hit.
For example, early hits can apply partial damage, while the final hit can apply fatal damage.
Add a Motion Warping Animation Notify State and name it
ExecutionWarp.
Create the Victim Montage
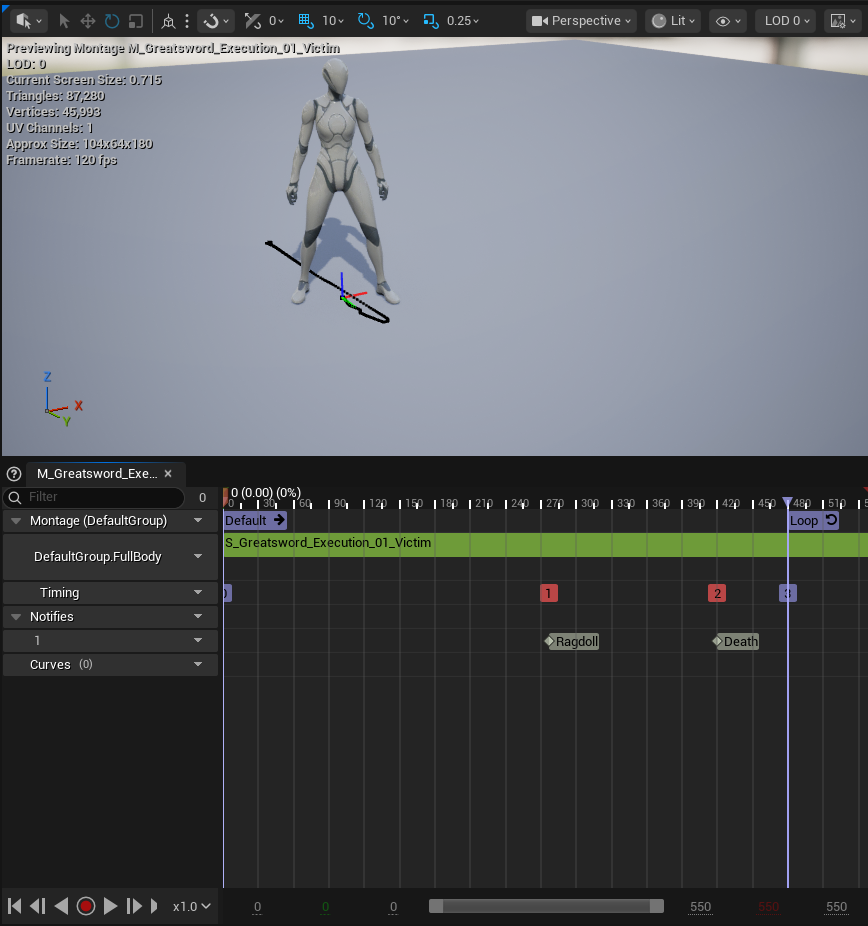
Create an Animation Montage for the victim.
Set the montage to use the correct full-body Slot.
Make sure the source Animation Sequence has Root Motion enabled, if the victim animation moves the character.
If this animation represents fatal damage, add the Death Animation Notify.
Optionally, add the Ragdoll Animation Notify.
Create the Contextual Scene
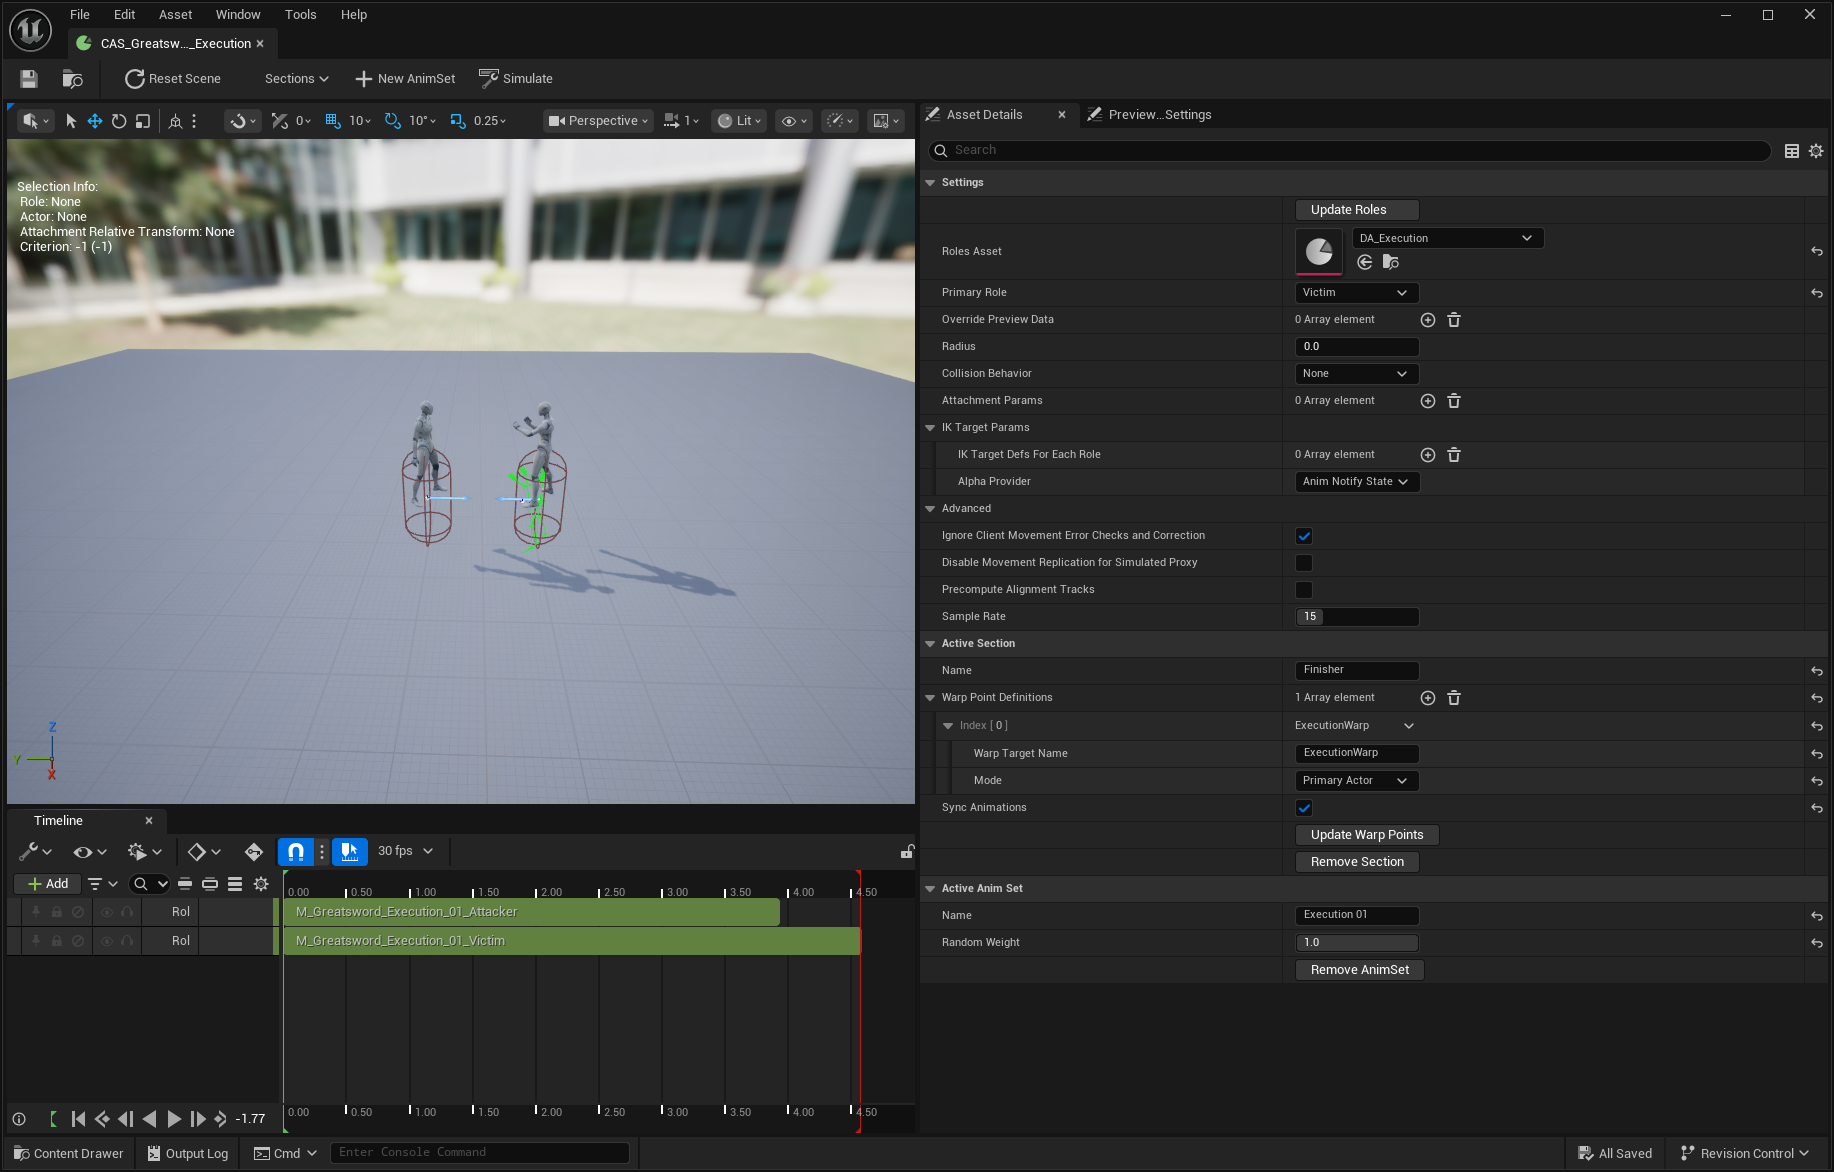
In the Content Browser, click the Add button and select Animation → Contextual Anim Scene.
Open the new asset and set the Roles Asset created earlier.
Click Update Roles and confirm.
For the Primary Role, select Victim.
Click New Animset and configure it:
Set the Section Name to identify the scene.
Set the Animation Montage for the Victim role.
Set the Animation Montage for the Attacker role.
In the Timeline, select the Attacker role track.
In the Mesh To Scene panel, adjust the attacker position to match the intended animation distance.
Select the Victim role track and adjust rotation as needed.
Add a new Warp Point Definition:
Set Warp Target Name to
ExecutionWarp. This must match the name used by the Motion Warping Animation Notify State.Set Mode to Primary Actor, so the warp targets the victim.
Click Update Warp Points.
Camera
Opportunity Attacks can play Camera Animations along with the Contextual Animation Scene.
Camera Animations are played through the Player Camera Manager, so your Player Controller must use a compatible camera manager.
Use the Combat Camera Manager
Create a Player Camera Manager based on
NinjaCombatPlayerCameraManager.Assign this Player Camera Manager to your Player Controller.
If you cannot use
NinjaCombatPlayerCameraManager, implementCombatCameraManagerInterfacein your own Player Camera Manager.In that case, implement
PlayCombatCameraAnimationandStopCombatCameraAnimation.
Create Camera Animations
In the Content Browser, click the Add button and select Cinematics → Camera Animation.
In the Content Browser, click the Add button and select Cinematics → Level Sequence.
Create and open an empty level to author the Camera Animation.
In the empty level, place your Player Character Blueprint or a simpler reference blueprint.
The blueprint should have the correct camera setup and a Mesh or Animation Blueprint able to play the Attacker Animation Montage.
Place this blueprint at location
[0, 0, 0]and rotation[0, 0, 0].Add a Cine Camera Actor to the level and position it to match the camera location from the Player Blueprint.
Optionally, set Lens Settings to
12mm Primeand Crop Settings to2.39.Add a Camera Cuts Track to the Level Sequence.
Add the Player Blueprint from the level to the sequence.
Add the Cine Camera from the level to the sequence.
If Sequencer starts piloting the camera, click Eject to return to regular viewport navigation.
Remove the Transform track from the Cine Camera, since the camera movement will be authored in the Camera Animation asset.
Save this level as a reusable Camera Animation Authoring Level.
Add an Animation track to the Player Blueprint and select the Attacker Animation Sequence.
Adjust the timeline length to match the animation.
Add a Template Sequence to the Cine Camera track and select the Camera Animation.
Animate the camera by creating keyframes for changes in location, rotation, and other camera properties.
For smoother transitions, it is usually best for the camera to return to its origin point by the end of the animation.
Optionally, create Camera Shake assets and add them to the timeline on each attack.
Create a Camera Anchor
Create a new Actor Blueprint based on
NinjaCombatCameraAnchorActor.Optionally, modify the Camera Component to use a different camera type.
Gameplay Ability
Opportunity Attacks are executed by CombatAbility_OpportunityAttack, using the assets configured in the previous steps.
Configure the Opportunity Attack
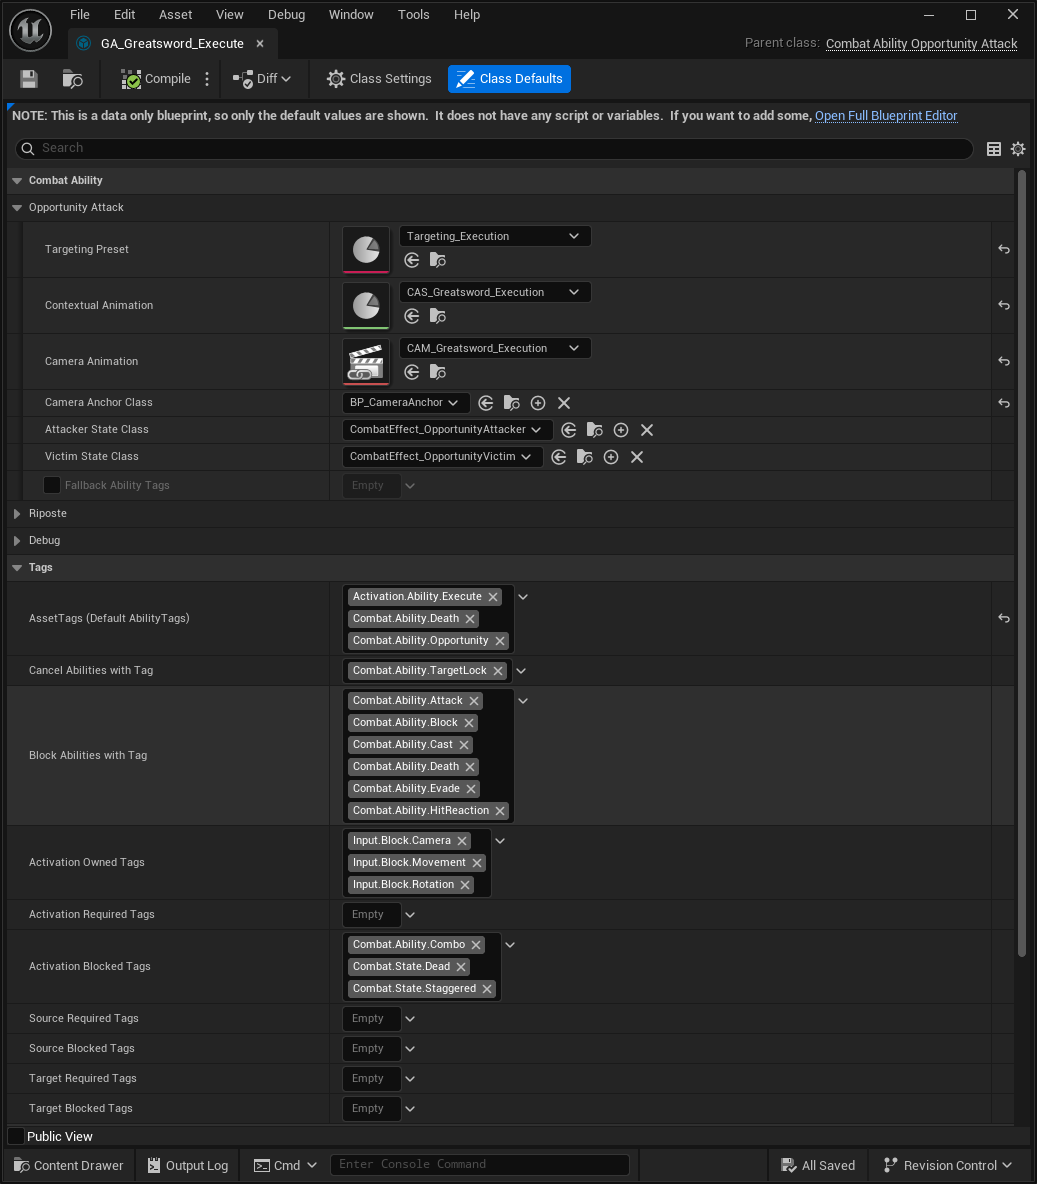
Create a new Gameplay Ability based on
CombatAbility_OpportunityAttack.Set a Targeting Preset to select eligible targets.
Set the Contextual Animation configured for the attack.
Set the Camera Animation, if the attack uses one.
Set the Camera Anchor Class, if needed.
Add an Activation Tag for the Opportunity Attack.
Grant the Gameplay Ability to the owner.
Configure input or interaction logic to activate the ability.